31
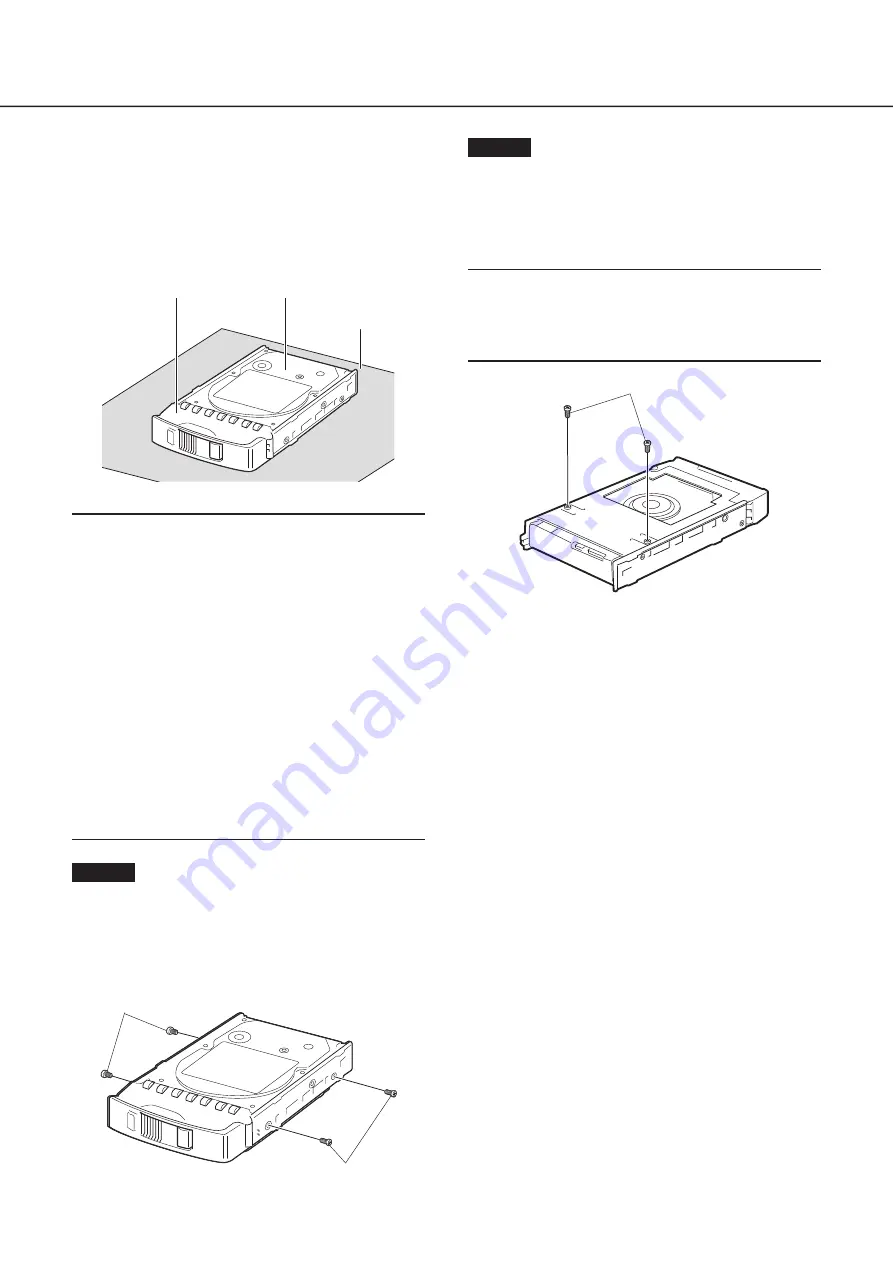
To install a hard disk drive in the recorder, it is necessary to
assemble an HDD unit (encase the hard disk drive in the
HDD canister).
The HDD unit is designed to easily install/remove the hard
disk drive in/from the recorder.
Contact your dealer about purchasing, installing, and replac-
ing the hard disk drives.
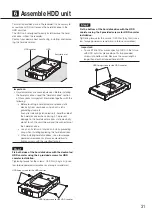
HDD canister
HDD
Anti-static mat
Important:
• Hard disk drives are precision devices. Before installing
the hard disk drives, read the "Hard disk drive" section
of Precautions in important information together with the
following.
• Before touching a hard disk drive, release static
electricity from your body using an anti-static
grounding strap, etc.
Even after releasing static electricity, hold the side of
the hard disk drive when carrying it. To prevent
damage to the hard disk drive from static electricity,
do not touch the circuit board and the connectors of
the hard disk drive.
• Use an anti-static mat and an anti-static grounding
strap when installing/replacing the hard disk drives.
• When installing hard disk drives, use a low-torque
powered screwdriver or a torque screwdriver to
tighten screws with the specified torque.
Step 1
Fix both sides of the hard disk drive with the dedicated
HDD canister using the 4 provided screws for HDD
canister installation.
Tightening torque for the screws: 0.49 N·m (5 k
g
f·cm) (use a
low-torque powered screwdriver or a torque screwdriver)
HDD fixing screws for the HDD canister
HDD fixing screws for the HDD canister
Step 2
Fix the bottom of the hard disk drive with the HDD
canister using the 2 provided screws for HDD canister
installation.
Tightening torque for the screws: 0.49 N·m (5 k
g
f·cm) (use a
low-torque powered screwdriver or a torque screwdriver)
Important:
• To use 5TB, 6TB or more capacity of HDD in the future
with HDD canister, please do not fix two provided
screws into bottom side. Because the screw length is
longer than depth of tapped hole of HDD.
HDD fixing screws for the HDD canister
6
Assemble HDD unit

