Usin
g
the Front Panel for Operations
50
The HDDs in one extension unit can
b
e removed simultaneously.
For details refer to the operating instructions for the extension unit.
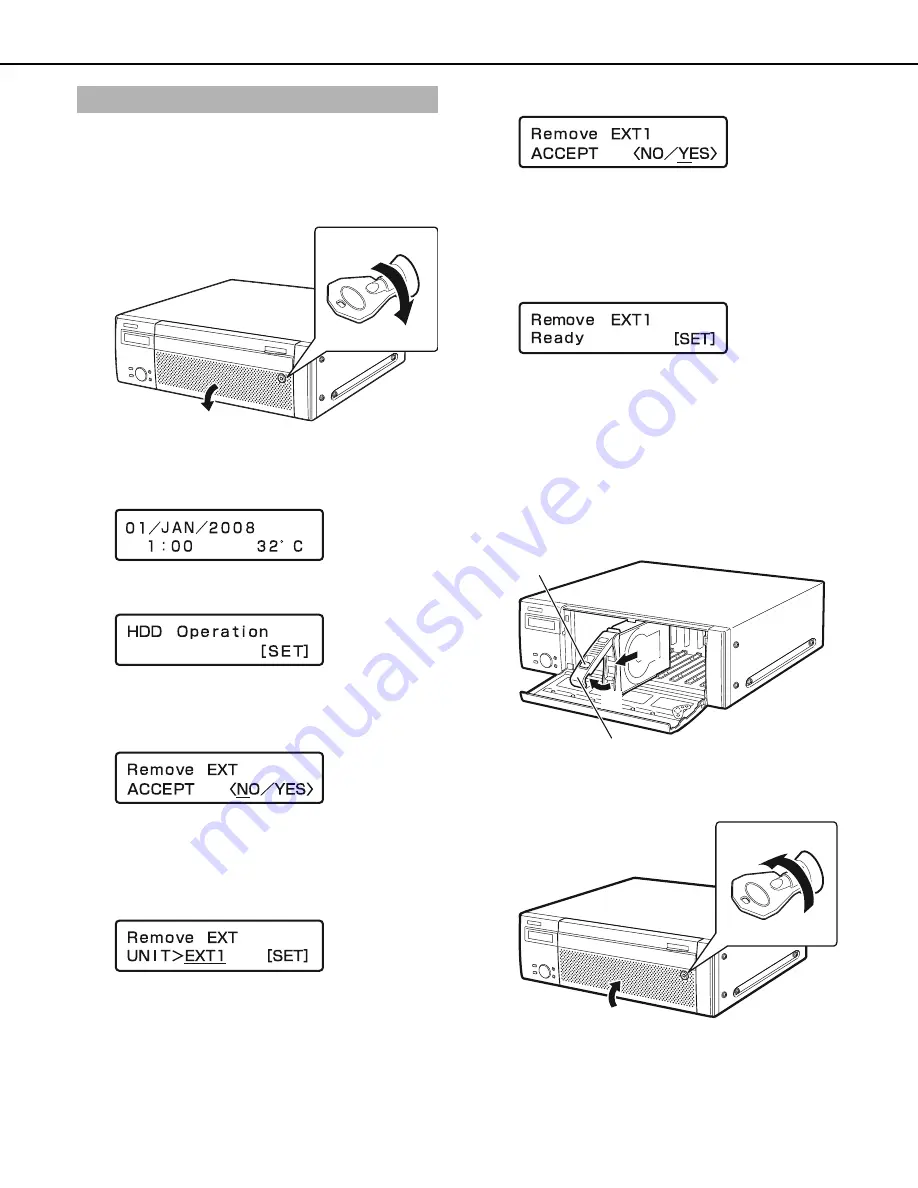
1
Insert the key (included) into the key hole on the front
cover of the extension unit and turn it while pressin
g
in
g
ently to open the front cover.
2
Press the [USE] button for over 2 seconds.
A
b
uzzer sounds.
Press the front panel
b
uttons according to the directions on
the LCD panel.
3
Press the arrow buttons (up or down) on the front panel
until [HDD Operate] appears on the screen.
4
Press the [SET] button.
5
Press the arrow buttons (up or down) on the front panel
until [Remove EXT] appears on the screen.
6
Select [YES] with the arrow buttons (left or ri
g
ht) and
then press the [SET] button.
7
Select the extension unit (EXTx) to be removed with the
arrow buttons (up or down) and then press the [SET]
button.
8
Select [YES] with the arrow buttons (left or ri
g
ht) and
then press the [SET] button.
The extension unit stop process
b
egins and all the HDD
status indicators
b
link orange.
All the HDD status indicators go off once the stop process is
complete.
•
If you stop the extension unit during recording, recording
s
w
itches to the HDD in another device.
V
ideo is not
recorded for a fe
w
seconds
w
hile recording s
w
itches. If
another HDD is not availa
b
le, recording stops.
Press the [SET]
b
utton to return to the display format screen.
9
Make sure that all the HDD status indicators on the
extension unit are out and then remove the HDD unit.
(1)
Press the knob on the HDD unit.
(2)
Open the lever.
(3)
Remove the HDD unit.
Remove the HDD carefully so you do not
b
ump it (
b
e
careful not to drop it).
10
Close the front cover of the extension unit and lock it by
li
g
htly pressin
g
and turnin
g
the key to the left.
Keep the key in a safe place.
Removin
g
HDDs by unit
(1)
(2)
(3)
(2)
(2)
(1)
(2)
(1)
ND400_Basic.book 50 ページ 2008年7月10日 木曜日 午前10時50分
Summary of Contents for WJND400 - NETWORK DISK RECORDER
Page 73: ...4 ...


