background image

27

LEGAL

79%

INVOICE

LETTER

LETTER

129%

LETTER

65%

INVOICE

LEGAL

61%

INVOICE

100%

Handling

ATTENTION

Handling

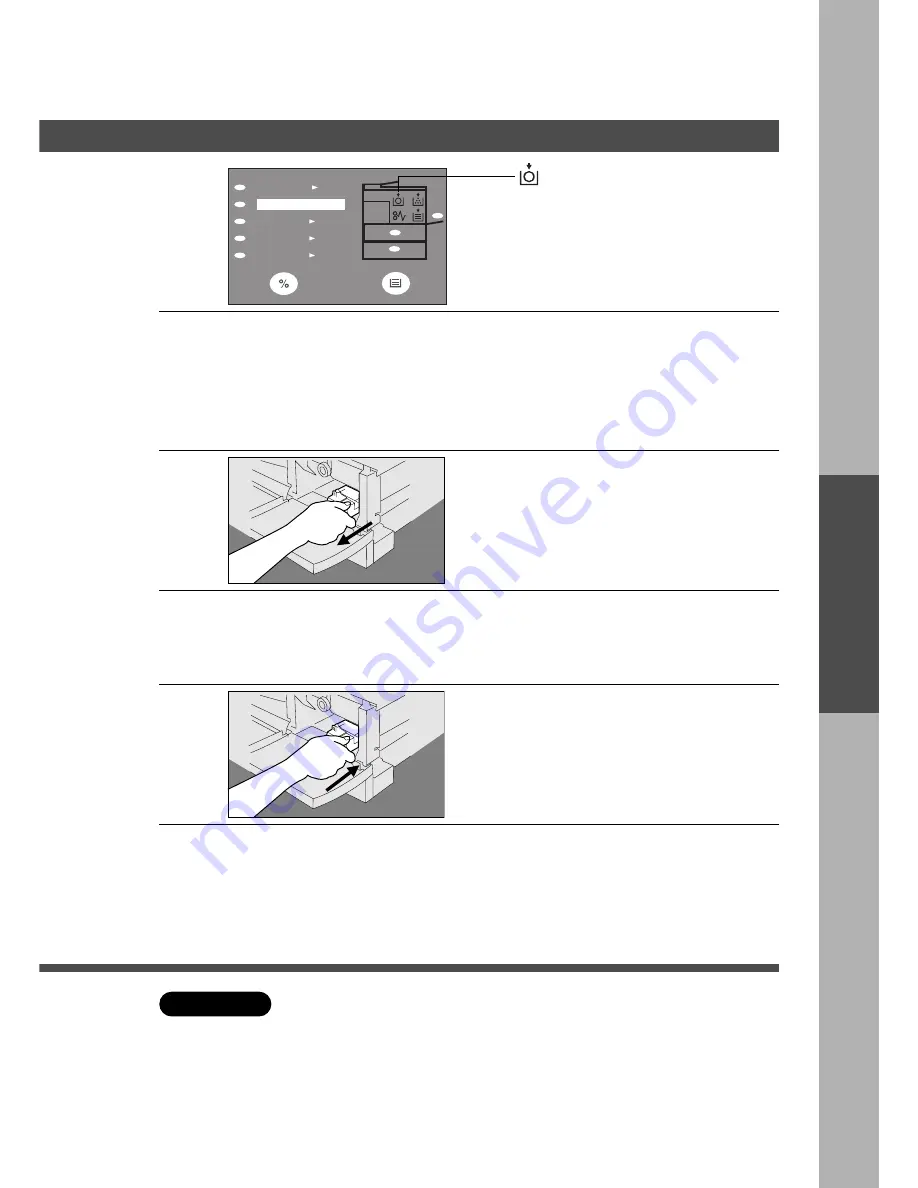
Changing Drum Unit

C

To maintain optimum performance, we recommend only using genuine
Panasonic supplies and parts.
Store drum unit in a cool dark place. Do not unseal drum unit before use.
Use it as fast as possible after unsealing.

C

Do not touch or scratch the surface of the drum.

Replacing Drum Unit Indicator

When the indicator flashes, change the
drum unit.

#

Open the sheet bypass.

$

Push the button and open the right cover.

%

Open the front panel.

&

Remove the toner cartridge.

For detail procedure, see page 26.
(Procedure 1 to 3)

1

2

Remove the drum unit by pulling
the handle with green label.

C

Discard the used drum unit properly.

3

Take out the new drum unit from
the plastic bag.

4

Install the new drum unit by
aligning the arrows on the drum
unit with those of the copier.

5

#

Replace the Toner Cartridge.
(See page 26)

$

Close the front panel.

%

Close the right cover. (See page 9)

&

Close the sheet bypass.

Summary of Contents for WORKIO DP-130

Page 1: ...DP 130 DP 130P DP 150 DP 150A DP 150PA DA DS150 Option Before operating this copier please read these instructions completely and keep this operating instructions for future reference Making Copies Maintenance Checking Before Operating Others DP 130 130P except U S A Option DA DS150 DA SM16B ...

Page 2: ...ER R LEGAL INV LTR LGL INV LTR LGL Position of the Original Original Guide Place original against guide If the original is not positioned properly a portion of the original may not be copied Face DOWN on Platen Face UP on ADF DP 150A 150PA C Up to 30 originals 20 lbs Inappropriate originals for use with the ADF C Paper with a smooth surface such as glossy and coated papers C Transparencies C Paste...

Page 3: ...Operation Chart Features List Reduction or Enlargement Copying See page 19 Copying with preset ratios Zoom Copying See page 20 Copying with variable zoom ratios System Configuration DP 130 150 DP 130P DP 150A 150PA None None Yes Not Available Not Available Optional Not Available Standard Standard DP 150PA Sorting 2nd Paper Feed Module Scanner None None Yes Digital Skyshot Mode Not Available Not Av...

Page 4: ...n energy consumption and usage standards for copiers This copier will automatically power down after a specified period of non use The use of these Energy Star compliant copiers will reduce energy consumption and ultimately benefit the environment The default functions can be adjusted depending on your office requirements Please see your authorized Panasonic copier dealer for more details ...

Page 5: ...aper 28 Mode Functions 18 Checking Others Troubleshooting 32 Specifications Consumables List 35 Energy Star Table of Contents Installation Instructions Before Installation 12 Release Scanner Remove shipping materials 13 Install Toner Cartridge 14 Install paper 15 DA DS150 Option 16 Table of Contents Before Operating Precautions 6 Components External Internal 9 Control Panel 10 Creative Features Di...

Page 6: ...lies with DHHS Rules 21 CFR Subchapter J in effect at date of manufacture Utsunomiya Tochigi Japan Product complies with DHHS Rules 21 CFR Subchapter J in effect at date of manufacture Taytay Rizal Philippines Matsushita Business Machine Corporation of the Philippines FFPTE2479 DANGER Invisible laser radiation when open and interlock defeated AVOID DIRECT EXPOSURE TO BEAM Label when manufactured i...

Page 7: ...her metal objects into the copier Toner and Paper Store toner cartridge and paper in cool areas with low humidity C High quality paper of 16 lbs 24 lbs 15 34 lbs via sheet bypass may be used C For optimum performance it is recommended that only Panasonic Brand supplies be used in the copier Ventilation The copier should be installed in a well ventilated area to minimize the ozone density in the ai...

Page 8: ...d to disconnect main power Please ensure that the socket outlet is installed near the equipment and shall be easily accessible For U S A This equipment has been tested and found to comply with the limits for a Class A digital device pursuant to part 15 of the FCC Rules These limits are designed to provide reasonable protection against harmful interference when the equipment is operated in a commer...

Page 9: ...ge 24 25 Front Cover Right Cover On Button Off Power Switch Precautions Components Internal Knob See page 29 Drum Surface C Do not touch it Drum Unit See page 27 Toner Cartridge See page 26 Fuser Cover See page 28 Transfer Roller C Do not touch it 2nd Paper Feed Module Option Exit Tray Pull out the tray when copying Push here when closing Right Cover ...

Page 10: ...e 2 Auto Photo Select Key See page 2 Exposure Indicator L Normal position See page 3 Exposure Control Key See page 3 Select Key See page 19 PaperTray Key Press to select paper tray or sheet bypass By pressing Exposure Control key the Exposure Indicator will be indicated as follows DARK LIGHT Normal Position Dark Darker Lighter Light Sort Key DP 150A 150PA See page 23 ...

Page 11: ... LINE Components Copy Count Display Indicates number of copies or machine condition codes etc See page 32 Energy Saver Key See page 18 Clear Stop Key Press to stop copy run or clear copy count in display Zoom Keys See page 20 10 Key Components 1 Key Start Key Note The Control Panel shown above is a representative sample of the model DP 150PA Each models Control Panel may be slightly different depe...

Page 12: ...in optimum performance we recommend only using genuine Panasonic supplies and parts C Drum unit already comes installed in copier C Toner Cartridge is packed in carton box Set up the main unit with following procedure Remove all shipping tape and styrofoam Release the scanner Remove shipping materials See page 13 Installation of the Toner Cartridge See page 14 Loading paper See page 15 Install the...

Page 13: ...r until directed to do so 3 Completely remove the paper tray from the copier Release the shipping tapes 2 pieces from the bottom Push the bottom plate lock button Bottom view 4 Remove the shipping tapes from the bottom plate 2 pieces 5 C Do not plug in copier until set up is complete C Do not open the front panel first It can not be opened unless you open the covers shown in procedure 5 Remove the...

Page 14: ...hake the toner cartridge several times Take off the toner cartridge cover white plastic and discard 9 Do not touch the magnetic roller Do not stand the toner cartridge on end Install the toner cartridge 10 Push the toner cartridge until it stops Push the green handle until it locks Close the front panel Close the right cover See page 9 Close the sheet bypass ATTENTION C To maintain optimum perform...

Page 15: ...verfill Indicator 1 sided copy Set up is completed Now ready to make a copy Push the paper tray into copier Plug in the unit and turn on the power When the Add Paper Indicator J J J J J lights install paper using the following procedure C When it is necessary to make 2 sided copies place the output from side 1 face up on the sheet bypass tray then print the second side C If the paper tray is not c...

Page 16: ... as shown Check that the Half Moon Paper Feed Rollers are in the up position as illustrated on the left If they are out of position turn them with your fingers ccw until they are in the correct position 3 Lift the copier on its side to gain access to the bottom of the unit then remove the white cover and discard 4 Lift the copier carefully and place on to the top of the 2nd paper feed module as il...

Page 17: ...ook Open the cover slightly and remove it 7 Plug the harness of the 2nd paper feed module into the machine connector 8 Reinstall the rear cover Insert the hook untill it locks 9 Slide out the paper tray and remove the shipping materials See steps 3 4 on page 13 ATTENTION Select paper size by Paper Tray Key and 1 Key See page 25 10 C Unplug the power cord when installing Do not touch the gear area ...

Page 18: ...ray key To cancel this mode Press and hold Select key then press Paper Tray key This Toner Saver Mode is to save toner consumption by copying dark originals lighter The exposure indicator LIGHTER flashes when Toner Saver Mode is on Auto Start function While the copier is warming up you may position your original on the copier enter your copy job selections and press the Start key The Wait indicato...

Page 19: ...ect paper tray or sheet bypass NOTE 3 4 Number of copies 5 Press Start Example Reduction Original Size Copy Size LEGAL LETTER The correct ratio is automatically selected Select Key Mode Functions C To change the paper size of the paper tray see page 25 Common Features Usage of PaperTray Key When copy size is different from paper size in paper tray select sheet bypass by pressing Paper Tray key and...

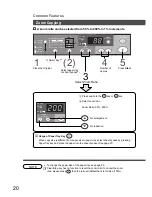
Page 20: ...ss 1 2 1 Usage of PaperTray Key When copy size is different from paper size in paper tray select sheet bypass by pressing Paper Tray key and place the paper into the sheet bypass See page 21 C To change the paper size of the paper tray see page 25 2 Clear Stop key has no function to reset the zoom ratio To cancel the zoom ratio please press then the ratio will default back to full size 100 3 Selec...

Page 21: ...d mailing labels Adjust the side guides to paper width Incorrect adjustment may cause paper to wrinkle misfeed or skew Common Features C When using printed paper do not set more than 25 20 lbs sheets in bypass C Some types of mailing labels and transparency film may damage your machine Contact your service provider for advice regarding non standard paper types C When sheet bypass has no paper P wi...

Page 22: ...n with ADF open Making copies from small originals without dark areas around the image The Digital Skyshot mode is normally set on If the mode is not set please use the following procedure 1 Set original to the platen Select Sky Shot Mode 2 3 Number of Copies 4 Press Start Skyshot Mode is turned ON Skyshot Mode is turned OFF C Incorrect output may occur if the copier cannot properly detect the edg...

Page 23: ...re start scanning Follow the procedures indicated in the display If this problem continues your originals require more memory when being scanned Contact your local authorized Panasonic Dealer for the 16MB memory upgrade DA SM16B Number of Copies 3 Press Start 4 Original Without Sort mode With Sort mode When using ADF 1 Set original to the platen Press Sort Key C The indicator flashes 2 Number of C...

Page 24: ...er mailing labels and transparencies cannot be fed out of the paper tray Use the Bypass of all special paper however ensure any special paper labels and or transparencies you purchase are specifically designed for use in a xerographic copier C When making 2 sided copies use the sheet bypass C If the paper tray is not closed completely the Add Paper Indicator in the control panel will light up In t...

Page 25: ...peatedly press 1 key to scroll until the number in the display matches the paper size required Use the chart on the right 3 Lift paper tray and pull out of the copier until it stops Move the paper guide a to the paper length required 4 Move the paper guide b to the paper width required Squeeze the stopper to move the paper guide b to the desired paper size Push paper tray back into copier Paper Gu...

Page 26: ... opened unless you open the covers shown in procedure 1 Pull the green hook of toner cartridge 3 Remove the toner cartridge 4 Shake the toner cartridge several times Take off the toner cartridge cover white plastic and discard ATTENTION Do not stand the toner cartridge on end Do not touch the magnetic roller See page 14 5 Install new toner cartridge Push the green handle until it locks Close the f...

Page 27: ...g Drum Unit Indicator When the indicator flashes change the drum unit Open the sheet bypass Push the button and open the right cover Open the front panel Remove the toner cartridge For detail procedure see page 26 Procedure 1 to 3 1 2 Remove the drum unit by pulling the handle with green label CDiscard the used drum unit properly 3 Take out the new drum unit from the plastic bag 4 Install the new ...

Page 28: ...t Cover Sheet Bypass 2 Remove the misfed paper ATTENTION In case the jam is in fuser unit Open the fuser cover Remove the misfed paper Caution This fuser area will be hot 3 Close the right cover 4 Close the sheet bypass C Make sure that the misfeed indicator goes off after removing the misfed paper The misfeed indicator will not go off if the paper is still jammed in the copier Check again and rem...

Page 29: ...ht Cover Sheet Bypass 2 Open the front panel Do not open the front panel first It can not be opened unless you open the covers shown at procedure 1 3 Turn the knob Remove misfeed paper Knob Handling C Make sure that the misfeed indicator goes off after removing the misfed paper The misfeed indicator will not go off if the paper is still jammed in the copier Check again and remove all misfed paper ...

Page 30: ... misfed paper The misfeed indicator will not go off if an original is still jammed in the ADF Check again and remove the misfed original 2 Paper Feed area Open paper feed cover of ADF Remove misfed paper and close paper feed cover Paper Exit Area Open paper feed cover of ADF Remove misfed paper and close paper feed cover Paper Feed Cover Paper Feed Cover LEGAL 79 INVOICE LETTER LETTER 129 LETTER 6...

Page 31: ... jammed in the copier Check again and remove all misfed paper C Do not open the rear cover of the 2nd Paper Feed Module And do not touch to the gear area Fingers might be wedged between gears Button Right Cover Sheet Bypass 1 Open paper feed cover 2 Remove the misfed paper 3 Close paper feed cover 4 To clear the paper misfeed indicator Open the sheet bypass Push the button Open the right cover Clo...

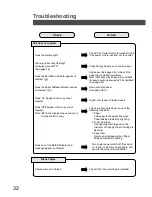
Page 32: ...isfed paper See page 28 31 Does U1 appear in the copy count display Right cover is open Please close it Does P appear in the copy count display Note in the display means how many copies are left to copy Copying is interrupted due to one of the following conditions 1 Paper Add paper to the paper tray when Paper Misfeed Indicator is lighting 2 Toner Cartridge Change toner cartridge when the indicato...

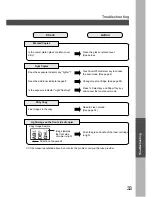
Page 33: ...he exposure indicator Light flashing Press Select key and Paper Tray key and cancel the toner saver mode Dirty Copy Need to clean corona See page 34 If the measures outlined above do not solve the problem call your Service provider Line images in the copy Light image on the front side of copier Push the green handle of the toner cartridge to right Copy Image Sample Image towards the front side of ...

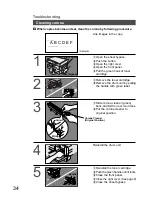
Page 34: ...clean the corona by following procedure Open the sheet bypass Push the button Open the right cover Open the front panel Pull the green hook of toner cartridge Corona Cleaner Original Position Right Cover Sheet Bypass Button Correct Wrong 4 Reinstall the toner cartridge Push the green handle until it locks Close the front panel Close the right cover See page 9 Close the sheet bypass 5 Reinstall the...

Page 35: ... 24 lbs Paper Tray 15 34 lbs Sheet Bypass Quantity Selector 1 99 Automatic Repeat Automatic Reset to 1 Exposure Control Automatic Manual Photo modes Dimensions W D H 19 5 W 17 2 D 10 7 H H is up to Platen glass 19 5 W 18 6 D 15 1 H H is up to ADF DP 150A 150PA Weight 41 lbs DP 130 130P 150 49 lbs DP 150A 150PA Electrical Requirement AC 120V 60Hz 12A Main unit Original Capacity 30 sheets 20 lbs Pap...

Page 36: ...onsumable Name Part Number Yield Toner Cartridge DQ UG15A Approx 5 000 sheets Drum Unit DQ UH32A Approx 30 000 sheets Based on copying onto letter size 6 image original Copier Care As a rule clean weekly Platen Platen Cover Wipe marks off with cloth and neutral detergent Wipe again with dry cloth Platen Platen Cover ...

Page 37: ...ANASONIC COPIER SEE YOUR DEALER FOR DETAILS OF DEALER S WARRANTY U S A only IMPORTANT INFORMATION When requesting information supplies or service always refer to the model and serial number of your machine The model and serial number plate Main Name Plate is located on the rear side of machine For your convenience space is provided below to record information you may need in the future Model No Se...

Reviews: