background image

26

Summary of Contents for WX-CT2020

Page 1: ...2020 Before attempting to connect or operate this product please read these instructions carefully and save this manual for future use Model No WX CT2020 Order Taker Unit Operating Instructions ENGLISH FRANÇAIS ...

Page 2: ...dverse health effects Many studies of low level RF exposures have not found any biological effects Some studies have suggested that some biological effects might occur but such findings have not been confirmed by addi tional research WX CT2020 has been tested and found to comply with FCC radiation exposure limits set forth for an uncontrolled equipment and meets the FCC radio frequency RF Exposure...

Page 3: ...by qualified service personnel or system installers Use only Panasonic authorized batteries like the rechargeable Ni MH 3 6 V Follow the battery care and handling instructions Read the instructions included with the battery charger Charge the battery when the power indicator lights up in red and a beep is heard in the headset Fully charge the battery Failure to do so may shorten the operating time...

Page 4: ...4 EJECT WX CT2020 A B PWR VOL u i 2 o 0 1 q y q w e r t NAMES FUNCTIONS ...

Page 5: ...nd time When the button is released you can hear the cus tomer t Power Indicator The indicator shows the status as follows Green ON Power is supplied and the unit is oper ating Red ON The battery requires recharging Red Blink The channel selector refer to p 7 is set to a wrong position y Channel Indicator While lighting in red or green this indicator shows which channel is in operation Red lightin...

Page 6: ...shown in the figure Note Be sure to insert it until the lock clicks EJECT WX CT2020 Replacement 1 Slide the battery lock to the upside 2 Remove the battery EJECT WX CT2020 q w WHEN DISCONNECTING THE HEADSET PLUG When disconnecting the headset plug from this product pull the plug straight holding the resin molded part Do not hold the cable or pull the resin molded part up and down That may cause tr...

Page 7: ...tting the channel selector which is the rotary switch inside the switch pocket 1 Press the power button to turn off the order taker unit 2 Set the switch to the channel group Available Channel Group 1 8 Notes When a switch position other than 1 through 8 is select ed the power indicator will blink in red Be sure to turn off the order taker unit in Step 1 Otherwise the channel group will not be act...

Page 8: ...r Module Note Normally set SW 6 to ON Pay attention to high level noise that may be output when set to OFF SW 7 While talking with a customer in the Talk Lock mode you may need to contact store personnel in the Page PTT or Page Lock mode which interrupts the Talk Lock mode This switch specifies the status of the interrupted Talk Lock mode after ending the Page PTT or Page Lock mode ON Resumes the ...

Page 9: ... mode where the indicators and buttons have different functions than in normal oper ation A B Indicator A B Off Blink On Off Off On Off Blink Selected mode Selected mode A Indicator Press to TALK Blink TALK Lock On Selected mode B Indicator Press to TALK Blink TALK Lock On CH A B Button A Disable A Enable B Disable B Enable Push Push Push Power Indicator Blink Power Indicator On Push A B ...

Page 10: ...to move to the talk setup and page setup 5 Select a talk mode pressing the button T 6 Select a page mode pressing the button P 7 Press the button A B to confirm that the indicators show the three modes selected for the default channel talk and page 8 Hold down the power button for two seconds to turn off the order taker unit and then turn it on again The newly selected operation mode will be appli...

Page 11: ...e another person is operating Maintain a distance of more than 0 3 m 1 ft between the headset and the order taker or more than 1 m 3 ft between the headset and the center module Prior to operating the order taker unit confirm that the system setup for the order taker unit center module and other devices has been completed OPERATING PROCEDURES Communications with Customers TALK Any store personnel ...

Page 12: ...urned off The vehicle detector may malfunction because the detector is not plugged into the center module no power is supplied or the detecting function is out of order Radio wave intensity is insufficient in the areas What to do Select any of channels 1 through 8 If no remedy exists consult your dealer for repairs Recharge the battery Recharge the battery Position the battery properly Refer to p ...

Page 13: ...1 8 DIP Switch Setup 8 bit Dimensions 139 mm W x 63 mm H x 26 mm D 5 1 2 in W x 2 1 2 in H x 1 in D Weight excluding battery 110 g 0 24 lbs Dimensions and weighs indicated are approximate Specifications are subject to change without notice STANDARD ACCESSORIES Miniature Screwdriver 1 pc OPTIONAL ACCESSORIES Battery Ni MH 3 6 V DC 1100 mA h 2020BAT Battery Charger 2020CH Headset WX C1027A Order Tak...

Page 14: ...e même type ou un type équivalent 14 ATTENTION Une pile recyclable alimente l appareil que vous avez acheté Veuillez appeler 1 800 8 BATTERY pour toute information sur la façon de recycler cette pile Ni MH VERSION FRANÇAISE FRENCH VERSION Le numéro de série de cet appareil se trouve dans le logement de batterie Nous vous conseillons de relever le numéro de série de votre appareil dans l espace rés...

Page 15: ...l de dépannage qualifié ou des installateurs professionnels Utiliser uniquement les batteries autorisées par Panasonic telles que des batteries rechargeables Ni MH 3 6 V Se conformer aux instructions de précaution et d utilisation de batterie Lire les directives qui accompagnent le chargeur de batterie Charger la batterie quand le témoin d alimentation s allume en rouge et qu un bip est entendu da...

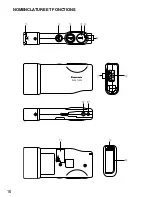
Page 16: ...16 EJECT WX CT2020 A B PWR VOL u i 2 o 0 1 q y q w e r t NOMENCLATURE ET FONCTIONS ...

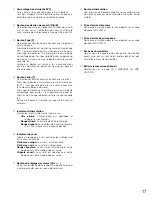
Page 17: ...Lorsque le bouton est relâché ce que dit le client est entendu t Indicateur d alimentation L indicateur montre l état actuel comme suit Gris allumé L alimentation est appliquée et l appareil est en fonction Rouge allumé La batterie doit être rechargée Rouge clignote Le sélecteur de canal se référer à la p 19 est réglé sur la mauvaise position y Indicateur de canal Allumé en rouge ou en vert cet in...

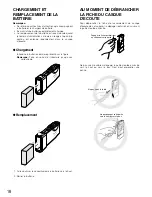
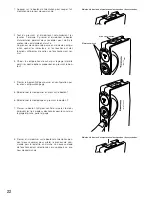
Page 18: ...Faire en sorte de l introduire jusqu à son verrouillage EJECT WX CT2020 Remplacement 1 Faire coulisser le verrouillage de la batterie vers le haut 2 Retirer la batterie EJECT WX CT2020 q w AU MOMENT DE DÉBRANCHER LA FICHE DU CASQUE D ECOUTE Pour débrancher la fiche de raccordement du casque d écoute de cet appareil la dégager tout droit en saisissant la partie moulée en résine Ne pas saisir le câb...

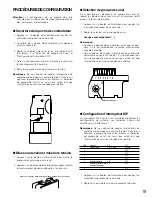
Page 19: ... possible de sélectionner un groupe de canal en réglant le sélecteur de canaux qui est un sélecteur rotatif placé à l intérieur de la poche 1 Appuyer sur le bouton d alimentation pour couper l ali mentation du preneur de commande 2 Régler le sélecteur sur le groupe de canal Groupe canal disponible 1 8 Remarques Quand une position de commutateur autre que les posi tions 1 à 8 est sélectionnée le té...

Page 20: ...nalités à partir du module central Remarque SW 6 doit être normalement placé en position ON Faire attention au bruit aigu qui risque de se manifester lors du positionnement sur OFF SW 7 Tout en parlant au client en mode de verrouillage pour parler il est parfois nécessaire de prendre contact avec le personnel du magasin en mode page PTT ou en mode de verrouillage page ce qui interrompt le mode de ...

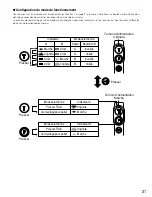
Page 21: ...cateurs et les touches ont des fonctions différentes de celles du fonctionnement normal Indicateur A B Arrêt Clignote Marche Arrêt Arrêt Marche Arrêt Clignote Mode sélectionné Mode sélectionné Indicateur A Presser TALK Clignote Verrouillage pour parler Marche Mode sélectionné Indicateur B Presser TALK Clignote Verrouillage pour parler Marche Canal Bouton A B A Invalidé A Validé B Invalidé B Validé...

Page 22: ... pour passer en configuration par ler et en configuration page 5 Sélectionner le mode parler en pressant le bouton T 6 Sélectionner le mode page en pressant le bouton P 7 Presser le bouton A B pour confirmer que les témoins indiquent les trois modes sélectionnés pour le canal par réglage implicite parler et page 8 Presser et immobiliser sur le bouton d alimentation pen dant deux secondes pour arrê...

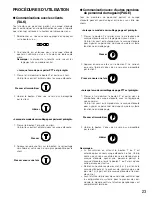
Page 23: ...tenir une distance de plus de 0 3 m 1 pd entre le casque d écoute et le preneur de commande ou de plus de 1 m 3 pd entre le casque d écoute et le mod ule central Avant d utiliser le preneur de commande confirmer que la configuration du système pour le preneur de com mande le module central et d autres périphériques est complètement terminée PROCÉDURES D UTILISATION Communications avec les clients ...

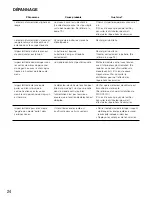
Page 24: ...ut être mal parce qu il n est pas branché dans le module central ou bien l alimentation n est pas fournie ou encore que la fonction de détection est déréglée L intensité des ondes radio est insuffisante dans certains secteurs Que faire Choisir n importe lequel des canaux de 1 à 8 S il n existe aucun moyen de rectifier consulter le distributeur pour qu il effectue les réparations nécessaires Rechar...

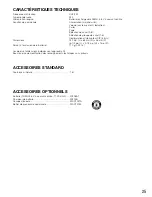
Page 25: ...iguration d interrupteur DIP 8 bits Dimensions 139 mm L x 63 mm H x 26 mm P 5 1 2 po L x 2 1 2 po H x 1 po P Poids à l exclusion de la batterie 110 g 0 24 liv Les poids et dimensions indiqués sont approximatifs Sous réserve de modification des renseignements techniques sans préavis ACCESSOIRES STANDARD Tournevis miniature 1 él ACCESSOIRES OPTIONNELS Batterie Ni MH 3 6 V à courant continu 1100 mA h...

Page 26: ...26 ...

Page 27: ...27 ...

Page 28: ...nasonic Corporation of North America Security Systems www panasonic com security For customer support call 1 877 733 3689 Executive Office Three Panasonic Way 2H 2 Secaucus New Jersey 07094 Zone Office Eastern Three Panasonic Way Secaucus New Jersey 07094 Central 1707 N Randal Road Elgin IL 60123 Southern 1225 Northbrook Parkway Suwanee GA 30024 Western 6550 Katella Ave Cypress CA 90630 Printed in...

Reviews: