25
●
●
●
●
■
■
●
●
●
1
2
1
2
3
4
5
6
7
1
2
3
4
5
6
7
1
2
Please contact the dealer for replacement.
Installing
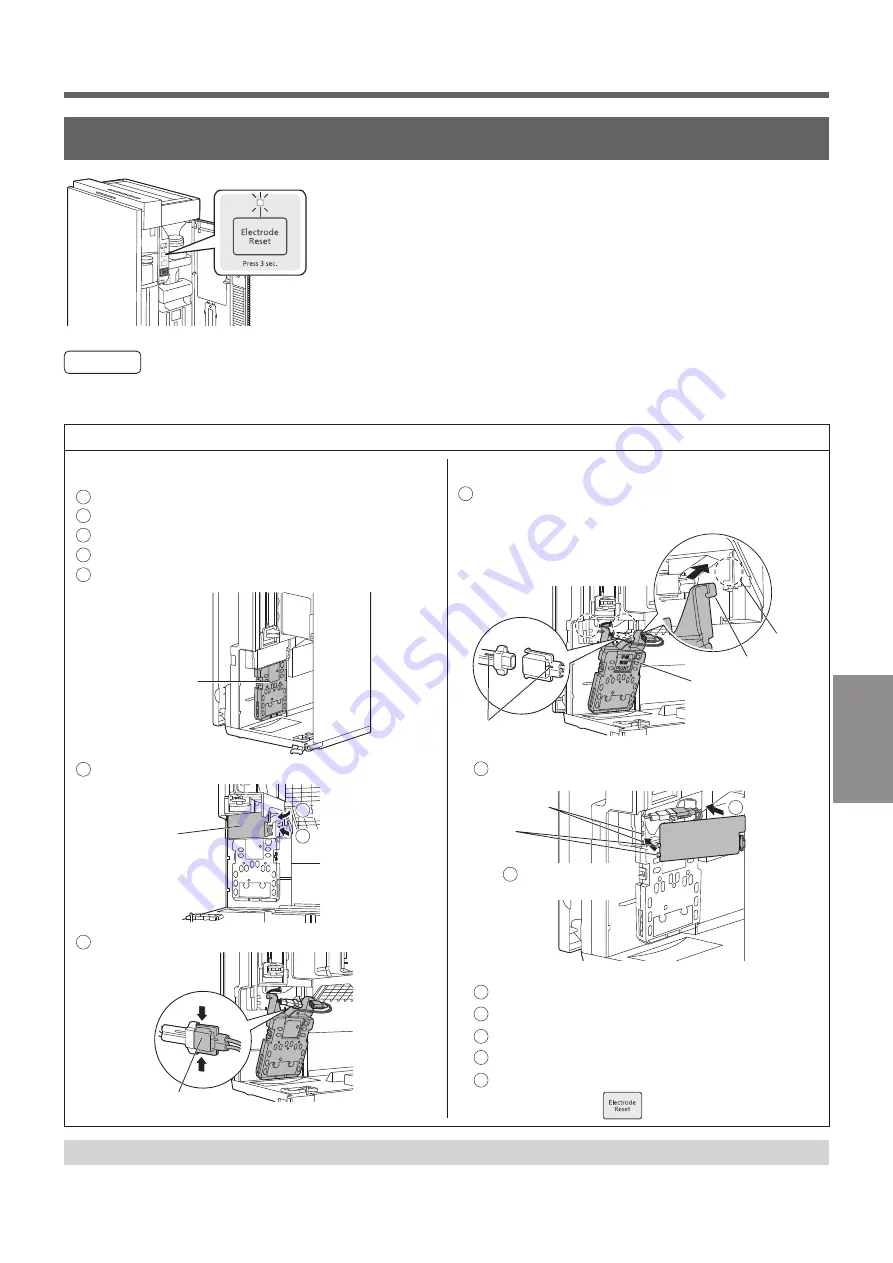
Insert the protrusions (two)
into the recesses (two).
Disposing of the electrode unit
When replacing the electrode unit
When the electrode reset indicator blinks
When the electrode reset indicator blinks, replace the
electrode unit.
The electrode reset indicator will light on after blinking
for about one month. (When the electrode reset indicator
becomes steady on, the product cannot operate.)
The replacement cycle may vary with the water quality and
operating environment.
About once every 5 years.
(In the case that the product runs 12 hours a day.)
Notice
When lifting up or pressing down the electrode unit, please pinch the slider latch to move it.
Be sure to use the electrode unit dedicated for this product. (See ”Optional accessories” on page 26.)
Removing/Installing the electrode unit
Removing
Press the slider latch down (electrode unit).
Lift the slider latch (electrode unit) up.
Lift the slider latch (electrode unit) up.
Remove the tray from the main unit.
Take the tank out.
Disconnect the power plug.
Electrode unit
Open
Housing
Remove the housing of the electrode unit.
Press
Connector
Remove the connector.
Press
Press
The electrode unit is a mixture of plastic and metal. Please dispose of it according to your local
garbage classification rules.
Protrusions
Mark
Install the new electrode unit onto the connector
with the mark facing you, and then install them
onto the main unit.
Recesses
Align with the
direction of the line
Align the buckles
with the holes.
Install the housing onto the electrode unit.
Buckles
(two)
Holes (two)
Close
Install the tank back to the main unit.
Pull the slider latch (electrode unit) down.
Install the tray back to the main unit.
Insert the power plug into the power outlet,
press and hold for about 3 seconds.
MAINTENANCE
MAINTENANCE

