background image


Table of Contents   

INTRODUCTION .............................................................................................................................. 7


Important Safety Precautions & Instructions .............................................................................. 7


Cleaning the KTC ....................................................................................................................... 9


The KTC’s Key Features ................................................................................................................ 9


System Requirements .................................................................................................................. 10


What’s in the Box.......................................................................................................................... 10


INSTALLATION ............................................................................................................................. 10


Countertop, Under Cabinet, or Wall Mounting ......................................................................... 10


Attach the Countertop Stand ............................................................................................. 11


Wall or Under Cabinet Mounting ....................................................................................... 12


Adjust the Monitor Angle .......................................................................................................... 12


Change the Decorative Faceplates .......................................................................................... 12


Back Panel Input Connectors .................................................................................................. 13


Connecting Speakers to the KTC ............................................................................................ 14


The Left Side Panel Media Slots ................................................................................................. 14


The Right Side Panel Control Buttons ....................................................................................... 14


The KTC Remote Control ............................................................................................................. 15


Installing Batteries in the Remote Control................................................................................ 16


Power On the KTC ........................................................................................................................ 16


TELEVISION SECTION ................................................................................................................. 18


TV Connection Options ................................................................................................................ 18


Connecting Digital Cable with or without Cable Box ................................................................ 18


Connecting DVD Player with Component YPbPr .................................................................... 18


Connecting DVD player with S-Video ...................................................................................... 19


Connecting DVD player with Composite .................................................................................. 20


Connect to Cable or Satellite Boxes with High-Definition Multimedia Interface (HDMI) .......... 20


Connecting to a PC with VGA and 3.5 mm minijack ................................................................ 21


Ready to Watch TV? ..................................................................................................................... 22


‘No Database’ Message ........................................................................................................... 22


Initial Tuner Setup .................................................................................................................... 22


On Screen Display (OSD) Menu .................................................................................................. 23


OSD Menu Options Overview .................................................................................................. 23


VIDEO Option .......................................................................................................................... 24


AUDIO Option .......................................................................................................................... 25


TIME Option ............................................................................................................................. 26


SET UP Option ......................................................................................................................... 26


LOCK Option ............................................................................................................................ 28


TV Option ................................................................................................................................. 29


Aspect Ratio ............................................................................................................................. 30


Program Ratings ........................................................................................................................... 31


USTV Ratings .......................................................................................................................... 31


MPAA Ratings .......................................................................................................................... 32


Browsing Channels ...................................................................................................................... 32


Favorites List ............................................................................................................................ 32


Add & Remove Channels .................................................................................................. 32


Browse Channels from the Favorite List ........................................................................... 32


Summary of Contents for KTC

Page 1: ...User Guide ...

Page 2: ...2 PANTV1512_EN_V3 0_11 08 ...

Page 3: ...Power On the KTC 16 TELEVISION SECTION 18 TV Connection Options 18 Connecting Digital Cable with or without Cable Box 18 Connecting DVD Player with Component YPbPr 18 Connecting DVD player with S Video 19 Connecting DVD player with Composite 20 Connect to Cable or Satellite Boxes with High Definition Multimedia Interface HDMI 20 Connecting to a PC with VGA and 3 5 mm minijack 21 Ready to Watch TV ...

Page 4: ...hoto 39 Rotate a Photo 40 Zoom a Photo 40 Photo Date Time Stamp 40 Enable Clock Display 40 Photo Copy Methods 41 Set the Photo Copy Method 41 Copy Photos from Memory Card into Internal Memory 41 Copy All Photos 41 Copy Selected Individual Photos 41 Delete Photos from the Internal Memory 42 Delete All Photos 42 Delete Selected Individual Photos 42 SLIDESHOWS 42 All Photos Slideshow 42 Custom Catego...

Page 5: ... 54 Establish accounts with Google PicasaTM and FrameIt 54 Set up your Wireless Network on the KTC 54 Connect the KTC with Google PicasaTM 55 Viewing Photos Stored on Google PicasaTM 55 Connect with Windows Live FrameIt 56 Connect KTC to Windows Computer via USB Cable 56 Disconnect the KTC from the Computer 58 Wireless Connection between the KTC and Windows Computer 58 Download and Install the Yah...

Page 6: ...6 ...

Page 7: ...hock and or fire To ensure your safety and prolong the service life of your Liquid Crystal Television please read the following precautions carefully before using the product WARNING Do not expose this product to rain or moisture Do not remove the cover Refer all servicing to qualified service personnel Servicing is required when the KTC has been damaged in any way such as power supply cord or plu...

Page 8: ...aler o The power connector fails or frays o Liquid sprays or any object drops into the KTC o The Display is exposed to rain or other moisture o The Display is dropped or damaged in any way o The performance of the Display changes substantially Do not use the KTC in a portrait format by rotating 90 degrees under high temperature environment 25 C or higher since this would retard heat dissipation an...

Page 9: ...m penetrating into the electronics The KTC s Key Features Displays High Definition TV Videos from your DVD player Satellite Set top box or Cable box with HDTV tuner Displays digital recipe collections pre loaded in KTC Displays digital photos individually or as slideshows with background music Supported photo file types JPEG images up to 16 Mega Pixels Plays digital MP3 music files Plays digital M...

Page 10: ...Decorative colored faceplates white black and silver on unit INSTALLATION Please read the installation instructions carefully before performing the installation The power consumption of the display is approximately 50 watts Always use the power cord designated for the product When an extension cord is required use one with the correct power rating The cord must be grounded and the grounding featur...

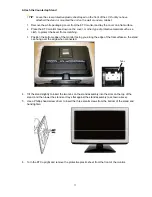
Page 11: ...h to protect the bezel from scratching 3 Position the bottom edge of the monitor facing you along the edge of the flat surface so the stand can hang over the edge when connected 4 Tilt the stand slightly to insert the two tabs on the stand assembly into the slots on the top of the stand and then lower the stand so it lays flat against the stand assembly as shown above 5 Use a Phillips head screw d...

Page 12: ... TV Mounting s Installation and Assembly instructions for using the Wall Mount Kit to mount on wall or under cabinet Adjust the Monitor Angle You can adjust the angle of the monitor by gently moving top of monitor back or forward until the desired viewing angle is achieved If the KTC is on the countertop press down on the stand to secure before moving the monitor Change the Decorative Faceplates T...

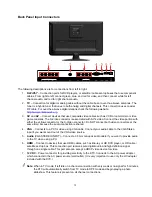
Page 13: ...T connect both video connectors at the same time because the audio connection is shared 4 VGA Connects to a PC for video using VGA cable Connect your audio cable to the VGA Stereo input if you want sound out of the VGA video source 5 Audio VGA STEREO INPUT Connect a 3 5mm mini jack audio cable if you want to provide audio to the TV when using a PC 6 HDMI Connect to devices that use HDMI cables suc...

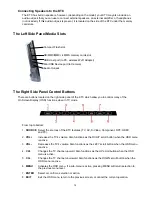
Page 14: ... Component DPF HDMI and PC 2 VOL Increases the TV s volume Also functions as the RIGHT scroll button when the OSD menu is active 3 VOL Decreases the TV s volume Also functions as the LEFT scroll button when the OSD menu is active 4 CH Changes the TV channel upward Also functions as the UP scroll button when the OSD menu is active 5 CH Changes the TV channel downward Also functions as the DOWN scro...

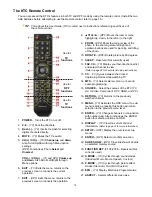
Page 15: ...ture by 90 degrees 11 SLEEP Reserved Not currently used 12 FAV CH TV Display your favorite channel list and select channel to view Refer to page 32 for Favorite list setup instructions 13 CC TV Cycles between the Closed Captioning modes while watching TV 14 MTS TV Selects stereo mono or second audio programming 15 SOURCE Select the sources of the KTC TV AV S Video Component DPF HDMI and PC 16 RETU...

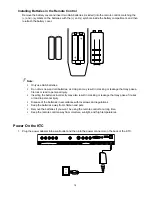
Page 16: ...e that may pose a fire risk or lead to personal injury Inserting the batteries incorrectly may also result in cracking or leakage that may pose a fire risk or lead to personal injury Dispose of the batteries in accordance with local laws and regulations Keep the batteries away from children and pets Remove the batteries if you won t be using the remote control for a long time Keep the remote contr...

Page 17: ...igital cable the first time you power the KTC on the unit may display Proceed with Auto Scan No Signal and or No Database messages Press SOURCE on the remote control or side panel buttons use the arrows to highlight DPF and then press ENTER The KTC will now be in the Digital Photo Frame DPF mode and will remain in the DPF mode until you change the SOURCE at a later time No Database If you are conn...

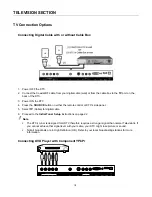
Page 18: ...ther the remote control or KTC s side panel 5 Select TV Cable for digital cable 6 Proceed to the Initial Tuner Setup instructions on page 22 Note The KTC s tuner is designed for HDTV therefore requires a stronger signal than normal Televisions If you cannot achieve that signal level with your cable your KTC might lose picture or sound Not all broadcasts are in High Definition HD Refer to your loca...

Page 19: ...player s user guide to make sure the DVD player is configured to output correctly to the KTC Connecting DVD player with S Video 1 Power OFF the KTC and DVD player 2 Connect the S Video Cable connector to both your DVD player and AV s S Video connector port on the back of your KTC 3 Connect the RCA Audio Cable White connector to both your DVD player and AV s white port on the back of your KTC Red c...

Page 20: ...e control or KTC s side panel 6 Select AV Note Do not connect the yellow connector in the same group You can only connect either the S Video port or the Yellow Connector port DO NOT CONNECT BOTH Refer to the DVD player s user guide to make sure the DVD player is configured to output correctly to the KTC Connect to Cable or Satellite Boxes with High Definition Multimedia Interface HDMI 1 Power OFF ...

Page 21: ...nder the SETUP option select PC function 10 Under PC function use AUTO ADJUST to adjust the screen AUTO COLOR to adjust the color and use PREF RESOLUTION to select 1280x768 at 60hz Note For the best results set your PC resolution to 1280x768 at 60 Hz The TV resolution is 1366x768 but the PC resolution does not support this mode so we suggest using 1280x768 as the closest compatible resolution Refe...

Page 22: ...r the current channel to be displayed Perform the Initial Tuner Setup per the following instructions Initial Tuner Setup The first time you power on the KTC after connecting a digital Coaxial RF cable perform the following initial setup and then your TV will be ready for viewing Note Use the remote control to perform the initial tuner setup functions 1 Press MENU to display the OSD menu 2 Press VO...

Page 23: ... for more information When the scan finishes you can begin to watch TV Note The KTC s tuner is designed for HDTV therefore requires a stronger signal than normal TVs If you cannot achieve that signal level with your digital cable your KTC might lose picture or sound Not all broadcasts are in High Definition HD Refer to your local broadcasting stations for more information On Screen Display OSD Men...

Page 24: ...wing and video gaming MILD Mainly used for movies VIVID Mainly used for nature channels and sporting events CUSTOM Saves your custom settings If you changed settings under the OSD VIDEO main option the settings would be saved under CUSTOM mode Note While watching the TV you can use the P MODE button on the remote control to temporarily select a different mode and then the Picture Mode will return ...

Page 25: ...which you can change to optimize your listening preferences The following descriptions are suggested usage o STANDARD Mainly used for regular television viewing o MUSIC Mainly used for music videos o MOVIE Mainly used for movies sporting events and video gaming o SPEECH Mainly used for news and commentary programs o CUSTOM Saves your custom settings If you changed settings under the OSD AUDIO main...

Page 26: ... and press VOL or VOL to select the option setting Sleep Timer Set the time between 15 and 240 minutes that you want the TV to remain on before automatically shutting off Time Zone Set the time zone for your location Daylight Saving Time Set daylight savings time ON or OFF SET UP Option You can adjust various options such as OSD language PC setup or Closed Captioning 1 Press MENU to open the OSD m...

Page 27: ...tandard for North America broadcasts If you have TEXT1 TEXT4 turned on there will be a black box blocking the TV s video o ADVANCED SELECTION Select between various digital closed caption services North America broadcast usually uses service 1 o OPTION Adjustments for the type of digital caption style you want MODE Either locks or opens the adjustments of the closed captioning FONT STYLE Select di...

Page 28: ...e password again System Lock Enable Disable the TV blocking options Unrated Lock Lock or unlock TV shows or movies that are unrated US Enter the ratings systems for both movies and TV shows Refer to Program Ratings on page 31 for the defined Ratings o TV Blocks TV shows you can select the level you want to block by TV rating or by content o MPAA Blocks movies you can select the level you want to b...

Page 29: ...u do not want to watch so they don t display when you use the CH and CH buttons on the remote control to scroll through channels The channel choices are those on the scanned list therefore this function is only available after you perform an Auto Scan Refer to Browsing Shortcuts on page 32 for more information Favorite Select channels that you want to watch frequently so they will be displayed whe...

Page 30: ...l get black bars on the top and bottom of the screen 2 4 3 Most analog TV channels have 4 3 signal formats If the original 4 3 aspect ratio 1 33 1 source is preserved black bars are added to the left and right of the display image This aspect keeps that aspect ratio and shows you the black bars on the side 3 Zoom When watching a 4 3 aspect ratio TV or movie this mode zooms in to cut off most of th...

Page 31: ... these programs suitable for all ages Although this rating does not signify a program designed specifically for children most parents may let younger children watch this program unattended It contains little or no violence no strong language and little or no sexual dialogue or situations TV PG USTV Parental Guidance Suggested For programs that contain material that parents may find unsuitable for ...

Page 32: ...nes you want to watch Favorites List and Channel Skip Note The available channel choices for both the Favorites List and Channel Skip options are those on the scanned list therefore these functions are only available after you perform an Auto Scan Favorites List Allows you to quickly scroll through only those channels you may frequently watch You can add or remove channels to your Favorites list w...

Page 33: ...g a TV program you can view various channel information by using the DISPLAY and EPG buttons Note You must use the KTC remote control for these features Display Current Channel Information DISPLAY Button 1 While watching a TV program while using the Antenna press DISPLAY once to display the current channel number call sign time of program current Closed Captioning mode setting program rating and c...

Page 34: ... will remain in the DPF mode until you change the SOURCE at a later time The PanTouch Interface The KTC includes our PanTouch Technology active in DPF mode only a touch icon driven menu system designed to provide the same KTC functions as the remote control The menu icons are conveniently hidden away in the top right inside edge of the frame waiting to be activated TIP Throughout this section PT i...

Page 35: ...lay your photos jpg or jpeg individually or as slideshows and set viewing parameters Full functionality is described under PHOTO on page 38 MUSIC List and play your MP3 music files Full functionality is described under MUSIC on page 48 VIDEO List and play your Video files Full functionality is described under VIDEO on page 49 FILE View all files on each present memory source Full functionality is ...

Page 36: ...se all transition effects randomly throughout a slideshow Slideshow Speed Fast default Medium Slow Determines how quickly photos transition from one to another Display Option Settings Description Display Image Size Original Optimal default Original Display photos in original format actual photo size Optimal Display photos reduced to best fit the screen Set Time Date Time Date YYYY MM DD Time HH MM...

Page 37: ...out Photo Copy Method Optimized default Non Optimized Optimized Compresses photo files before copying to internal memory Non Optimized Copies photo files with original size and resolution View Folder Family Friends Vacation Events Others Photos can be copied into these five category folders for custom group viewing Network Setup SSID Security IP Address Search Network Connect Provides access to Go...

Page 38: ...s at the top of the screen indicating the currently selected memory source PHOTOS You can view your photos individually or as slideshows with or without background music Display Image Size There are two modes for displaying your photos on the DPF Original Displays photos in actual photo size which may result in part of a photo not being visible on the screen Optimal default Reduces the size and re...

Page 39: ... the photo thumbnail screen displayed use the arrows to highlight the photo you want to view The photo file name will be displayed above the photos and the page number total page numbers indicates which thumbnail page you are viewing and the total number of pages in the current memory source 2 To view the highlighted photo touch VIEW or press ENTER 3 PT only When a photo is displayed you can scrol...

Page 40: ... stamps displayed with the photos This date time stamp will only display if your photo files include this information If your photos have been obtained from sources other than directly from the digital camera i e scanned photos there will be no date time stamp to display RC only 1 While a slideshow is playing press SETUP 2 Use the arrows to highlight Photo Date time Stamp and then press ENTER 3 Us...

Page 41: ...ER 2 PT With the photo thumbnails screen displayed touch COPY ALL RC With the photo thumbnails screen displayed press SETUP Use the arrows to highlight Copy Photo and Copy All and then press ENTER CAUTION The photos will be copied without a confirmation message If any of the file names already exist in the internal memory they will be overwritten without notice 3 Touch HOME or press EXIT to return...

Page 42: ... the arrows to highlight PHOTOS and then touch or press ENTER 2 With the photo thumbnails screen displayed use the arrows to scroll through your photos 3 PT Touch SELECT on each photo you want to delete a check mark appears when selected then touch DEL SEL A confirmation message Are you sure you want to delete the selected photos appears Touch YES to delete or NO to cancel RC Press CH on each phot...

Page 43: ... check mark is displayed on each selected photo Continue until you have selected all desired photos 5 Press SETUP 6 Use the arrows to highlight Assign Selected Photos To and then press ENTER 7 Use the arrows to highlight the desired folder and then press ENTER to assign the selected photos to that folder Note The photos are assigned to the folder not copied If you delete the photo file from intern...

Page 44: ... 2 Use the arrows to scroll through the photos Press CH to select photos or CH to un select them 3 A check mark is displayed on each selected photo Continue until you have selected all desired photos 4 Press SETUP 5 Use the arrows to highlight Start Slideshow press ENTER 6 Use the arrows to highlight Slideshow Selected and then press ENTER 7 The slideshow will display only those photos you selecte...

Page 45: ...picts the selected effect 4 Press EXIT to return to the HOME screen Set Slideshow Speed You can set the speed at which the slideshow photos transition from one to another Fast default Medium Slow PT 1 While a slideshow is playing touch SLIDE SET UP and then SLIDESHOW SPEED 2 Use the arrows to highlight the preferred speed and then press SELECT 3 The slideshow will resume after approximately 3 seco...

Page 46: ...d press SETUP 2 Use the arrows to highlight Slideshow Shuffle and then press ENTER 3 Use the arrows to highlight the preferred mode and then press ENTER A small white square depicts the selected mode 4 Press EXIT to return to the HOME screen RECIPES The KTC includes pre loaded cookbooks that contain a collection of popular recipes from well known publishers i e bon appétit TIP Additional seasonal ...

Page 47: ...uch or press ENTER 2 Use the arrows to highlight the desired cookbook and then touch VIEW or press ENTER 3 Use the arrows to highlight the recipe you want to copy and then touch SELECT or press CH A check mark will appear on each selected recipe 4 PT Touch COPY SEL Use the arrows to highlight the desired category and then touch SELECT RC Press SETUP On Copy Recipe pages to press ENTER Use the arro...

Page 48: ...the recipe The recipe will still be in the main cookbook Note You cannot delete recipes from the main Cookbooks 1 With the HOME screen displayed use the arrows to highlight RECIPE and then touch or press ENTER 2 Use the arrows to highlight the any of the six food group categories and then touch VIEW or press ENTER 3 Use the arrows to highlight the recipe you want to delete and then touch SELECT or...

Page 49: ...e HOME screen displayed use the arrows to highlight MUSIC and then press ENTER A list of all music files found on the memory source is displayed 2 Press SETUP 3 Use the arrows to highlight Audio Playback Repeat and then press ENTER 4 Use the arrows to highlight your desired mode and then press ENTER 5 Press EXIT to return to the music file list 6 To listen to a music file now use the arrows to hig...

Page 50: ...ck method for listing all folders and files located on the selected memory source whether they are photo audio or video files You can also quickly select a photo audio or video files for immediate viewing or listening View Contents of Selected Memory Source 1 With the HOME screen displayed use the arrows to highlight FILE and then touch or press ENTER The contents of the selected memory source wil...

Page 51: ... to return to the HOME screen RC 1 With the contents of the FILE screen displayed use the arrows to scroll through the file names 2 Use the arrows to select files you want to copy A check mark will appear at the end of the file name 3 Continue selecting until you have all the desired files selected and then press SETUP 4 Use the arrows to highlight Copy File and then press ENTER 5 The selected fil...

Page 52: ... 4 When the date and time are correct press ENTER to save and return to the normal CLOCK CALENDAR screen Set the Alarm You can use your KTC as an alarm clock and you can set the alert as either a built in tone or music You can also set the alarm to alert only once or daily CAUTION After setting the alarm the CLOCK CALENDAR screen must be displayed for the alarm feature to activate If any other scr...

Page 53: ...ill sound instead TIP Be sure to have the CLOCK CALENDAR screen displayed and the KTC s volume turned up when you want to use the Alarm Clock Turn Alarm Off When the alarm sounds touch the PanTouch Interface or press any button on the remote control to stop it and return to the CLOCK CALENDAR screen To cancel the alarm before its scheduled time follow the previous instructions for setting the alar...

Page 54: ...your photos Visit http www frameit live com to set up an account create folders and assign desired RSS feed content Set up your Wireless Network on the KTC RC only 1 Insert the Pandigital wireless USB adapter included to the USB host port 2 With the HOME screen displayed press SETUP 3 Use the arrows to highlight Network Setup and then press ENTER 4 Use the arrows to highlight Search for Network an...

Page 55: ... appropriate upper lower case characters 8 Highlight Picasa Web Albums and then press ENTER 9 When you are successfully connected the folders you created in Picasa will be displayed 10 Use the arrows to highlight the folder you want to view and then press ENTER to view the photos you previously uploaded Viewing Photos Stored on Google PicasaTM 1 With the HOME screen displayed use the arrows to hig...

Page 56: ... will be displayed and as you highlight the folders the titles will appear 9 Use the arrows to highlight a desired folder and then press ENTER to view the contents of the feed as a slideshow If you have slideshow music enabled the music will also automatically begin to play as contents are displayed TIP While viewing a page press EXIT once to pause and ENTER to resume Press EXIT multiple times to ...

Page 57: ...7 To copy files from the memory card into your PC select and drag them to the desired location on your computer 8 To copy photos from your computer into the KTC s internal memory select the files you wish to copy click Edit Copy TIP Most cameras and graphic programs store photos in the Windows My Pictures folder If you didn t save them in a different location they may be found in the My Pictures f...

Page 58: ... with the KTC and other Pandigital DPFs to transfer photos between the PC and the internal memory in Pandigital units IMPORTANT This step assumes your PC is already connected to an active wireless network and that the KTC is located within a close enough range to make a successful connection to the network Setting up the Pandigital DPF Manager Widget to transfer photos from your PC to the KTC requ...

Page 59: ...dget 6 If the installation is successful the DPF Manager Dock will appear on your desktop 7 Right click in the DPF Manager box to show the application menu select Add DPF to add a unit 8 Enter a Name for the unit you choose any name as desired and the wireless network IP address and then click Add Note If you have multiple Pandigital units to add repeat steps 7 8 for each device 9 Click on the nam...

Page 60: ...mbnails screen To transfer images from Pandigital unit to PC a Right click on an image in the DPF Manager window and then click DOWNLOAD b In the Save As window select the folder on your PC into which you want to transfer the image and then click SAVE c The images will be transferred without notice Can Not Connect Successfully Message If the connection between the PC and your Pandigital unit is di...

Page 61: ...olour Choose the desired color for the highlighter when you position the cursor over a unit name in the Dock window View Type Choose how the unit name will be displayed in the Dock window Test only Icon Text Icon only Dock Dock Location Choose the desired location for the Dock window to be displayed Left Top Right Window Width and Height Use the sliding size indicators to adjust the width and heig...

Page 62: ...oth feature allows you to download photos from popular Bluetooth capable mobile phones i e BlackBerry Motorola Nokia SonyEricssson and others directly into your KTC A Bluetooth USB Adapter is required not included with KTC Note Phone models vary and not all phones support transmitting photos to devices like a DPF Check to be sure your phone supports transmitting photos to external devices like KTC...

Page 63: ...d formats and that the files on the card are JPEG image files Verify that the memory card is inserted all the way into the card slot and is facing the right direction Follow the instructions for starting the KTC in DPF mode again If the photos on your card still do not display you may want to try another card Note Some digital cameras save images in other formats Refer to your camera s user guide ...

Page 64: ... password on the DPF Refer to the initial Wi Fi setup instructions under INTERNET on page 54 Q I followed the steps to connect to Windows FrameIt but only the default feed folders are displayed How do I get my personal feed folders to display A A setting in one of the system files may need to be reset Please contact Customer Support for help KTC Specifications Display panel Item Illustration Activ...

Page 65: ... 1024 768 60Hz 75Hz 800 600 60Hz 75Hz 640 480 60Hz 75Hz 4 NTSC ATSC NTSC Sound Mono Stereo SAP Favorite Channel V chip Closed caption CC1 CC4 Text 1 Text 4 ATSC Sound Mono Stereo SAP Favorite Channel V chip Video input format 1080i 720p 480p 480i ATSC continued Analog closed caption CC1 CC4 Text 1 Text 4 Digital closed caption Service 1 Service 6 5 I O TV Tuner NTSC ATSC AV S Video Audio Shared wi...

Page 66: ... remote sensor of the KTC CANNOT RECEIVE SUFFICIENT CHANNELS THROUGH THE ATSC NTSC TUNER The KTC s tuner signal must not be lower than 65 If you have digital cable contact your cable company and ask about signal strength of your local cable NO COLOR Adjust your picture setup and make sure the saturation and the RGB are not turned all the way down The TV s tuner signal must not be lower than 65 Che...

Page 67: ...A However due to variances in broadcast practices it is possible some image distortions can occur TIPS FOR LETTERBOX CONTENT USERS Letterboxed Widescreen versions of DVD movies are most commonly formatted for standard 4 3 TVs The KTC has the capability of expanding this content so the entire screen is filled at the expense of the image proportion To use this function press the aspect button on the...

Page 68: ...s may not apply This warranty gives you specific legal rights and you may have other rights which vary from state to state All content included on the Pandigital website as well as Pandigital products including preloaded demonstration images digital media digital cookbooks text graphics logos designs photographs button icons images audio video clips digital downloads data compilations and software...

Reviews: