background image


O p e r a t i n g   t h e   S c a n n e r / C o n v e r t e r  

Preparation and Initial Setup 


1.  Peel off the tape that secures the guide lever 

(first time only).


2. Connect the plug on the power adapter to the power connector on the Scanner/Converter. 


3. Plug the power adapter into a power outlet. 

  The type of power plug and socket illustrated may differ from that of your region. 


4. Insert an unlocked (writable) memory card into the memory card slot. 

  Always insert a memory card before scanning. 
  Make sure the memory card is unlocked (writable) 
  The Scanner/Converter only accepts memory cards in FAT16 or FAT32 file system. NTFS and other file 

systems are not supported. 


Power on the Scanner/Converter 


1.  Press and release the 

Power

 button. The power indicator light blinks. (For more indicator lights information, 

refer to “Indicator Lights” on page 7.) 


2.  Wait until the power indicator stops blinking and then goes off. The Status/Card indicator will stay on steady, 

indicating that the Scanner/Converter is ready. 

  Do not insert an original into the feeding slot when the power indicator is blinking; the original will not be 

scanned. 


Set the Scanning Resolution 

The scanning resolution is measured in dpi (dots per inch). The higher the dpi, the more details on the original will be 
captured by the Scanner/Converter and produce a higher quality scanned image. However, a higher dpi will also result in a 
larger image size and occupy more space on the memory card. 


To change the scanning resolution, when the Scanner/Converter is powered on, press and release the 

Power

 button. The scanning resolution changes by each press of the button, and the color of the 

Status/Card indicator will also change according to the resolution selected: 

          Green

 = 300dpi (normal mode, default setting) 

          Orange

 = 600dpi (fine mode) 


Scanning a Photo 

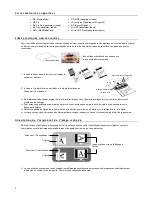
1.  Insert your original into the plastic sheath (

included with Scanner/Converter

). 


2.  With the side to be scanned facing upward and in correct orientation as indicated by the orientation 

guide, place one edge of the plastic sheath on the Scanner/Converter and adjust the guide lever so 
that the plastic sheath aligns against the left side of the feeding slot. 


CAUTION

:  Do not scan glossy photos in humid environments 

(humidity higher than 70% RH)

; the 

surface of the photo will become sticky and may cause the Scanner/Converter to jam. 


Insert the plastic sheath into the feeding slot; it will be fed through the slot and scanned automatically. The 
Power and Status/Card indicator lights blink while scanning. 

  To prevent poor image quality, reserve adequate space behind the Scanner/Converter for the photo to 

complete the scan feeds. 


When scanning is completed, the Power and Status/Card indicator lights will keep blinking momentarily, 
indicating that the Scanner/Converter is processing the image and storing the file onto the memory card. 

Wait until the indicator lights stop blinking before inserting and scanning the next original. 

Align left 

Summary of Contents for PANSCN06

Page 1: ...ser Guide Guide de l utilisateur Guía del usuario English Français Español Effortlessly Moving Images Out of your Camera and Into your Life Amenez en toute aisance vos images numériques de votre appareil photo dans votre vie Cómo trasladar las imágenes con movimiento de su cámara digital a su vida sin esfuerzos ...

Page 2: ...2 UG E FRC SP_PANSCN06_V1 0_11 09 ...

Page 3: ...3 English ...

Page 4: ... Safely Disconnect the Scanner Converter Windows 12 Connect with Macintosh 12 Safely Disconnect the Scanner Converter Macintosh 12 Scan2PC Manager Windows 12 System Requirements 12 Installing the Scan2PC Manager 13 Using the Scan2PC Manager 13 File Naming Convention 13 Uninstalling the Scan2PC Manager 13 Scan2Mac Manager Macintosh 14 System Requirements 14 Installing the Scan2Mac Manager 14 Using ...

Page 5: ...ot drop or apply shock vibration to this device Strong impacts may damage the components inside Do not insert objects other than compatible memory cards into the memory card slots of this Scanner Converter The metal contacts inside the slots can easily become damaged by foreign objects Do not use an unknown power adapter other than the one supplied with this Scanner Converter Connecting this Scann...

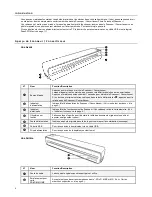
Page 6: ...ss and hold for 1 second to power off the Scanner Converter If an original gets stuck in the feeding slot press to back it out from the Scanner Converter Power Indicator Indicates the power status of the Scanner Converter Refer to Indicator Lights on page 7 Status Card Indicator Indicates the operating status of the Scanner Converter and memory card Refer to Indicator Lights on page 7 Paper Guide ...

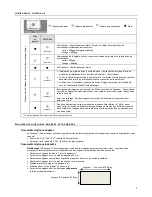
Page 7: ...tact your nearest service center for help color No memory card card full free space below 10MB card error SD card locked or the file system is not supported Remove files from the card to free up space unlock the card if it is locked or try another card Color is based on selected scanning resolution Suitable and Unsuitable Original Types Suitable The Scanner Converter is designed to obtain the best...

Page 8: ... free from finger prints oil dirt and dust for optimum scanned image quality Remove photos from the sheath after scanning to prevent the sheath from sticking to the photos over time If the plastic sheaths are not in use store them in a safe place and keep them protected from accumulating dust Orientation of the Original and Scanned Image Refer to the illustrations below for the relationship betwee...

Page 9: ... in a larger image size and occupy more space on the memory card To change the scanning resolution when the Scanner Converter is powered on press and release the Power button The scanning resolution changes by each press of the button and the color of the Status Card indicator will also change according to the resolution selected Green 300dpi normal mode default setting Orange 600dpi fine mode Sca...

Page 10: ...ner Converter The Scanner Converter will automatically power off if it s left idle for 5 minutes if not connected to a computer Automatic Image Cropping The Scanner Converter has a built in cropping function that detects and crops dark edges of an original during the scan process see following illustration Scanning Resolution Cropping size as measured on the original A B C D 300dpi 600dpi when ori...

Page 11: ...ard into the memory card slot Memory card is required The scanned image files will be stored on an inserted memory card and then you can access the scanned images with Windows Explorer Vista Photo Import Wizard or Mac Finder window 4 Connect the mini end of the USB cable included with Scanner Converter to the Mini USB connector on the Scanner Converter 5 Power on your computer and then connect the...

Page 12: ...n also choose the location where the scanned images will be saved System Requirements Operating system Windows XP Vista 7 or later version 32 Bit 10MB free hard disk space Connect with Windows XP When the PC recognizes the Scanner Converter with an inserted SD Card a pop up PDSCAN window will appear To view photos on the PC while scanning change Windows Explorer s setting as follows 1 Select Open ...

Page 13: ...g on page 11 using the Pandigital SD card included with Scanner Converter 2 When the Windows Explorer window opens navigate to the new Removable Disk icon titled PDSCAN and then open the Pandigital Utilities folder 3 In the right window pane double click the Scan2PC_Setup_Vxxxx exe file to begin the Scan2PC installation 4 Follow the on screen instructions to complete the installation Once installe...

Page 14: ...can2Mac and then select Move to Trash Installing the Scan2Mac Manager 1 Connect the Scanner Converter to your computer see instructions beginning on page 11 using the Pandigital SD card included with Scanner Converter 2 Open a Finder window 3 Select PDSCAN volume Pandigital Utilities Scan2Mac 4 Double click the Scan2Mac_Setup_Vxxxx zip file 5 Double click Scan2Mac to begin the installation 6 Follo...

Page 15: ...ne end of the output slot Make sure that there is no visible dust on the swab before inserting it into the output slot 3 Gently slide the sensor cleaning swab back and forth from one end of the output slot to the other five or six times consecutively CAUTION Do not apply too much force on the swab 4 Remove the sensor cleaning swab from the slot Store it in a safe place and protect it from dust Cal...

Page 16: ...rotect Unlock the card Is the memory card full The indicator blinks when the free space on the memory card is below 10MB Use another card if necessary Make sure the memory cards are in FAT or FAT32 file formats only not NTFS or any other file format Reformat the memory card if necessary to use it with the Scanner Converter Did you insert the next original before the scanning process of the previou...

Page 17: ...r the loss of data regardless of format Pandigital reserves the right to modify and design this product without prior notice written or otherwise To obtain warranty service you must deliver the product freight prepaid in either its original packaging or packaging affording an equal degree of protection plus proof of purchase Repair or replacement as provided under this warranty is the exclusive re...

Page 18: ... may violate your local copyright laws and related regulations Pandigital cannot be made liable for the losses that may result from breaching the laws described above Disposal of this product To help protect the environment dispose of this Scanner Converter properly according to your local regulations regarding the disposal of waste products ...

Page 19: ...Français ...

Page 20: ...rité du Scanneur Convertisseur Windows 10 Connexion avec Macintosh 10 Déconnexion en tout sécurité du Scanneur Convertisseur Macintosh 10 Gestionnaire Scan2PC Manager Windows 11 Système Requis 11 Installation du Gestionnaire Scan2PC Manager 11 Utilisation sur Gestionnaire Scan2PC Manager 11 Convention d appellation de fichiers 11 Désinstallation du Gestionnaire Scan2PC Manager 12 Gestionnaire Scan...

Page 21: ... appareil et ne le soumettez pas à des chocs vibrations Les chocs violents peuvent endommager les composants internes N insérez aucun objet dans les lecteurs de cartes de ce Scanneur Convertisseur excepté les cartes mémoires compatibles Les bornes de contact métallique se trouvant à l intérieur des fentes peuvent être facilement endommagées par des corps étrangers N utilisez pas d adaptateurs sect...

Page 22: ...rant 1 seconde pour éteindre le Scanneur Convertisseur Si un document original se retrouve bloqué dans la fente d alimentation appuyez pour la refaire sortir du Scanneur Convertisseur Indicateur d alimentation Indique l état d alimentation du Scanneur Convertisseur Voir indicateur lumineux à la page 5 Indicateur d état carte Indique l état de fonctionnement du Scanneur Convertisseur et de la carte...

Page 23: ...eur Pas de carte mémoire carte mémoire pleine espace libre inférieur à 10 Mo erreur carte carte verrouillée ou fichier système non supporté Retirez des fichiers de la carte afin de libérer de l espace déverrouillez la carte si elle est verrouillée ou essayez avec une autre carte La couleur dépend de la résolution de numérisation choisie Documents originaux adaptés et inadaptés Documents originaux ...

Page 24: ...enir une qualité de numérisation optimale éviter les traces de doigts d huile de saleté et de poussière sur le document d origine Retirer les photos du film après la numérisation afin d éviter que le film ne se mette avec le temps à coller à la photo Lorsque vous ne vous servez pas des films plastiques rangez les dans un lieu sûr et conservez les à l abri de la poussière Orientation de l original ...

Page 25: ... de ppp est élevé plus les détails présents sur l original seront conservés par le Scanneur Convertisseur et plus la qualité de l image numérisée sera bonne Un nombre de ppp plus élevé induit toutefois également des fichiers d images plus volumineux et occupe d avantage de place sur la carte mémoire Pour modifier la résolution de numérisation lorsque le Scanner Convertisseur est en marche appuyez ...

Page 26: ...a est nécessaire Pour éteindre le Scanneur Convertisseur une fois tous les documents originaux numérisés appuyez sur la touche Mise en marche et maintenez la enfoncée durant une seconde L indicateur lumineux correspondant va clignoter puis s éteindre Vous pouvez maintenant débranchez le Scanneur Convertisseur en toute sécurité et retirer la carte mémoire Le Scanneur Convertisseur va s éteindre aut...

Page 27: ...t USB Supporté Port USB 1 1 ou 2 0 1 Branchez la fiche du câble de l adaptateur secteur sur le branchement de l alimentation du Scanneur Convertisseur 2 Branchez l adaptateur secteur sur une prise électrique Le type de fiche et de prise de courant représentés peuvent différer de ceux disponibles dans votre région 3 Insérez une carte mémoire non verrouillé inscriptible dans l emplacement prévu à ce...

Page 28: ...U Cliquez sur la touche Ejection qui se trouve à côté du nom du ficher dans la fenêtre du Finder 2 Déconnectez le Scanneur Convertisseur de votre ordinateur Connexion avec Windows Vista ou Windows 7 Lorsque le PC reconnaît le Scanneur Convertisseur avec une carte SD insérée une fenêtre Lecture Automatique apparaît Pour visionner les photos sur le PC au cours de la numérisation modifiez les réglage...

Page 29: ...llation du Gestionnaire Scan2PC Manager 1 Connectez le Scanneur Convertisseur à votre PC Voir les instructions à partir de la page 9 en utilisant la carte Pandigital SD card fournie avec Scanneur Convertisseur 2 Lorsque le fenêtre de Windows Explorer s ouvre allez sur la nouvelle icône de Disque Amovible nommée PDSCAN puis ouvrez le répertoire nommé puis ouvrez le répertoire nommé Utilitaire 3 Sur...

Page 30: ...r de la page 9 à l aide de la Carte SD Pandigital fournie avec le Scanneur Convertisseur 2 Ouvrez une fenêtre du Finder 3 Sélectionnez le volume PDSCAN Pandigital Utilities Scan2Mac 4 Double cliquez sur le fichier Scan2Mac_Vxxx zip 5 Double cliquez sur le fichier Scan2Mac pour débuter l installation 6 Suivez les instructions à l écran pour terminer l installation 7 Cliquez sur Redémarrer pour redé...

Page 31: ...ndé de nettoyer le Scanneur Convertisseur boîtier externe et capteur d image dans le Scanneur Convertisseur environ toutes les 50 à 100 numérisations ou si des lignes ou des bandes verticales apparaissent sur l image numérisée N utilisez que les outils recommandés et fournis pour nettoyer le Scanneur Convertisseur AVERTISSEMENT N utilisez aucun solvant ou liquide corrosif ex alcool essence etc pou...

Page 32: ...lisé durant une période prolongée sans qu il ne soit nettoyé ni calibré Suivez les instructions du paragraphe Nettoyer le Scanneur Convertisseur à la page 13 et du paragraphe Calibrer le Scanneur Convertisseur à la page 14 puis essayez à nouveau Problème Le document original est bloqué à mi chemin dans la fente d alimentation Solution Appuyez sur la touche Marche Power Le Scanneur Convertisseur va...

Page 33: ...achat si ce produit s avère défectueux Pandigital réparera ou remplacera le produit à sa convenance et gratuitement Au delà de la période d un 1 an le coût de la main d oeuvre sera facturé au cas par cas PIÈCES DÉTACHÉES Pendant une période d un 1 an à compter de la date d achat si ce produit s avère défectueux Pandigital fournira gratuitement des pièces de rechange neuves ou remises à neuf à son ...

Page 34: ...onceptions photographies icônes boutons images clips audio vidéo téléchargements numériques compilations de données et logiciels appartiennent à Pandigital ou à ses fournisseurs et tout cela est protégé par les États Unis et la législation internationale sur la propriété littéraire et intellectuelle ou par d autres lois et traités sur la propriété intellectuelle Le contenu cité ne pourra pas être ...

Page 35: ...Español ...

Page 36: ...versor Windows 10 Para usuarios de Macintosh 10 Desconexión segura del Escáner Conversor Macintosh 10 Administrador de Scan2PC Windows 10 Requisitos del sistema 10 Instalación del Administrador de Scan2PC 11 Uso del Administrador de Scan2PC 11 Convenciones sobre el nombre de archivos 11 Desinstalación del Administrador de Scan2PC 12 Administrador de Scan2Mac Macintosh 12 Requisitos del sistema 12 ...

Page 37: ...s o movimientos bruscos Los impactos fuertes podrían dañar los componentes internos del dispositivo No inserte objetos en las ranuras para tarjetas de memoria del dispositivo que no sean tarjetas de memoria compatibles con el Escáner Conversor Los contactos metálicos del interior de las ranuras pueden ser dañados fácilmente por objetos extraños No utilice adaptadores de suministro eléctrico descon...

Page 38: ...botón por un Segundo para encender el Escáner Conversor Si un original se atasca en la ranura de alimentación presione el botón para retirarlo del Escáner Conversor Indicador de energía Indica el estado de energía del Escáner Conversor Consulte Luces indicadoras página 5 Indicador de estado tarjeta Indica el estado de funcionamiento del Escáner Conversor y de la tarjeta de memoria Consulte Luces i...

Page 39: ...o para recibir ayuda color Sin tarjeta de memoria tarjeta llena el espacio libre es menor a 10 MB error de tarjeta o tarjeta SD bloqueada o el sistema de archivo no es compatible Elimine estos archivos de la tarjeta para obtener espacio libre desbloquee la tarjeta si está bloqueada o intente con otra tarjeta El color se basa en la resolución de escaneo seleccionada Tipos de originales adecuados y ...

Page 40: ...camientos Evite las huellas digitales el aceite la suciedad y el polvo en los originales para obtener una óptima calidad de escaneo de imagen Retire las fotografías de la funda plástica después del escaneo para evitar que ésta se adhiera a las fotografías con el paso del tiempo Si las fundas plásticas no están en uso consérvelas en un lugar seguro protegidas de la acumulación de polvo Orientación ...

Page 41: ...r calidad Sin embargo un dpi alto producirá una imagen de mayor tamaño y ocupará más espacio en la tarjeta de memoria Para cambiar la resolución del escaneado cuando se enciende el Escáner Conversor presione y libere el botón Encendido La resolución de escaneado cambia cada vez que presiona el botón y el color del indicador del Estado Tarjeta también cambiará de acuerdo a la resolución seleccionad...

Page 42: ...automáticamente si permanece inactivo durante 5 minutos si no está conectado a la PC Recorte automático de imágenes El Escáner Conversor tiene incorporada una función de recorte que detecta y recorta los bordes oscuros de un original durante el proceso de escaneo observe la ilustración que aparece a continuación Resolución de imágenes Tamaño de recorte medida en el original A B C D 300dpi 600dpi c...

Page 43: ...scaneados serán almacenados en la tarjeta de memoria introducida y después se podrá tener acceso a las imágenes escaneadas mediante el Explorador de Windows o el asistente para importar fotografías de Vista o la ventana Mac Finder 4 Conecte el extremo menor del cable USB incluido con el Escáner Conversor al conector Mini USB del Escáner Conversor 5 Encienda la PC y conecte el extremo mayor del cab...

Page 44: ...itorio a la papelera O Haga clic en el botón de eyección cercano al nombre del volumen en la ventana Finders 2 Desconecte el Escáner Conversor de su computadora Administrador de Scan2PC Windows Con el Administrador de Scan2PC puede escanear fotografías con facilidad y guardar las imágenes escaneadas directamente a la PC que esté conectada También puede elegir la ubicación en la que desea guardar l...

Page 45: ...des 3 En el panel derecho de la ventana haga doble clic en el archivo Scan2PC_Setup_Vxxxx exe para comenzar la instalación de Scan2PC 4 Siga las instrucciones que aparecen en pantalla para completar la instalación Una vez instalado el Administrador de Scan2PC se ejecuta automáticamente al iniciarse la PC y el icono permanece en la bandeja del sistema Si desea cerrar el Administrador de Scan2PC por...

Page 46: ...necesario Instalación del Administrador de Scan2Mac 1 Conecte el Escáner Conversor a su computadora consulte las instrucciones al comienzo de la página 9 con la tarjeta SD Pandigital SD incluida con el Escáner Conversor 2 Abra la ventana Finder 3 Seleccione el volumen PDSCAN Pandigital Utilities Scan2Mac 4 Haga doble clic en el archive Scan2Mac_Vxxx zip 5 Haga doble clic en el archive Scan2Mac par...

Page 47: ...ar el polvo del Escáner Conversor 2 Utilice una tela ligeramente humedecido para retirar cualquier mancha en la superficie del Escáner Conversor 3 Limpie el Escáner Conversor con una tela seca limpia y sin pelusas Limpieza del sensor de imagen 1 Primeramente limpie la carcasa externa del Escáner Conversor 2 Con el Escáner Conversor apagado y desconectado del suministro eléctrico introduzca el hiso...

Page 48: ... Solución Pulse el botón Encendido El Escáner Conversor hará que el original retrocede para que pueda quitar el original atascado en la ranura de alimentación Problema El indicador del estado parpadeará rápidamente y no será posible escanear Solución Verifique lo siguiente La tarjeta de memoria se ha introducido correctamente en la ranura para tarjetas de memoria Vuelva a introducir la tarjeta e i...

Page 49: ...llas durante un período de un 1 año a partir de la fecha de compra Después de ese período se cobrará el valor de las piezas de acuerdo con cada caso Las modificaciones no aprobadas por la parte responsable del cumplimiento podría anular la autoridad del usuario para poner el equipo en funcionamiento Esta garantía no cubre 1 el accionar la instalación o la configuración del cliente 2 los daños físi...

Page 50: ...e El uso de este producto constituye la aceptación de los términos y condiciones de la garantía Consulte el teléfono de Atención al cliente en nuestro sitio Web www pandigital net support Descargo de responsabilidad Pandigital no declara ni garantiza ya sea de forma expresa o implícita respecto de los contenidos de esta publicación Pandigital se reserva el derecho de revisar esta publicación y de ...

Reviews: