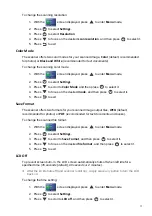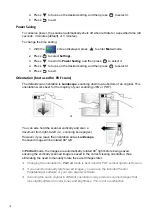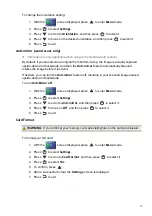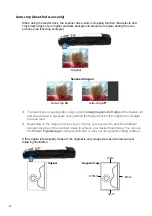
background image

14 


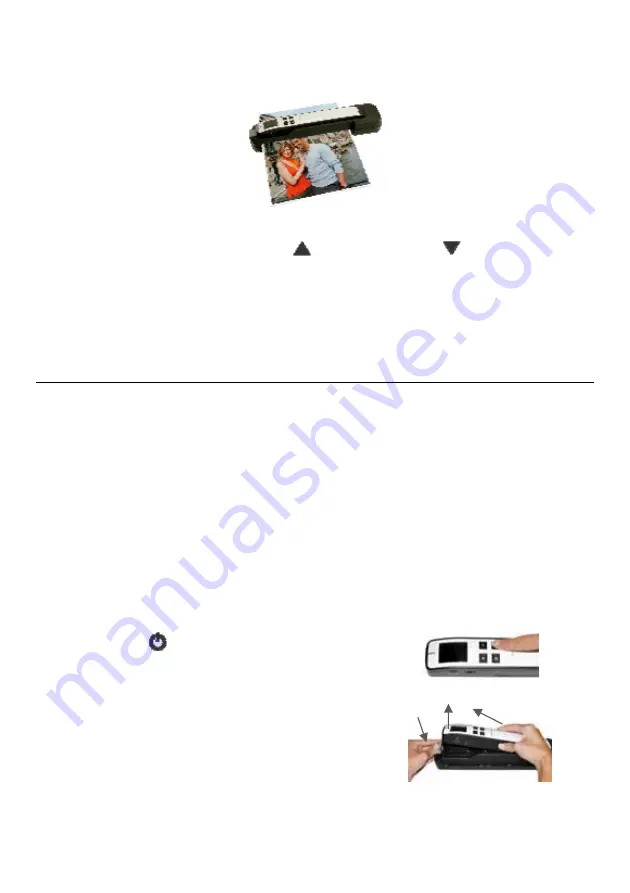
7.  Gently insert the original into the feed slot; release it as soon as it begins to feed. 


After the feed begins, the scanner pauses briefly and then completes the scan. 


By default, the Preview mode is on allowing you to preview the scanned image for 
2 seconds immediately after scanning. Two options appear on the screen with the 
image allowing you to press 


OK

 to save (default) or 

 to 

Delete

 the image 

immediately (delete confirmation displays during deletion). (See page 16 to set the 
Preview mode.) 


PDF scans cannot be previewed; they are always saved immediately when scan is 
completed. 

8.  Wait until the indicator light stops blinking before inserting and scanning the next original. 

Wand


Sc ann ing


( h an d

h e ld )


Using the scanner as a wand scanner without the feeder dock allows you to scan a larger variety 
of documents, especially those that may not fit in the feeder dock 

(i.e., pages of a book)

. It also 

allows you to scan vertically or horizontally across the original, which may help you scan book 
pages easier. 


Our ScanRite

TM

 roller tracking technology makes it easy to keep the scanner steady to capture 

a straight high-quality scan. 


For best scanning results, always place your original on a clean flat surface. 


The battery is required to operate the scanner without the feeder dock.   


If you want to scan a document vertically by sliding the scanner right-to-left (i.e., scanning book 

pages), you can change the Orientation


setting to Portrait 

so your saved images will be in the 

correct orientation rather than rotated 90

o

 left 

(see the “Orientation” section on page 18.) 


Scanning the same original in different orientations may produce scanned images that look 

slightly different in color tones and brightness. This is not a malfunction. 

1. Press 

  to turn scanner OFF. 


2.  Remove the scanner from the feeder dock: 

a) Press the latch. 
b) Lift the end of the scanner up to clear 
  the latch.  
c) Pull the scanner out of the feeder dock to 
    disengage from the connector. 


a

b

c

Summary of Contents for PANSCN10

Page 1: ...PORTABLE WAND SCANNER WITH FEEDER DOCK User Guide PANSCN10 ...

Page 2: ...2 UG E_PANSCN10_v1 0_03 12 ...

Page 3: ...Sheet fed Scanning with Feeder Dock 13 Wand Scanning hand held 14 Preview Scanned Images on LCD Screen 15 Set Preview Mode 15 View Scanned JPG Images 16 Delete JPG Images 16 Menu Settings 16 Resolution 16 Color Mode 17 Save Format 17 LCD Off 17 Power Saving 18 Orientation best used for PDF scans 18 Anti mirror wand scans only 19 Card Format 19 Auto crop sheet fed scans only 20 Language 21 Date Tim...

Page 4: ...Restore Files 31 Printing from a PC 31 Uninstall PageManager 31 MAC Operating Instructions 31 Launch the Software 31 View your Scanned Images 32 Edit and Annotate Image 33 PDF Annotation Toolbar 33 Use the Optical Character Recognition OCR Function 33 Convert images to text OCR 33 Set Preferences 33 Back up Restore Files 33 Restore Files 34 Printing from a MAC 34 Uninstall PageManager 34 Clean the...

Page 5: ...device to malfunction Do not attempt to disassemble or modify this device There are no user serviceable parts inside this scanner and unauthorized modifications void your warranty Do not drop or apply shock vibration to this device Strong impacts may damage the components inside Do not insert objects other than compatible memory cards into the memory card slots of this scanner The metal contacts i...

Page 6: ...oSD TM Card with Adapter Cleaning Cloth Presto PageManager Software Quick Start Guide User Guide microSD Card Folder Structure PD_SCAN DCIM 100PHOTO for storing scanned photo jpg files 200DOC for storing scanned document pdf files Pandigital Documentation QSG Scanner Quick Start Guide UG Scanner User Guide Software PM for Macs Presto PageManager PageManager program folders PM for Windows Presto Pa...

Page 7: ... 5x7 original 5 0MP 8x10 A4 original 8 MP 300dpi color BW 900dpi color BW 300dpi color BW 900dpi color BW 300dpi color BW 900dpi color BW JPEG 5 500 1 100 3 500 900 1 100 300 PDF 5 500 1 100 3 500 900 1 100 300 Battery Performance The scanner includes a Lithium Ion rechargeable NP 45 Batterypack The battery is only needed for hand held wand scanning If the Low Battery message appears your scanned ...

Page 8: ...USB port Connect scanner to your computer via USB cable included to copy scanned images from the SD card to your computer microSD card slot Insert microSD TM card for storing your scanned images Down arrow Enters Display mode from Scan Ready screen Used to navigate forward through images and menu options Back arrow Returns to previous screens or exits from Display mode or Settings menu Scanner bot...

Page 9: ...ways align original printed side up straight against left edge of the feed dock and firmly contact the sheet fed roller for better auto crop imaging Photo edge guides Shows edge positions for feeding standard 3 5 x5 or 4 x6 photos in portrait orientation Photo edge guide Shows edge position for feeding 4 x6 photos in landscape orientation A4 document guide Shows edge position for feeding A4 size d...

Page 10: ...nd scan mode or low battery replace battery Green flashes when scanner is inserted into the feeder dock 2 green flashes indicate the switch from battery power to feeder dock power Getting Started 1 Remove the scanner from the feeder dock a Press the latch b Lift the end of the scanner up to clear the latch c Pull the scanner out of the feeder dock to disengage from the connector 2 Remove the foam ...

Page 11: ...riginal straight against left edge of the feeder slot align the Guide Slide against the right edge of the original and ensure there is adequate space behind the feeder dock for the original to complete the scan feed Scanning the same original in different orientations may produce scanned images that look slightly different in color tones and brightness This is not a malfunction If the SD card is f...

Page 12: ...rop your image with a graphic editing program This added step allows you to restore the saved image to its original size Access your Scanned Images on SD Card Using Presto Page Manager You can use the included Presto PageManager software to view edit and print your scanned images see Presto PageManager on page 25 Using Windows Explorer or Mac Finder If desired you can use Windows Explorer or Mac F...

Page 13: ...ss This is not a malfunction CAUTION Insert only one original at a time and insert the next original only when the previous one is done otherwise the feeder dock may malfunction CAUTION Do not scan glossy photos in humid environments humidity higher than 70 RH the surface of the photo becomes sticky and may cause the feeder dock to jam 1 Insert a SD card 2 Insert the scanner into the feeder dock a...

Page 14: ...ages of a book It also allows you to scan vertically or horizontally across the original which may help you scan book pages easier Our ScanRite TM roller tracking technology makes it easy to keep the scanner steady to capture a straight high quality scan For best scanning results always place your original on a clean flat surface The battery is required to operate the scanner without the feeder do...

Page 15: ...view mode PDF scans cannot be previewed they are always saved immediately when scan is completed 8 Wait until the indicator light stops blinking before scanning another original Preview Scanned Images on LCD Screen You can quickly and easily preview your JPG scanned images on the LCD screen immediately after a scan or at any other time you can view all images individually or as a slideshow PDF sca...

Page 16: ...een You can press to display previous or next images and then the slideshow resumes after 4 seconds To pause the slideshow press to restart slideshow press again Delete JPG Images 1 With the screen displayed press to enter Display mode 2 Press to display previous or next images 3 With an image displayed that you want to delete press 4 To delete the image press and then press to confirm deletion 5 ...

Page 17: ...o exit Save Format The scanner offers two formats for your scanned image output files JPEG default recommended for photos or PDF recommended for text documents and books To change the scanned file format 1 With the screen displayed press to enter Menu mode 2 Press to select Settings 3 Press to scroll to Save Format and then press to select it 4 Press to focus on the desired file format and then pr...

Page 18: ...ty of your scanning JPG or PDF or You can also hold the scanner vertically and scan a document from right to left i e scanning book pages However if you leave the orientation set as Landscape the saved image will be rotated 90 o left In Portrait mode the images are automatically rotated 90 o right before being saved ensuring the vertically scanned image is saved in the correct viewing orientation ...

Page 19: ...mage before it is saved If desired you can turn the Anti mirror feature off resulting in your scanned images saved upside down and backwards To turn Anti Mirror off 1 With the screen displayed press to enter Menu mode 2 Press to select Settings 3 Press to scroll to Anti mirror and then press to select it 4 Press to focus on Off and then press to select it 5 Press to exit Card Format WARNING If you...

Page 20: ...t against left edge of the feeder slot and ensure there is adequate space behind the feeder dock for the originals to complete the scan feed Depending on the shape and size of your original you may want to perform additional manual cropping on the scanned image to achieve your desired final image You can use the Presto PageManager software included or use your own graphic editing software If the o...

Page 21: ... and then press to select it 4 Press to focus on the desired language and then press to select it 5 Press to exit Date Time The scanner does not have an internal clock to keep real time so the date time attributes of your scanned images are a fixed value assigned during the production of the device If you want your scanned images to have the current date or any other date i e the same date the pho...

Page 22: ...it 4 Press to select Yes 5 To confirm press 6 After a successful reset the scanner automatically shuts off Press to turn the scanner back on About The About option lists the current Firmware and Calibration versions You may need this information if you contact our Customer Support 1 With the screen displayed press to enter Menu mode 2 Press to select Settings 3 Press to scroll to About and then pr...

Page 23: ...by using your own graphic editing software You can also use the Presto PageManager software to build a book or multiple page PDF files See Presto PageManager on page 25 Computer System Requirements Operating system Windows XP Vista 7 or later version 32 Bit Macintosh Mac OS 10 5 10 6 or later version USB Port USB 2 0 port 1 Turn the scanner on and insert the memory card containing your scanned ima...

Page 24: ...lected action checkbox and then click OK After Successful Windows Connection When the scanner connects with the computer an additional drive is listed in the Windows Explorer window The drive is titled Removable Disk drive letter or the personalized title you may have previously assigned to your memory card You can find the scanned images in the DCIM 100PHOTO and DCIM 200DOC folders Safely Disconn...

Page 25: ...le sharing problems by creating a self executable file that can be put on a floppy disk attached to e mail or downloaded from the Internet Presto PageManager software is a NewSoft product Please read the NewSoft End User License Agreement before installing the software pg 42 Features Supports file formats Windows Images BMP PCX PCD GIF TIFF JPEG PICT TGA PSD Wrapper Viewer Documents TXT DOC DOCX D...

Page 26: ...uirements Windows PC Personal computer must meet the minimum requirements to run the OS For details please refer to the relevant Microsoft website Microsoft Windows XP SP3 32bit 64bit Vista SP2 32bit 64 bit Windows 7 SP1 32bit 64 bit 350MB free hard disk space for installation 512MB RAM Microsoft Internet Explorer 5 0 or higher Recommended 1024x768 SVGA or higher display card 1GB RAM Windows compa...

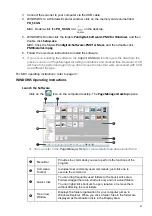
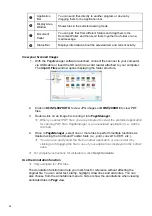
Page 27: ...were processed with OCR as a different file type For MAC operating instructions refer to page 31 WINDOWS Operating Instructions Launch the Software Click on the icon on the computer desktop The PageManager Desktop opens You can refer to the PageManager Help for more details than documented here Menu Bar Provides the commands you use to perform the functions of the program Command Toolbar Includes ...

Page 28: ... 3 Double click on an image file to bring it into PageManager When you select PDF files you are prompted to select the preferred application for opening PDF files PageManager or an associated application i e Adobe Acrobat 4 Once in PageManager select one or more files to perform multiple functions as desired using the Command Toolbar tools i e print convert to OCR etc You can also easily send the ...

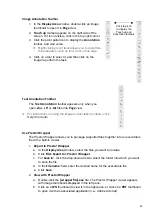
Page 29: ...tation toolbars click Help Contents Use Presto Wrapper The Presto Wrapper allows you to package supported files together into an executable file with a built in viewer 1 Export to Presto Wrapper a In the Display Area window select the files you want to include b Click File Export to Presto Wrapper c For Save in click the drop down arrow to select the folder into which you want to save the file d I...

Page 30: ...d and text in the image is now recognized as editable text 4 Click on any letter you want to edit 5 To insert a character before the selected one click To insert a character after the select one click To delete a character select it and then click 6 When proofing is finished save the OCR result by clicking one of the save buttons Save as PDF button to save in the PDF format Save as XPS button to s...

Page 31: ...ther useful information in the Memo field 8 Click OK Restore Files 1 To restore backed up files click File Restore 2 Tap Browse to find the desired Restore target folder path 3 Tap Open to find the backup folder that you want to restore When the folder is selected the Label and Memo are automatically entered 4 Tap OK Printing from a PC When ready to print click File Print Fax and then select the d...

Page 32: ...ng mode Open the Shortcut menu and click Properties to see the file information Document Pallet You can pick files from different folders and drag them to the Document Pallet and then convert them to PDF and sent them together to a folder or e mail message Status Bar Shows the total number of files in the display area and disk space information Drag the slider to adjust the magnification of the wo...

Page 33: ...are stored on your microSD card Convert images to text OCR 1 In the Tree View window select a document thumbnail 2 Click the OCR icon on the Command toolbar 3 The document is evaluated and text in the image is now recognized as editable text 4 Click the text and edit as desired 5 When proofing is finished save the OCR result by clicking the Save as button 6 Select the desired format and location f...

Page 34: ...o the Trash Software CD If a software CD is included with your scanner varies by promotional offers it contains several additional software programs that you can use if desired Refer to the individual program Help files for usage instructions Installation 1 Insert the CD into your computer CD drive 2 Open the Autorun 3 Click the icon for the program you want to install 4 Follow the onscreen instru...

Page 35: ...anned images use a clean cloth to gently wipe the CIS cover Complete the following steps to calibrate your scanner 1 Make sure the battery is fully charged and a memory card is inserted 2 Remove the calibration sheet from its plastic cover and lay it on a flat surface printed side up 3 Remove the scanner from the feeder dock The calibration can only be performed using the scanner as a wand scanner...

Page 36: ...anner over the original slower and if necessary rescan the original Paper jam Original has become stuck in the feeder dock Remove the scanner from the feeder dock and then gently pull the original out of the feed slot Frequently Asked Questions Scanner Q Why doesn t my scanner turn on A Possible causes The scanner may not be engaged with the feeder dock correctly The battery may not have enough po...

Page 37: ...stuck in the feed slot A Remove the scanner from the feeder dock and then gently pull the original out of the feed slot Q What do I do if the status indicator blinks rapidly and no scan is possible A Check the following Is the memory card inserted properly into the memory card slot Re insert the card and try again Is the memory card full The indicator blinks when the free space on the memory card ...

Page 38: ... to sort by Name Type Size Date Author or Keyword 1 Click View and then select Sort 2 Select the preferred sort type Q How can I improve unsatisfactory results after converting a document A Unsatisfactory results may be caused by the following Low scanning resolution Scan the document at a minimum of 300 dpi and black white line art The original document was not clear or it was a faxed page Multip...

Page 39: ... compressed as PMF files Follow the instructions in the Back up Files section on page 31 Q Why is my printer dialog box gray and does not allow me to change settings A Windows only Before you attempt to print a document you must do a one time printer setup Follow these steps 1 Click File Fax Print Setup your output printer 2 In the Tree View window click and drag the file that you want to print to...

Page 40: ...iod of time store the scanner for future use 1 Disconnect the feeder dock from the power supply 2 Remove the battery from the scanner 3 Place the scanner feeder dock and power adapter in a box or bag to keep them from accumulating dust 4 Place them in a cool and dry place inaccessible to small children 5 To avoid warping the top housing do not place heavy objects on top of the scanner 6 After long...

Page 41: ...d or implied warranty on this product Except to the extent prohibited by applicable law any implied warranty of merchantability or fitness for a particular purpose on this product is limited in duration to the duration of this warranty Some states do not allow the exclusion or limitation of incidental or consequential damages or allow limitation on how long an implied warranty lasts so the above l...

Page 42: ...to which the receiver is connected Consult the dealer or an experienced radio TV technician for help NewSoft s End User License Agreement IMPORTANT PLEASE READ CAREFULLY BEFORE INSTALLING This NewSoft End User License Agreement EULA is a legal agreement between you End User and NewSoft Technology Corporation NewSoft for the accompanying computer software Software which may include software from th...

Page 43: ...he Software including all component parts the media and printed materials any upgrades this EULA and if applicable the Certificate of Authenticity and c the recipient agrees to abide by all of the terms of this EULA If the Software is an upgrade any transfer must include all prior versions of the Software and all of rights therein if any Upgrades If the Software is labeled as an upgrade the End Us...

Page 44: ... agents or employees shall create a warranty or in any way increase the scope of this warranty and the End User may not rely on any such information or advice Limitation of Liability NewSoft s and its suppliers entire liability and the End User s exclusive remedy shall be at NewSoft s option either replacement of any media that does not meet the above limited warranty and that is returned to NewSo...

Reviews: