background image

Summary of Contents for UG-SCF-1

Page 1: ...Digital Photo Frame User s Guide UG SCF 1 ...

Page 2: ...deo 9 Listen to Music 10 Control the Volume 10 Connect Speakers to the Digital Photo Frame 10 Copy Photos from a Memory card to Built in Memory 11 Copy A Single Photo 11 Copy Multiple Photos 11 Deleting Photos from the Built in Memory 12 Delete the Displayed Photo 12 Delete a Single Photo on the Thumbnails Screen 12 Delete Several or All Photos in the Built in Memory 12 Setting Viewing Options 13 ...

Page 3: ...ems placed on or against it Pay particular attention to the point where the cord attaches to the Digital Photo Frame 6 Only use the AC adapter included with the Digital Photo Frame Using any other power adapter will void your warranty 7 Unplug the power cord from the outlet when the unit is not in use Cleaning the LCD Screen Treat the screen gently The screen is made of glass and can be scratched ...

Page 4: ...he frame and an infrared remote control 5 Bright TFT active matrix LCD screen 6 USB 2 0 Mini USB high speed connection to connect to your PC 7 USB 1 1 Host to connect to your digital camera 8 Built in Memory to store digital pictures To learn more about your Digital Photo Frame s features and take full advantage of them please take a few minutes to read this User s Guide What s In the Box 1 Digita...

Page 5: ...ls Screen 3 With the Thumbnails Screen displayed use the direction arrows to choose a photo Press ENTER on the top of the Digital Photo Frame or the ENTER button on the remote control The selected photo is displayed on the Digital Photo Frame Note Pull the plastic tab sticking out of the remote control It protects the battery and the remote control will not work unless it is removed 4 To restart t...

Page 6: ...me may look slightly different from the one shown here but it includes all of the same buttons and functions in the same way Up Arrow f Exit t Left Arrow t t Enter I Play I Pause t Volume 1 11 Zoom t t t 11 Setup t 11 Right Arrow t t Down Arrow I Volume 1 Slide Show 11 Rotate aNi lIGnraL OlgllOI Pholo Fforr Install and Replace the Remote Control Battery 1 Hold the Remote Control with the control b...

Page 7: ... Select Card Screen 2 Press the LEFT or RIGHT arrow to select the desired memory card or the built in memory A yellow highlight indicates the selected memory source 3 Press ENTER to make the selection The Select Mode Screen opens Note Card can be selected only when it is inserted into card slot properly and detected by the Digital Photo Frame Select Mode Screen The Mode Selection Screen opens afte...

Page 8: ...ed at the top of the screen The other number indicates how many screens of photos are in the memory and which one is currently displayed Display a Single Photo on the Full Screen You can choose a single photo to display on the full screen without a Slideshow 1 With the Thumbnails screen displayed select a photo and press ENTER to display it on the full screen 2 Press the LEFT arrow button to retur...

Page 9: ...e Remote Control or on the frame to open a setup menu 4 Choose Start Slideshow and press ENTER 5 Choose Selected from the menu to start your custom slideshow Play Music with the Slideshow To play background music with a slideshow copy MP3 files onto the same memory card as your photos The music will playas the slideshow runs See Copying Files from a Computer for details on copying files You can al...

Page 10: ...e the LEFT or RIGHT arrow to choose a file to play 3 Press the ENTER button to play the file 4 To stop the music and return to the Music screen press the EXIT button Control the Volume Use the Remote Control to adjust the volume on the Digital Photo Frame or when playing MP3 files Press and buttons to adjust the volume up and down Connect Speakers to the Digital Photo Frame The Digital Photo Frame...

Page 11: ...press ENTER to copy the selected photo 9 Press EXIT to return to the Thumbnails screen Copy Multiple Photos Use the Remote control to copy more than one photo from a memory card to the built in memory 1 Press the EXIT button until the Select Card screen opens 2 Use the Arrow buttons to highlight the desired memory card 3 Press the ENTER button to select the card The Mode Selection screen opens 4 S...

Page 12: ...al or All Photos in the Built in Memory You can use the Remote Control when the Thumbnails screen is displayed to delete several photos or all photos from the internal memory 1 With the Thumbnail screen displayed press the Arrow buttons on the Remote Control or the Digital Photo Frame until the desired photo is highlighted The photo s filename is displayed at the top of the screen The notations at...

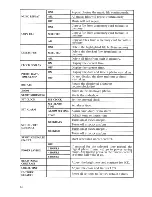
Page 13: ...lect the setting The second menu closes 5 You can make as many changes as you wish in the same manner When you are finished press the EXIT button to close the Setup Menu and return to the previous screen The following table lists the Setup Menu and submenu options and describes their actions Menu Option Second menu Description options OFF FADE STUTTER CROSS COMB MASK SUDESHOW BRICK Shecial effects...

Page 14: ...Off was taken ROTATE Rotate the displayed photo 90 counterclockwise ZOOM Zoom in the displayed photo START SLIDESHOW Starts the slideshow SET CLOCK SET CLOCK Set the internal clock SET ALARM Set alarm time TIME SET ALARM ALARM SETTING Alarm once daily or no alarm TONE Default tone or music tone WEEKDAYS Turns on at xx xx am pm SET ON OFF Turns off at xx xx am pm SCHEDULE Turns on at xx xx am pm WE...

Page 15: ...e slideshow window Set the Internal Clock When the Digital Photo Frame s internal clock is set you can use it as an alarm clock 1 To set the internal clock go to CLOCK mode press SETUP to open the Setup Menu 2 Choose Set Clock 3 Use the RIGHT or LEFT arrow to move to a time or date field to be changed 4 Use the UP and DOWN arrows to change the value in the selected field 5 When the date and time a...

Page 16: ...r DOWN arrow to set the hour you want scheduled slideshows to start then use the RIGHT arrow to move to the minutes field set the minutes in the same manner as the hours and then move the highlight to the AM PM field 4 Use the UP or DOWN arrow button to choose AM or PM 5 Set the time you want the slideshow to end in the same manner 6 Press the ENTER button when Always OFF is highlighted if you don...

Page 17: ...o Frame 2 Connect the small end of the USB cable to the Mini USB port on the Digital Photo Frame 3 Connect the Larger end of the USB cable to a USB port on your computer 4 Open My Computer on your Desktop A window showing all drives connected to your computer opens It will look similar to the screen shown below My Compulef ile Edil iew F vor e 1001 Help B Search Folders m S stem Tasks J View syste...

Page 18: ...ion on your computer 8 To copy photos from your computer to the built in memory first locate the files on your computer second select the files you wish to copy choose File Copy and then move your cursor back to the disk drive in the open window for the built in memory Note Most cameras and graphic programs store photos in the Windows My Pictures folder If you didn t move them somewhere else they ...

Page 19: ...disconnect the USB cable from your computer Connect to a Macintosh You can also copy files from your Macintosh Computer to your Digital Photo Frame 1 Use the included USB cable to connect your Digital Photo Frame to your Macintosh 2 Macintosh will recognize the Digital Photo Frame as an external storage device 3 Drag and drop files between the two devices as you normally move photo files 4 To safe...

Page 20: ... Variable Speed For Show Variable Speed For Slide Show Multiple Position Slide Show Multiple Position Adjustable Stand For Optimal Adjustable Stand For Optimal Viewing Angle Viewing Angle USB PORTS USB 1 1 HOST and USB 2 0 USB 1 1 HOST and USB 2 0 POWER INPUT 100V 240V AC 50 60 HZ 100V 240V AC 50 60 HZ OUTPUT 5VDC 2A 5VDC 2A CERTIFICATION FCC PSE Adapter FCC PSE Adapter INTERNAL 128MB 128MB MEMORY...

Page 21: ... couple of seconds you should see your first photo Press EXIT to open the Card Selection screen and select the card Then select Photos You should see the Thumbnails screen listing all photos on the card If you don t you may want to try another card Note Some digital cameras save images in other formats Please refer to your camera s manual if your photos are not JPEG files Q Why is the picture disp...

Page 22: ...t its option at no charge After this ninety 90 day period parts will be charged for on a case by case basis This warranty does not cover 1 customer instruction installation or setup 2 cosmetic damage or damage due to accident misuse abuse or negligence 3 commercial use of the product 4 modification of any part of the product 5 damage due to improper operation improper maintenance or connection to ...

Page 23: ... have other rights which vary from state to state FCC Statement FCC Part 15 Information This equipment has been tested and found to comply with the limits for a Class B digital device pursuant to Part 15 of the Federal Communication Commission FCC Rules These limits are designed to provide reasonable protection against harmful interference in a residential installation This equipment generates use...

Page 24: ...Part No OM6064US003 Made in China ...

Page 25: ...is present VIEW IMAGES FROM CAMERA MEMORY CARD Make sure the unit is turned off Insert a camera memory card into one of the open slots Turn on the power switch OR The frame will default to the images stored on the inserted memory card Insert a camera memory card into one of the open slots oepress EXIT on the remote until you reach the SELECT CARD screen Highlight the card you inserted with the ima...

Page 26: ... may not recognize the external device on the first try If after a few minutes the external drive s are not seen unplug the USB cable turn the frame off and then on and repeat the process Connect the larger end of the USB cable to an available USB port on your computer Connect the small end of the of the USB cable to the USB port on the side panel of the Digital Photo Frame Repeat until you have c...

Page 27: ... aNOIGI raL P O Box 2969 Dublin CA 94568 2969 Place First Class Stamp Here ...

Page 28: ...ct Registration First Name Last Name Address 1 Address 2 City _ State Zip Code _ Tel Email Model Number Serial Number Date Purchased Purchased At D I would like to receive email information from Pandigital in the future ...

Reviews: