background image

Installation Guide

AT-VTP-800

2

The AT-VTP-800 has two mounting options. In-wall or an optional stand (available through atlona.

com).

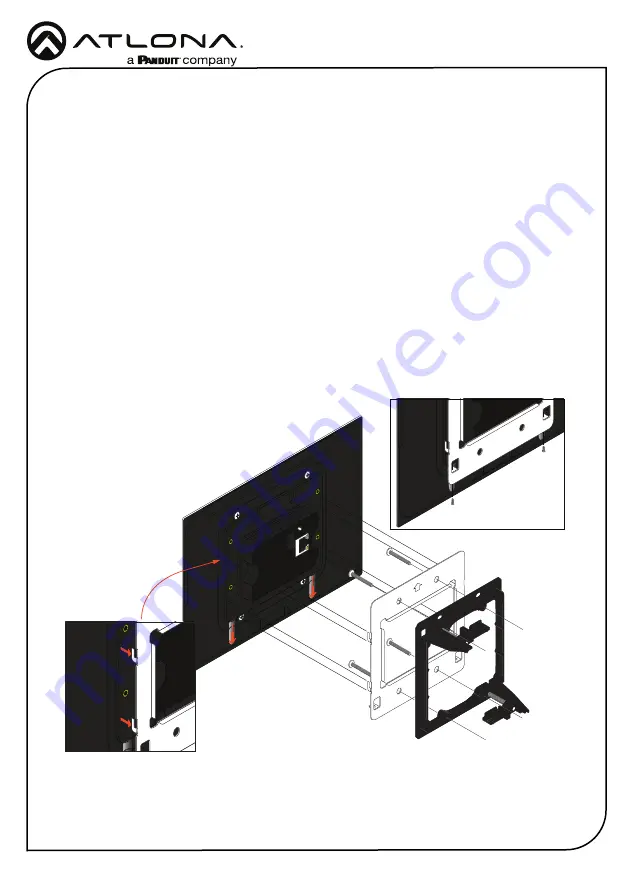
Mounting Instructions

In-wall

Use the included wall mount template to create a hole in the wall the correct 2-Gang size for 

the unit.

Install the back box (not included) or mud ring (included) into the wall.

Screw the included metal mounting plate into the mud ring using the 4 included screws.

Remove the two screws from the bottom of the touch panel.

Run the Ethernet cable through the mud ring and metal mounting plate.

Connect the Ethernet and/or power cable into the back of the touch panel.

Line up the touch panel with the mounting plate and thread the metal hooks into the four 

holes on the back of the panel.

Gently press the touch panel down to ensure it is fully seated on the mounting plate.

Replace the two bottom screws to secure the touch panel to the metal mounting plate.

Summary of Contents for ATLONA AT-VTP-800

Page 1: ...VTP 800 is fully functional The Atlona AT VTP 800 BL and AT VTP 800 WH are 8 touch panels in black and white respectively for the Atlona Velocity Control System They feature contemporary refined styli...

Page 2: ...mounting plate into the mud ring using the 4 included screws 4 Remove the two screws from the bottom of the touch panel 5 Run the Ethernet cable through the mud ring and metal mounting plate 6 Connec...

Page 3: ...the stand 3 Plug the Ethernet cable into the back of the touch panel 4 Place the touch panel on the stand pushing the excess cable back through the stand at the same time as resting the back panel of...

Page 4: ...llation guides for VGW HW VGW SW and Velocity Manual for instructions Initial Setup CONTINUE You will be guided through the setup process in the next few screens Velocity Device Setup Wired Address De...

Page 5: ...panel from the drop down 11 Select the Edit button on the tile to open the unit settings 12 Select the ADD button A tile for the unit will appear in the room 13 Enter the IP of the VTP into the IP Ad...

Page 6: ...lect the any icon to open the room s control page 15 Select sources and displays by tapping on them or dragging and dropping the source on the display Scheduling The panel can be set to scheduling to...

Page 7: ...t Mask Default Gateway DNS Server 75 75 75 75 10 0 0 1 255 255 255 0 10 0 0 123 URL Gateway Settings Device Settings Touch Screen LAN Configuration 0 0 0 0 Alternate URL 0 0 0 0 Alias Velocity Touch P...

Page 8: ...t Velocity Device IP Address 10 X X XXX Version Info Current Version X X X CHECK FOR UPDATES BACK About Velocity Device IP Address 10 X X XXX Version Info Current Version X X X CHECK FOR UPDATES BACK...

Page 9: ...eway 4 Click on the field to browse the local computer for the firmware file or drag and drop the firmware into the VTP Image Update field Firmware upgrading will start automatically When the firmware...

Page 10: ...the following link or QR code https atlona com warranty 2023 Atlona Inc All rights reserved Atlona and the Atlona logo are registered trademarks of Atlona Inc All other brand names and trademarks or r...

Reviews: