background image

4


ES2P P

DU INSTALLATION MANUAL


Large number of products will be connected to a single PDU, it may be 
necessary to conduct an evaluation of the installation to verify the total 
amount of leakage current. The total combined leakage current should not 
exceed 5 percent of the input current for the PDU and associated load. 

Connect only to a circuit providing branch circuit overcurrent protection of 

appropriate current rating. 

Connect the input power cord to a grounded (earthed) electrical outlet that is 

located near the equipment and is easily accessible. 

Be sure all circuit breakers are in the off position before connecting input power. 
Be sure that the devices connected to the Panduit PDU are adjusted for, or 

otherwise capable of, operation from the same line voltage supplying the 
PDU. Failure to verify the voltage can lead to severe equipment damage. 

Do not overload the PDU. The total input current rating of all equipment 
connected to each output cannot exceed the total output rating marked on the 

PDU. 

Use only the hardware provided to install the PDU. 
To reduce the risk of fire or electric shock, install this PDU in a temperature and 

humidity controlled, indoor environment, free of conductive contaminants. 
Do not operate near water or excessive humidity (90% maximum 
noncondensing). 

Ambient temperature must not exceed 0°C to 60°C (32°F to 140°F). 
The internal components can become extremely hot during operation. Allow 

sufficient time for the PDU to cool before handling. 

Do not use a two-wire power cord in any product  configuration. 
TO ISOLATE THIS EQUIPMENT, DISCONNECT THE POWER CORD. 

DANGER:  

This PDU contains 

LETHAL VOLTAGES

NO 

repairs should 

be performed on these units except for the replacement of the 
management card. There are 

NO USER SERVICEABLE PARTS 

inside  

the PDU. The installation of options, routine maintenance, and service of 
this product must be performed by individuals who are knowledgeable 
about the procedures, precautions, and hazards associated with AC power 
products. 

IT IS ESSENTIAL THAT THIS EQUIPMENT IS CONNECTED TO AN 
ELECTRICAL SUPPLY. 

For permanently connected PDUs, the installation must be performed by a licensed 
electrician, must be connected to an AC power source that is current limited by a properly 
rated circuit breaker or fuse meeting national and local electrical codes, and must be 
connected to a protective earth ground. 

Summary of Contents for ES2P

Page 1: ...ES2P Intelligent PDU Installation Manual V1 1...

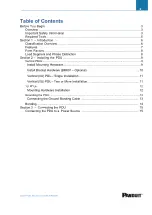
Page 2: ...nt and Phase Distinction 8 Section 2 Installing the PDU 9 Vertical PDUs 9 Install Mounting Hardware 9 Install Bracket Hardware BRK01 Optional 10 Vertical 0U PDU Single Installation 11 Vertical 0U PDU...

Page 3: ...ipment ITE loads with linear Power Factor Corrected PFC input current If non linear loads are connected the nameplate current rating of the PDU must be reduced by a factor of 0 8 WARNING A risk of per...

Page 4: ...f fire or electric shock install this PDU in a temperature and humidity controlled indoor environment free of conductive contaminants Do not operate near water or excessive humidity 90 maximum noncond...

Page 5: ...5 ES2P PDU INSTALLATION MANUAL Required Tools The following tools maybe required for installation Phillips screwdriver Torx screwdriver...

Page 6: ...the local display Panduit PDUs are designed for use with all Panduit cabinets and are compatible with most third party data center racks The PDU models vary in form factor with several mounting confi...

Page 7: ...r front of rack Higher operating temperature all Essential series PDUs rated for 60 C operating temperature Color coded outlets to circuit breakers used to easily differentiate load segments andphases...

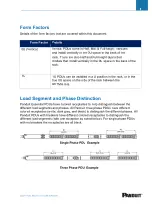
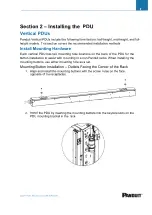
Page 8: ...n the rack or in the true 0U space on the side of the rack between the RETMA rails Load Segment and Phase Distinction Panduit Essential PDUs have colored receptacles to help distinguish between the di...

Page 9: ...two mounting hole locations on the back of the PDU for the button installation to assist with mounting in a non Panduit racks When installing the mounting buttons use either mounting hole as a set Mo...

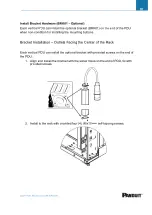
Page 10: ...dition for installing the mounting buttons Bracket Installation Outlets Facing the Center of the Rack Each vertical PDU can install the optional bracket with provided screws on the end of the PDU 1 Al...

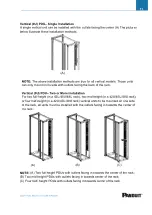
Page 11: ...the rack Vertical 0U PDU Two or More Installation For two full height in a 42U 45U 48U rack two mid height in a 42U 45U 48U rack or four half height in a 42U 45U 48U rack vertical units to be mounted...

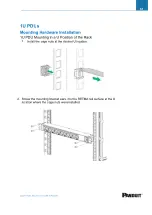
Page 12: ...Mounting Hardware Installation 1U PDU Mounting in a U Position of the Rack 1 Install the cage nuts at the desired U location 2 Screw the mounting bracket ears into the RETMA rail surface at the U loca...

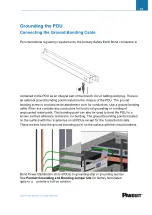
Page 13: ...ground bonding cable if the rack contains any conductors for functional grounding or bonding of ungrounded metal parts This bonding point can also be used to bond the PDU to a known earthed reference...

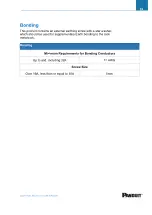
Page 14: ...ins an external earthing screw with a star washer which should be used for supplementary Earth bonding to the rack metalwork Bonding Minimum Requirements for Bonding Conductors Up to and including 32A...

Page 15: ...h in the PDU power cord to reach the PDU power source 1 Turn the feed circuit breaker Off 2 Make sure that all circuit breakers on the PDU are set to On 3 Connect each PDU to an appropriately rated br...

Reviews: