


For Technical Support: www.panduit.com/resources/install_maintain.asp
INSTALLATION INSTRUCTIONS PN256D
Page 6 of 8
4.1
5µm
4.3
DRY
5µm
4.5
WET
1µm Diamond
A B
C
D
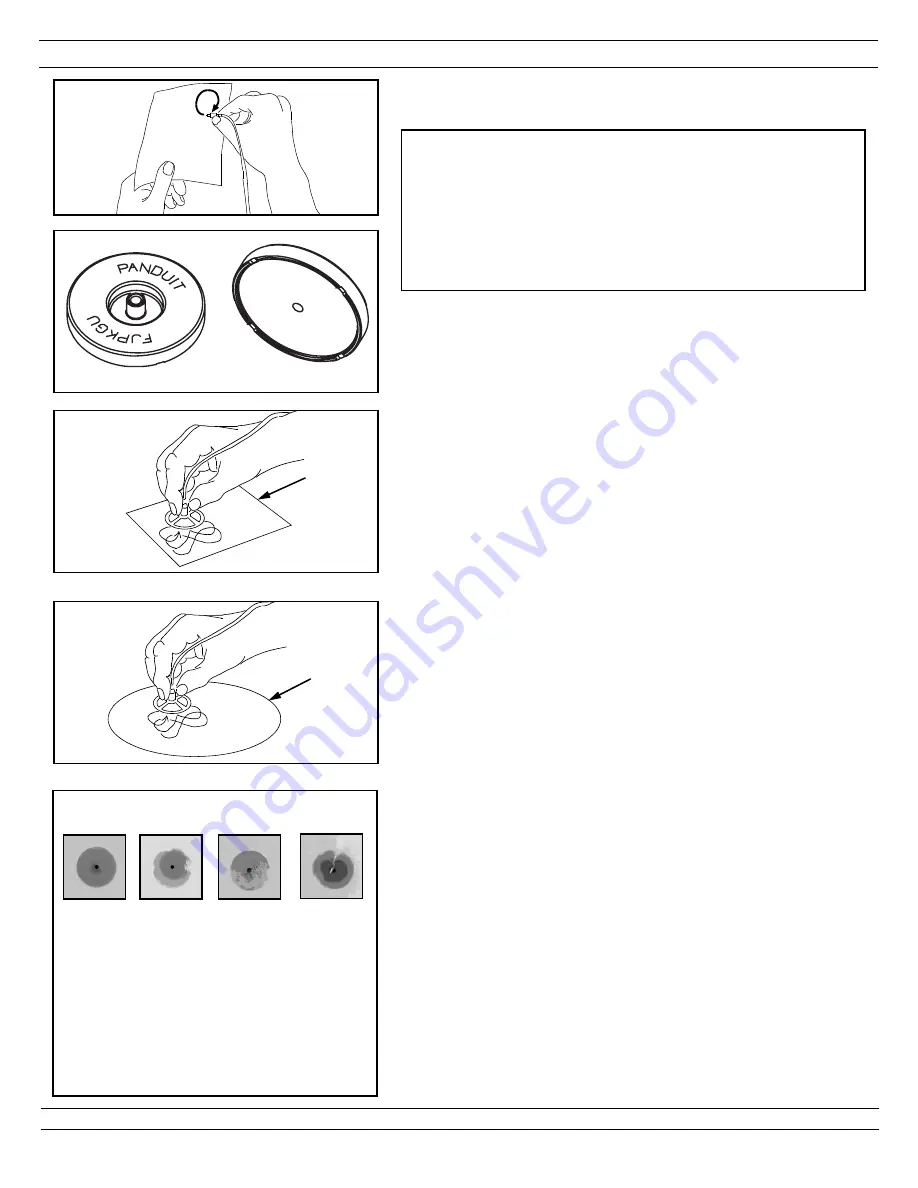
A= Ideal. No blemishes on core or cladding.
B= Good. Cladding is chipped, but core is
not.
C= Poor. Scratch across core. Try
repolishing or else reterminate.
D= Unacceptable. Fiber has shattered.
Reterminate.
4.6
Ferrule Tip After 1µm Diamond Polish
4. POLISHING
Carefully read this entire section before proceeding
.
Repeat each step for each ferrule assembly.
4.1
Hold a piece of the 5µm (micron) polishing film in the air and
gently rub the fiber stub against it in a circular motion until the
height of the fiber stub is equal to or slightly less than its diameter.
This is indicated when the white trace on the film is no longer
obvious. Make sure fingers are at the edge of the film, not directly
behind fiber.
Note: Do not use the same 5µm (micron) film used in this
step for any of the following polishing steps.
4.2
Thoroughly clean polishing puck, puck hole, and pad with alcohol
and cleaning swab. Place a separate sheet of 5µm (micron)
polishing film on the soft side of the polishing pad. Set the
polishing puck on the polishing film.
4.3
Carefully insert the ferrule assembly into the puck hole until the
ferrule/fiber contacts the polishing film. While keeping the puck
flat against the film, apply very light pressure on the ferrule
assembly making figure eight motions with the puck. Gradually
increase pressure until the fiber stub no longer leaves a white
trace on the film (about 10 figure eights). At this point, the
adhesive will be gone.
4.4
Remove 5µm polishing film from polishing pad. Clean the ferrule
tip, pad, and bottom of the puck with an alcohol soaked wipe.
4.5
Place a sheet of 1µm diamond polishing film onto the polishing
pad. Place several drops of distilled water on the diamond film.
Polish the fiber endface with the puck using medium pressure for
approximately 10 figure eights.
4.6
Clean the ferrule tip and puck with an alcohol soaked lint-free
wipe. Clean the 1µm diamond film using an alcohol soaked wipe
after every 5 connectors.
4.7
Inspect the fiber endface using a microscope. If scratches remain,
repeat steps 4.5 and 4.6.
WARNING: NEVER LOOK INTO THE END OF A FIBER WHICH
MAY HAVE A LASER COUPLED INTO IT.
Note: Each time a mating takes place, clean the ferrule
endface thoroughly with an alcohol soaked lint-free wipe.
4.8
For singlemode only:
Place a sheet of the .05µm lapping film on
the pad. Apply several drops of distilled water onto the center of
the film.
4.9
For singlemode only:
Place the puck in the center of the distilled
water on the film and pad. Keeping the puck flat against the film
and pad, apply even pressure for 4 figure eights.
4.10
For singlemode only:
Wipe the ferrule, pad, and puck with a
dry
wipe.
4.11
For singlemode only:
Clean the ferrule with a distilled water
soaked wipe.
Do not use alcohol to clean after using the
.05µm lapping film.
4.2
UNIVERSAL POLISHING PUCK
POLISHING GUIDELINES
• Keep the puck flat against the polishing film.
• Figure eights should be about 3" tall and 1.5" wide.
• Always polish on a clean area of the 5µm (micron) polishing film, with
figure eights traversing the film as shown in Figure 4.3.
• One sheet of 5µm (micron) polishing film will polish 2-4 ferrules.
• One sheet of 1µm diamond polishing film will polish 100 ferrules.
• One sheet of .05µm lapping film will polish approx. 18-20 ferrules.
• Clean the polishing puck and pad with a clean wipe after each step.
• DO NOT OVERPOLISH.


