For Technical Support: www.panduit.com/resources/install_maintain.asp
INSTALLATION INSTRUCTIONS
© Panduit Corp. 2012
FS036B
Page 5 of 7
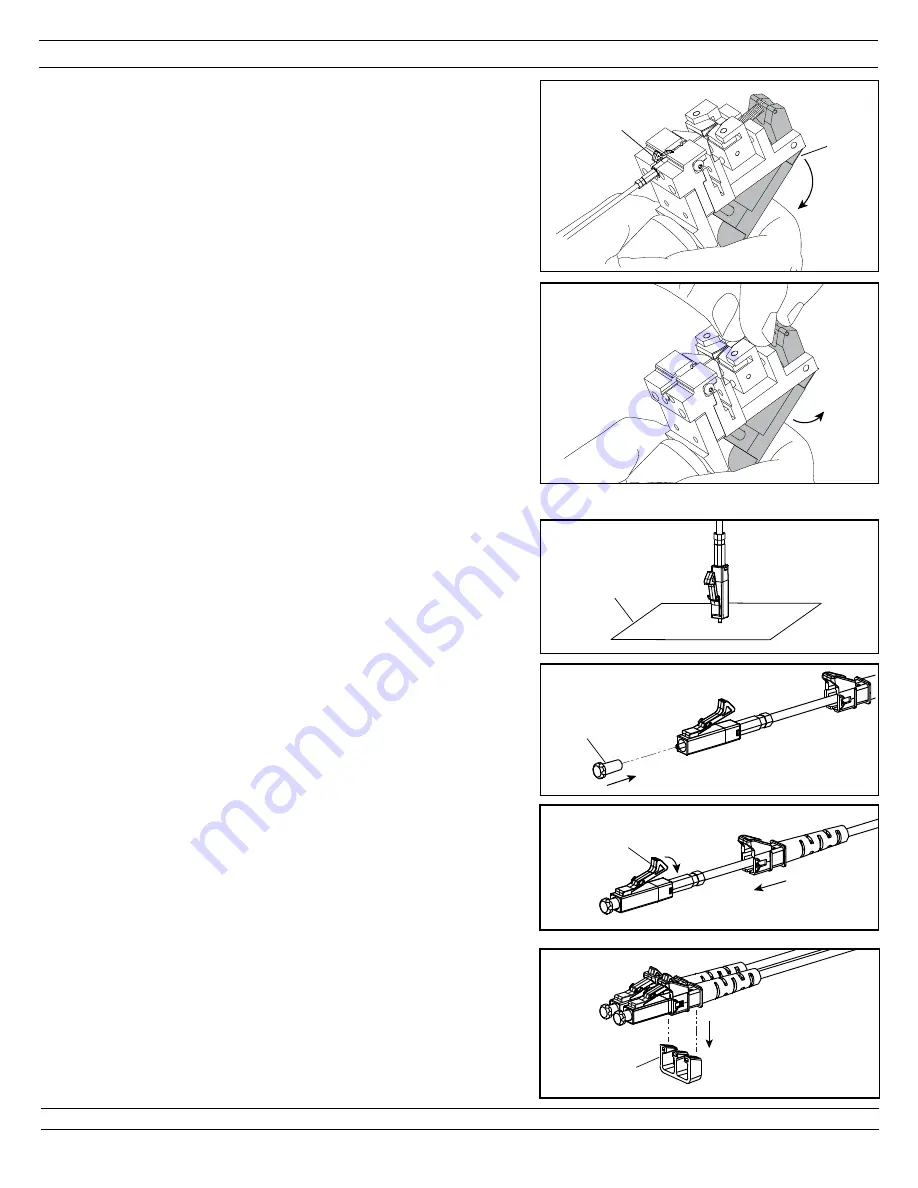
4.2
Cleave Fiber
4.2.1 DO NOT hold connector during cleave. To prevent fiber
protrusions, refrain from holding the latched connector
during the cleave process. DO NOT pull on the cable or let
cable weight pull on the connector. Hold cleave tool with
connector side up and SLOWLY press lever (3-5 sec) to
cleave fiber. Supporting the cable prevents potential
damage to the tool. To prevent fiber scrap from retracting
onto ferrule end face, DO NOT release lever at this step.
Note: The slow actuation of the trigger is critical. In order for the
diamond blade to do its job as a flaw initiator, the tool operator
must depress the trigger slowly (3-5 sec). Depressing the
trigger too quickly will crash the diamond into the glass fiber and
may break the blade.
4.3
Remove Connector and Fiber Scrap
4.3.1 With cleave tool lever still depressed, unlatch and remove
connector from cleave tool.
4.3.2 Release lever and remove fiber scrap.
Note: Removing the connector before releasing the lever allows
the blade to return to its correct position without contacting the
fiber scrap.
4.4
Apply Dust Cap and Install Boot Assembly
4.4.1
D
o not touch ferrule endface after cleaving. If endface
becomes contaminated, clean by pressing onto adhesive
side of FSTY tape. Multiple cleaning cycles may be
required.
4.4.2 Apply dust cap onto ferrule.
4.4.3 Fully deflect connector latch and slide boot assembly,
applied to cable in step 2.1, onto connector until it snaps
into place over the latch.
4.5
Attach Duplex Clip (Optional)
4.5.1 For each PCF LC connector, insert square portion of
boot assembly into the top opening of duplex clip.
4.2.1
Lever
Connector
latch
4.3.2
FSTY
4.4.1
Dust cap
4.4.2
4.4.3
Connector
latch
4.5.1
Duplex
clip


