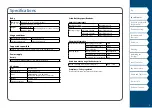
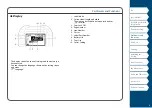
background image

2

Top

Using the printer with 

Easy-Mark Plus

Troubleshooting

Part Names and 

Functions

Start Here

Cleaning

Initializing the 

Settings

Label Functions

Key Menu Index

Frame and Table Lists

Symbol List

Specifications

Technical Support

Specifications

Body 

Dimensions  

(W x D x H)

Approx. 5.35 x 11.61 x 3.82 (inches)
Approx. 136 x 295 x 97 (mm)

Weight

Approx. 2.76 lb

(excluding batteries, tape cartridge)

Approx. 1,250 g

Usage conditions 

Operating temperature

5 to 35 degrees C

Storage temperature

-10 to 55 degrees C

Supported tape width

6 mm, 9 mm, 12 mm, 18 mm, 24 mm, 36 mm, 42 mm (Die-cut)

Power supply

Battery


Li-ion battery (C52CE97010) x 1 / AA alkaline battery x 6 

AC adapter


Type

AST1527Z2-1

Manufacturer

Seiko Epson Corp. 

Input

100-240 V AC, 1.2 A, 50-60 Hz

(dedicated adapter, power cable only)

Output

15 V DC, 2.7 A

Total output power

40.5 W

Li-ion battery specifications

Ambient temperature

During operation

0 to 40 degrees C

Charge

0 to 40 degrees C

During storage

Less than 1 month

-20 to 50 degrees C

Less than 3 months

-20 to 40 degrees C

Less than 1 year

-20 to 20 degrees C

Charging information

Nominal specifications Charging current (Std.)

1.0 A

Charging voltage (Std.)

8.05 V

Charging time

Approx. 3 hours

Charge limits

Battery pack model

C52CE97010

Maximum charge current, A 1.0 A
Maximum charge voltage, V 8.4 V

Rated time when using alkaline batteries

Rated operating time / Rated resting time

0.5 h / 1.0 h

Compliance/Safety regulation 

For more information, see Important Safety sheet. 

Summary of Contents for MP300

Page 1: ... 44 Frame and Table Lists 62 Symbol List 64 Technical Support 66 Notation used in this manual WARNING Indicates information that if ignored could possibly result in serious personal injury or even death due to incorrect handling CAUTION Indicates information that if ignored could possibly result in personal injury physical damage or damage to equipment due to incorrect handling Attention Indicates...

Page 2: ...ne battery x 6 AC adapter Type AST1527Z2 1 Manufacturer Seiko Epson Corp Input 100 240 V AC 1 2 A 50 60 Hz dedicated adapter power cable only Output 15 V DC 2 7 A Total output power 40 5 W Li ion battery specifications Ambient temperature During operation 0 to 40 degrees C Charge 0 to 40 degrees C During storage Less than 1 month 20 to 50 degrees C Less than 3 months 20 to 40 degrees C Less than 1...

Page 3: ...he printer with Easy Mark Plus Connect the printer to a computer with the USB cable in order to print from Easy Mark Plus Labeling Software For detailed instructions to install and use Easy Mark Plus go to www panduit com or contact the Panduit Identification Technical Support Group Visit the Panduit website to find the most current MP300 firmware upgrade file and instructions Technical Support Co...

Page 4: ...m either of the following Use a wider tape Reduce the text or cell size Lower ECC Level Overheated The printhead is overheated Turn off the power and remove the tape cartridge then leave the printer until it cools down Trash at slot Remove trash There is tape remaining in the tape eject slot Remove the tape Remove cut tape Unable to start printing because there is cut tape remaining in the tape ej...

Page 5: ...ress this to create with advanced serialization 10 Creates a barcode label 11 Enters a symbol 12 Cursor keys 13 Confirms the settings 14 Adds a page Hold down and press this to preview the created label 15 Sets the margins 16 Sets the tape length Hold down and press this to rotate the text 17 Sets the format and style 18 Changes the font size 19 Space 20 Creates a label to wrap around cables Hold ...

Page 6: ...pport Part Names and Functions Display The display shows the current settings and characters you have entered You can change the language shown on the setting screen and menu Language 1 Label Mode 2 Current label length and width The unit can be switched between inch and cm inch cm 3 Caps Lock ON 4 Page Number 5 Line Number 6 Cursor 7 Label Part Number 8 Battery Life 9 Font Size 10 Cutter Setting ...

Page 7: ...er to the printer with the Li ion battery installed Charging error Charging completed Charging Charge LED WARNING Be sure to use the dedicated Li ion battery C52CE97010 Using a battery other than the one specified may cause fire explosion leakage overheating or other damage CAUTION When disposing of used batteries make sure to follow the regulations 1 Open the battery cover 2 Install the Li ion ba...

Page 8: ...ct the USB cable to the printer 2 Connect the other connector of the USB cable to the computer Using alkaline batteries You can use alkaline batteries instead of the Li ion battery When using alkaline batteries install them in the correct orientation CAUTION When you have printed continuously for 30 minutes using alkaline batteries leave the printer for at least one hour to allow the batteries to ...

Page 9: ...top cover is closed firmly If you opened the top cover while a tape cartridge is installed check that the tape end is put into the tape eject slot before beginning operation Take care to keep the label for detecting the tape cartridge and the sensor of the printer clean Otherwise tape may no longer be detected correctly Do not touch the sensor directly with your fingers Label for detection Sensor ...

Page 10: ... there is no key operation within five minutes the printer automatically turns off The characters you have entered in the current session are stored Furthermore if there is no key operation within an hour while connected to a computer the printer automatically turns off Feeding the tape CAUTION Be sure to feed the tape every time after you install a tape cartridge 1 Press 2 Select a function with ...

Page 11: ...ss 2 Select a function with and then press Text Only Deletes all text Text Setting Deletes all text and restores the font size and other settings to the initial settings 4 Entering text 1 Press 2 Press 3 Press 4 Press A list of characters appears For the accent marks that can be inserted Accent 5 Select a character with and press â is entered 6 Press keys Câble appears on the screen 7 Press is ent...

Page 12: ...he print image 1 Press The print image scrolls on the entire screen When the preview ends the editing screen reappears CAUTION Do not insert your fingers into the tape eject slot Do not pull the tape until the printing is completed Attention Insert tape will appear on the display if the tape cartridge is not loaded or not correctly set Length of the label shown on the display is a guide and may no...

Page 13: ... to the above mentioned causes 6 Attaching label 1 Peel off the backing paper 2 Attach the label and rub it firmly 7 Turning the power off 1 Press The characters you have entered in the current session are stored even after the printer is turned off They are displayed when it is turned on again 2 Open the battery cover and then remove the Li ion battery If the AC adapter is connected disconnect th...

Page 14: ...ns Technical Support Cleaning CAUTION Turn off the printer and remove the batteries before cleaning If the AC adapter is connected disconnect the AC adapter cable from the printer Exterior Wipe the dirt off with a soft cloth If it is very dirty use a damp cloth CAUTION Never use chemicals or solvents such as benzine thinner or alcohol or use a chemical duster Printhead Clean the printhead with a c...

Page 15: ...s Initialize the settings if the printer does not operate normally such as when the display is interrupted Attention This function initializes the settings Take extreme care before initializing it All the created text will be lost and the settings you made will be reset 1 If the power is on press to turn it off 2 Press and hold and press 3 When a message appears press The settings will be initiali...

Page 16: ...ecifications Technical Support Label Functions Click the illustration of the label you wish to create or function you wish to use to display information such as the creation procedure or setting procedure Wiremarker Mode Component Mode PANDUIT PANDUIT Tape Mode Vertical Mode Label Modes Wrap Mode Flag Mode MIX LEN Mode Terminal Block Mode T1 T2 T3 T4 Patch Panel label 66 Block label 110 Block labe...

Page 17: ...ndex Frame and Table Lists Symbol List Specifications Technical Support Label Functions Customizing Labels Swapping the Text Barcode label Label with symbol Serialized labels Advanced serialized labels Format Style Font size Text orientation Length Margins Adding page Specifying the Font Size Large label Mirrored text label Printing Same Label Multiple Times ...

Page 18: ... Start Here Cleaning Initializing the Settings Label Functions Key Menu Index Frame and Table Lists Symbol List Specifications Technical Support Useful Functions Label Functions Saving Recalling Frequently Used Labels Upgrading Firmware and printing from Easy Mark Plus Printer Settings ...

Page 19: ...peated You can repeatedly print text so that it can be seen regardless of the angle from which the cable is viewed 1 Press 2 Enter the text and set the font size layout etc MEMO Add a column to continue creating another label with a set of text repeatedly printed on it The amount of text that can be printed on a label varies according to the font size number of lines etc set for the text When the ...

Page 20: ...pecifications Technical Support Wiremarker Mode Creating Labels with continuous self lam Tape Self Lamination Overwrap Use the dedicated Self Lamination Overwrap This label tape comes with transparent film The film can be wrapped around the label to prevent it from getting dirty Label length 1 Enter the label length and then press Setting range 0 39 to 39 36 1 to 99 99 cm 2 Enter the text 3 Press ...

Page 21: ...ble Lists Symbol List Specifications Technical Support Component Mode Create die cut tape labels of different set tings at once You can create many die cut labels at once 1 Press 2 Enter the text for the first label and press 3 In a new block enter the text for the second label Repeat these steps for all the labels you want to create MEMO Entered text can be edited using etc ...

Page 22: ...the length type with and then press In this example we will select Length AWG Sets the length according to the AWG wire size standards Dia Sets the length by cable diameter Setting range 0 1 to 5 9 0 25 to 15 00 cm Length Sets the length by label length 3 Enter the label length and then press Setting range 0 39 to 39 36 1 to 99 99 cm 4 Select On or Off of repeat text with and then press In this ex...

Page 23: ...pace length with and then press In this example we will select Length AWG Sets the length according to the AWG wire size standards Dia Sets the length by cable diameter Setting range 0 1 to 5 91 0 25 to 15 00 cm Length Sets the length by space length 3 Enter the space length and then press Setting range 0 1 to 11 81 0 25 to 30 00 cm 4 Enter the text length and then press Setting range 0 1 to 11 81...

Page 24: ...t Here Cleaning Initializing the Settings Label Functions Key Menu Index Frame and Table Lists Symbol List Specifications Technical Support Tape Mode Creating Labels with Text in the Horizontal Orientation Print labels with text in the horizontal orientation 1 Press 2 Enter the text 3 Press ...

Page 25: ...t Here Cleaning Initializing the Settings Label Functions Key Menu Index Frame and Table Lists Symbol List Specifications Technical Support Vertical Mode Creating Labels with Text in the Vertical Orientation Print labels with text in the vertical orientation 1 Press 2 Enter the text 3 Press ...

Page 26: ...ct the label length with and then press Auto Automatically adjusts the label length depending on the length of text Set Sets the label length Setting range 0 39 to 39 36 1 to 99 99 cm 3 Enter the labels number and then press In this example we will enter 3 4 Select the type of margins with and then press Tape 3 Sets margins that are 1 3 of the tape width Tape Sets margins that are equal to the tap...

Page 27: ...s by setting the pitch length and label length 1 Press 2 Select the length type and then press In this example we will select Pitch Pitch Sets the length by pitch length Label Sets the length by label length 3 Enter the pitch length and then press 4 Enter the terminal number and then press In this example we will enter 03 5 Select the type of separator with and then press In this example we will s...

Page 28: ...hen press 3 Select the length type with and then press In this example we will select Ports Ports Sets the length by port length Label Sets the length by label length 4 Enter the port length and then press Setting range 0 1 to 11 81 0 25 to 30 00 cm 5 Enter the ports number and then press In this example we will enter 3 Setting range 1 to 50 6 Select the type of separator with and then press In th...

Page 29: ...ss 3 Select the length type with and then press In this example we will select Ports Ports Sets the length by port length Label Sets the length by label length 4 Enter the port length and then press Setting range 0 1 to 11 81 0 25 to 30 00 cm 5 Enter the ports number and then press In this example we will enter 4 Setting range 1 to 50 6 Select the type of separator with and then press In this exam...

Page 30: ...ted to a 110 Block Lower count Upper count 1 Press 2 Select 110 Block with and then press 3 Select the blocks type with and then press In this example we will select 4pairs Blank Creates a table of two rows and one column 4 Select the text type with and then press In this example we will select Pins Pins Seri Blank 5 Enter the upper count and then press In this example we will enter 1 6 Enter the ...

Page 31: ...Menu Index Frame and Table Lists Symbol List Specifications Technical Support Customizing Labels Swaps the text line by line Swap the Order of Multiple Lines MEMO You may not be able to swap the lines depending on the label type you create 1 Press 2 Select Line swap with and press 3 Select an area to which you want to apply the function with and press ...

Page 32: ...ith and press 3 Select a symbol with and press 4 Press MEMO For available symbols Symbol List Creating Barcode Labels MEMO You may not be able to add a barcode depending on the label type you create Only up to two barcodes can be inserted in one label Supported barcode types EAN 8 EAN 13 CODE128 CODE39 QR CODE ITF CODABAR UPC A UPC E 1 Press 2 Select an item with and press Move on to the next opti...

Page 33: ...start value of the first label to the next sequential number 1 Press 2 Enter the start value of the sequential numbers and then press In this example we will enter 0001 3 Enter the end value of the sequential numbers and then press In this example we will enter 0005 4 Enter the increment value and then press In this example we will enter 2 5 Press One set of the set labels will be printed 0005 Cre...

Page 34: ...rt Customizing Labels Creating Serialized Labels with Collate function When printing serialized labels and using copies the order of the labels can be changed The default setting of the Collate function is No Example With the settings Start 1 End 3 Increment 1 the labels will be printed in three sets Collate No 1 1 1 2 2 2 3 3 3 Collate Yes 1 2 3 1 2 3 1 2 3 1 Press 2 Select Collate with and press...

Page 35: ...h Advanced Serialization Use when creating a serialization across multiple pages in a label Block 1 Block 2 Block 3 1 Create the blocks In this example we have created three pages Adding Page 2 Press 3 Enter the start value of the serialized numbers and then press In this example we will enter CN01 Serialized numbers are automatically assigned to block 2 and block 3 4 Select the number of repetiti...

Page 36: ... Select an area to which you want to apply the function with and press When Character is selected the function is applied to all characters on the right of the cursor MEMO The setting items displayed when you press differ depending on the label type you create Text Options menu You can customize your label by setting the following Layout Left Center Justify Right Adjusts the layout when multiple l...

Page 37: ...s when is pressed Setting the Label Length Margins This setting is the same as when is pressed Setting the Margins Orientation AB A A B AB AB Sets the orientation of the text AB A A B AB AB Font size Select font size from preset patterns or from Manual When Manual is selected font size can be set for each block line by line Changing the Font Size Specifying the Font Size Line swap Swaps the order ...

Page 38: ...tains the other letters and or marks Numbers English alphabet uppercase letters space and the following marks Danger DANGER 1 Press 2 Each time you press the font size changes Changing the Font Size The font size automatically adjusts to fit the text within the label area As more text is entered within a fixed area the text size will automatically decrease If text is deleted then the text size wil...

Page 39: ...e length of text Set Sets the label length Setting range 1 00 to 99 99 cm 3 Select the alignment for the text with and press Left Center Justify Right Setting the Margins Sets the left and right margins MEMO You may not be able to set the margins depending on the label type you create 1 Press 2 Select the type of margins with and press Tape width 3 Sets margins that are 1 3 of the tape width Tape ...

Page 40: ...e of the text is automatically adjusted according to the width of the tape So even if the first line is set to the largest font size its size may be changed depending on the font size settings of the second and third lines There are two ways to adjust font size Through 1 Keep pressing the to select among preset font size patterns Through 1 Press 2 Select Font size and press 3 Select the number of ...

Page 41: ... 2size with and press 4 Select 2 2 with and press 5 Select Start print with and press Printing starts MEMO The function remains enabled even after printing To disable the function select Off Mirror print On Off 1 Press 2 Select Mirror print with and press 3 Select On with and press 4 Select Start print with and press Printing starts MEMO The function remains enabled even after printing To disable ...

Page 42: ...ormation of the label including information of the tape in use is saved in the file Therefore if the specifications of the tape set in the printer differ with the tape information saved in the file you want to recall such as the type of tape etc an error message will appear Switch to a tape with specifications that match the information in the saved file Printing the saved label You can select mul...

Page 43: ...inting of the second or later labels starts each time you remove a printed label This function is only available when the label length is 1 1 inches 28 mm or more Auto cut is set to On and Half cut is set to Off MEMO If you perform continuous printing with the Drop stop function enabled printing may not be automatically resumed after you take out the printed tape In such a case open and close the ...

Page 44: ...eshooting Part Names and Functions Start Here Cleaning Initializing the Settings Label Functions Key Menu Index Frame and Table Lists Symbol List Specifications Technical Support Key Menu Index Click the keys boxed in blue to display the menu list page ...

Page 45: ...ations Technical Support Multi print MEMO The setting items displayed when you press differ depending on the label type you create Feed and Cut Mirror print 4size Enlarge print 3size Special print Repeat Copies 2size Off On Enter number of print copies 1 2 1 4 1 4 2size 1 3 Print copies 1 2 1 4 3size 1 3 Mirror print 2 2 1 4 4size 1 3 Start print 4 4 Off 3 3 Enlarge print Tape feed Feed and cut Ta...

Page 46: ...tings Label Functions Key Menu Index Frame and Table Lists Symbol List Specifications Technical Support Advanced Serialize Serialize Repeat Number Serialize Text Serialize Text Serialize Text Adv Seri Text 5 times 2 times 10 times 3 times 4 times 1 time Enter start value Enter end value Enter increment value Enter start value ...

Page 47: ...rt Barcode 1 Bar code Check Digit Width ECC Level Ratio On Off Medium 15 2 5 Large 25 3 0 30 Small 7 2 0 EAN 8 EAN 13 CODE128 CODE39 QR CODE Enter barcode information Enter barcode information Enter barcode information Enter barcode information Enter barcode information Width Medium Large Small Width Medium Large Small Width Medium Large Small EAN 8 CODE128 QR CODE CODABAR EAN 13 CODE39 ITF UPC A ...

Page 48: ...nical Support Barcode 2 Check Digit Ratio On Off 2 5 3 0 2 0 ITF CODABAR UPC A UPC E Enter barcode information Enter barcode information Enter barcode information Enter barcode information Bar code EAN 8 CODE128 QR CODE CODABAR EAN 13 CODE39 ITF UPC A UPC E Width Medium Large Small Width Medium Large Small Width Medium Large Small Width Medium Large Small Ratio 2 5 3 0 2 0 Check Digit On Off menu ...

Page 49: ...bol List Specifications Technical Support Length Margins MEMO The setting items displayed when you press differ depending on the label type you create MEMO The setting items displayed when you press differ depending on the label type you create Length Length Margins Length Set Auto Enter length Short 4mm Center Tape width 3 Tape width Middle 10mm Justify Minimum 1mm Left Long 18mm Right ...

Page 50: ...items displayed when you press differ depending on the label type you create Edit menu Layout Border Line Frame Table Char spacing Proportional Frame Table Style Frame Table Center Underline Off Narrow Off Normal Style Justify None Frame Normal Wide Gray Char spacing Right Border Shadow S O Border Line Round brdr Char Width Length Margins Bold Italic Orientation Font size Layout Left Strikeout Tab...

Page 51: ...cations Technical Support Text Options 2 Char Width Length Bold Italic Length Length Smaller Small Small Set Normal Center Under Under Narrow Bold Justify Normal Wide B I Right Smaller Auto Italic Left Enter length Center Center Edit menu Frame Table Style Char spacing Border Line Char Width Length Margins Bold Italic Orientation Font size Layout Line Swap menu continues backward menu continues fo...

Page 52: ...ze 1 5 to 5 5 Auto Edit menu Frame Table Style Char spacing Border Line Char Width Length Background Margins Bold Italic Orientation Font size Layout Margins Short 4mm Tape width 3 Middle 10mm Tape width Minimum 1mm Long 18mm 1Line 4 Lines 2 Lines 5 Lines 3 Lines 6 Lines 7 Lines 2 Lines 1 4 to 4 4 3 Lines 1 4 to 4 4 4 Lines 1 5 to 5 5 5 Lines 1 6 to 6 6 6 Lines 7 Lines 7 Lines 1 3 to 3 3 Manual Se...

Page 53: ...Technical Support Flag Wrap Length Type Space length Space length Text length Separator Orientation Repeat text Margins Diameter AWG AWG Label length Dia AWG Length Length Enter length Enter length Dia AWG Off Short Tape 3 Line Hori 2 Middle Tape Tic Vert 1 On Min Long Enter length 18 8 1 18 8 1 16 6 1 0 16 6 1 0 14 4 2 0 14 4 2 0 12 3 3 0 12 3 3 0 10 2 4 0 10 2 4 0 Enter length Vert 2 Vert 3 Vert...

Page 54: ...pecifications Technical Support Terminal block Mix Len Terminal num Labels num Length Type Label length Label length Pitch length Label length Separater Margins Orientation Orientation Label Set Enter label length Enter pitch length Enter length Pitch Auto Enter terminal number Enter number of labels Frame Tape 3 Line Short Vert 1 Vert 1 Tape Tic Middle Vert 2 Vert 2 Dotted Long None Min Hori Hori...

Page 55: ... 66 Block Length Type Length Type Ports num Ports num Separator Separator Orientation Orientation Ports length Label length Ports length Label length Ports Ports Label Label Frame Frame Line Line Vert 1 Vert 1 Tic Tic Vert 2 Vert 2 Enter length Enter length Enter length Enter length Dotted Dotted None None Hori Hori Enter number of ports Enter number of ports Network Network 66 Block 66 Block 110 ...

Page 56: ... the Settings Label Functions Key Menu Index Frame and Table Lists Symbol List Specifications Technical Support 110 Block Blocks type Text type Network Label length Lower count Upper count Blank 3pairs Seri 66 Block 4pairs Blank 110 Block 5pairs 2pairs Pins P Pan F Plate Enter length Enter start value Enter start value ...

Page 57: ... Mark Plus Troubleshooting Part Names and Functions Start Here Cleaning Initializing the Settings Label Functions Key Menu Index Frame and Table Lists Symbol List Specifications Technical Support Clear Clear Text Text Setting Text Only ...

Page 58: ...u Index Frame and Table Lists Symbol List Specifications Technical Support Setup Menu 1 Preference Drop stop Half cut Auto cut Print density Width pos Length pos Die Cut pos Backlight Print density Drop stop Die Cut pos Backlight Language inch cm Version Auto cut Off Off Off Length pos Off On On On 3 to 3 5 to 5 5 to 5 Width pos On menu continues forward ...

Page 59: ...s Key Menu Index Frame and Table Lists Symbol List Specifications Technical Support Setup Menu 2 Preference Language inch cm Print density Drop stop Die Cut pos Backlight Language inch cm Version Auto cut Português Br Deutsch Türkçe Italiano Suomi Español cm Norsk Nederlands Dansk Svenska Français Português EU English inch menu continues backward ...

Page 60: ...s Troubleshooting Part Names and Functions Start Here Cleaning Initializing the Settings Label Functions Key Menu Index Frame and Table Lists Symbol List Specifications Technical Support File Storage Menu Local File Recall End Delete Save Print ...

Page 61: ...Accent A Á À Â Ã Ä Å Æ Ā Ą Ă C Ç Č Ċ Ć D Đ Ď E É È Ë Ê Œ Æ Ø Ē Ę Ė Ě G Ģ Ġ Ğ H Ħ I Í Ï Î Ì IJ Ī Į İ K Ķ L Ļ Ł Ĺ Ľ Ŀ N Ñ Ň Ņ Ń Ŋ O Ó Ô Œ Õ Ò Ö Ø Ő Ō Ơ P Þ R Ř Ŕ S Š Ś Ş T Ť Ţ Ŧ U Ú Ü Ù Û Ů Ű Ū Ų Ư W Ŵ Y Ý Ÿ Ŷ Z Ž Ż Ź Ȝ a á à â ã ä å æ ā ą ă c ç ć č ċ d ð đ ď e é è ë ê œ æ ē ę ė ě g ģ ġ ğ h ħ i í ï î ì ij ī į ı k ķ l ļ ł ĺ ľ ŀ n ñ ň ņ ń ŋ ʼn o ó ô œ õ ò ö ø ő ō ơ p þ r ř ŕ s ß š ś ş ŝ t ť ţ ŧ u ú ü ù û...

Page 62: ...Functions Start Here Cleaning Initializing the Settings Label Functions Key Menu Index Frame and Table Lists Symbol List Specifications Technical Support Frame and Table Lists Frame 1 2 3 4 5 6 7 8 9 10 11 12 13 14 15 16 17 18 19 20 21 22 23 24 25 26 27 28 29 30 31 32 33 34 35 ...

Page 63: ...k Plus Troubleshooting Part Names and Functions Start Here Cleaning Initializing the Settings Label Functions Key Menu Index Frame and Table Lists Symbol List Specifications Technical Support Frame and Table Lists Table 1 2 3 4 5 6 7 8 9 10 ...

Page 64: ...re Cleaning Initializing the Settings Label Functions Key Menu Index Frame and Table Lists Symbol List Specifications Technical Support Symbol List Ansi Arc Arrows Audio visual Brackets Currency Data center Double number Electrical Environment Fire GHS whmis Greek Imo Laboratory Mark Math Metric ...

Page 65: ...art Names and Functions Start Here Cleaning Initializing the Settings Label Functions Key Menu Index Frame and Table Lists Symbol List Specifications Technical Support Symbol List Number Office PPE Prohibition Public signs Punctuation Shipping Warning Extra symbol ...

Page 66: ...nter Software Firmware Printers Detailed Operator s Manual Replacement Quick Reference Card Product Bulletin Product specification and safety information Warranty Registration Path Support Product Registration Related Products MP Label Cassettes MP100 Printer Mobile Labeling Apps for Android and iOS Easy Mark Plus Labeling Software Global Customer Service cs panduit com U S and Canada 800 777 3300...

Reviews: