SECTION 1: Using the SETUP Menu
Step 1: Turning the Printer On:
Locate the POWER Key, represented by the symbol, found
in the upper left hand corner of the keypad. Press and hold
the POWER Key until the print head cycles. The LS3E will
display the last label code in use.
Step 2: Loading/Removing the Labels:
1. Load labels on mandrel (label roll holder), as shown on
the decal inside the printer door.
2. Look inside the label door area and locate the label width
guides found behind the print mechanism. Push the left
guide into the appropriate slot in the aluminum base to
match your label width. Be sure the guides lock into
position.
3. Place leading edge of label liner under the rubber drive
roller until contact is made, label side down (See Figure
3 for label orientation when loading ).
Insure the labels
are loaded all the way to the right side.
4. Press and release the FEED Key to load the labels into
printing position.
5. Place mandrel behind label width guides and close the
cover door.
8
RUBBER
DRIVE ROLLER
WHEN LOADING ROLL OF LABELS INTO
THE PRINTER, THE LABEL SIDE SHOULD
FACE DOWNWARD
MEDIA WIDTH GUIDE.
FOR ADJUSTMENT OF SELECTED LABELS,
LIFT AND SLIDE (LEFT OR RIGHT) TO
PROPER SLOT
FIGURE 3
LABEL P
ATH
23
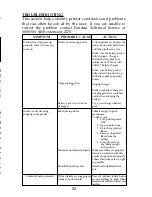
Labels not registering properly,
or stopping at next label.
Not printing.
Print is smudged or too dark.
Print dots missing or light.
Printer is not ready to operate.
Ribbon is not loaded correctly.
Drive roller or print shield is
dirty.
Ribbon problem.
Drive roller is not seated
properly.
Printhead has broken pin or
blown solenoid (visible if a
portion of the line of text is
missing).
Labels are not loaded properly.
Sensor is dirty.
Make sure labels are properly
loaded on mandrel, and side
guides are positioned correctly.
Labels should be located as far
to right as possible.
Make sure printhead is
located in the center of the
printer.
Carefully clean registration
sensor located to the right side
of drive roller by blowing on
the opening of the sensor.
Make sure printer:
1. Is turned on.
2. Has ribbon cartridge
properly loaded.
Load ribbon properly between
the printhead and print shield.
Remove ribbon cartridge, and
carefully clean drive roller,
print shield, and print
mechanism assembly with
isopropyl alcohol and cotton
swab.
Make sure ribbon is properly
installed between the
printhead and print shield, and
ribbon manual advance knob is
spinning during printing.
Ribbon is worn. Replace ribbon.
Ribbon not advancing.
Remove cartridge from
printer, and make sure ribbon
can be advanced by turning
knob on ribbon cartridge
counter-clockwise. Install
ribbon properly.
Make sure drive roller is not
skewed and is firmly
supporting the label stock.
Contact Panduit Technical Ser-
vice at (888)506-5400
extension 7470.
Summary of Contents for Pan-Quik LS3E
Page 3: ......
Page 5: ......
Page 9: ......
Page 11: ......
Page 13: ...o l y s r 4 d a e e e e t e e P o ...
Page 15: ......
Page 17: ...s f N r n r e e o e f ...
Page 19: ...e s l o g n d e n E ...
Page 21: ......
Page 23: ... s e e d e o e n e s d d o e d o e n y ...
Page 25: ...d d l n h t o o e e s o e ...
Page 27: ...d l y o f r e e n e e g g n e e d e ...
Page 29: ......


