Notes: The Terminal option can be used in conjunction with
serialization (see page 14) and with rotated text. When
continuous terminal block labels (labels with code ending
with 00) are used, the printer will automatically select the
Terminal option for the user. Line spacing can be entered in
inches or millimeters; use the UP ARROW Key and DOWN
ARROW Key to select the desired units. Part numbers
LC-14 and LC-15 are continuous terminal block labels.
Serialized Terminal
Rotated Serialized
Block
Terminal Block
101
102
103
Terminal Rotated
Terminal
Block
Block
D
P
F
A
H
A
T
O
X
A
N
1
1 E
1
1
1
1
0
0
0
1
2
3
DATA 1
PHONE 1
FAX 1
17
PRINTER SHUTDOWN
To turn the printer off, two key strokes are required. Press and release
the SHIFT Key and then press and release the POWER Key. This
prevents inadvertent shutdown. The printer will
automatically turn itself off after being idle for 5 minutes to
conserve battery power. This function can be deactivated by selecting
the Auto Shut Off option in the Other Options menu of the main
SETUP menu.
CREATING SERIALIZED LEGENDS ON SUCCESSIVE LABELS
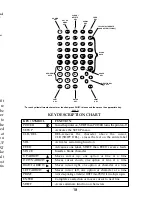
Symbols and alternate characters (yellow alternate characters on keys)
will not serialize. During legend entry, place the cursor at the desired
location of the serialized property and press the SRL Key.
• Use the or Key to highlight Numeric or Alphabetic and
then press the ENTER Key.
• Enter in the starting character and press the ENTER Key.
• Enter in the ending character and press the ENTER Key.
• Enter in the desired increment and press the ENTER Key.
For an Alphabetic Serialization example, Start - A, End - H,
Increment - 2 will produce labels with A, C, E, and G respectively.
Up to 4 separate serializations can be defined per label. After the
serialization is complete, the screen will show “ ” at the location
in the legend where the serialization was inserted.
PRINTING UPPER AND LOWER CASE LEGENDS IN THE
SAME LABEL
• Key in the portion of the legend that is to appear in upper case.
Use the SPACE Key to leave blanks where lower case letters will
appear.
• Press the SETUP Key. Select the Lower Case option in the Text
Case menu and exit the SETUP menu.
• Use the arrow keys to position the cursor to the desired location
of the lower case letters and use the key pad to insert the lower
case letters.
14
Display the Terminal option in the Label Format menu of
the Main SETUP menu. Press the ENTER Key.
Enter in the desired vertical spacing using the keypad.
Press the ENTER Key. If the vertical spacing entered
would result in one line of text overprinting the next line
of print, a warning will be displayed. Press the ENTER
Key and enter in a larger vertical spacing.
Exit the SETUP menu.
Enter the desired legend
•
•
•
•
Summary of Contents for Pan-Quik LS3E
Page 3: ......
Page 5: ......
Page 9: ......
Page 11: ......
Page 13: ...o l y s r 4 d a e e e e t e e P o ...
Page 15: ......
Page 17: ...s f N r n r e e o e f ...
Page 19: ...e s l o g n d e n E ...
Page 21: ......
Page 23: ... s e e d e o e n e s d d o e d o e n y ...
Page 25: ...d d l n h t o o e e s o e ...
Page 27: ...d l y o f r e e n e e g g n e e d e ...
Page 29: ......


