For Technical Support: www.panduit.com/resources/install_maintain.asp
INSTRUCTIONS V00028FG REV 11
A
B
C
D
Page 2 of 4
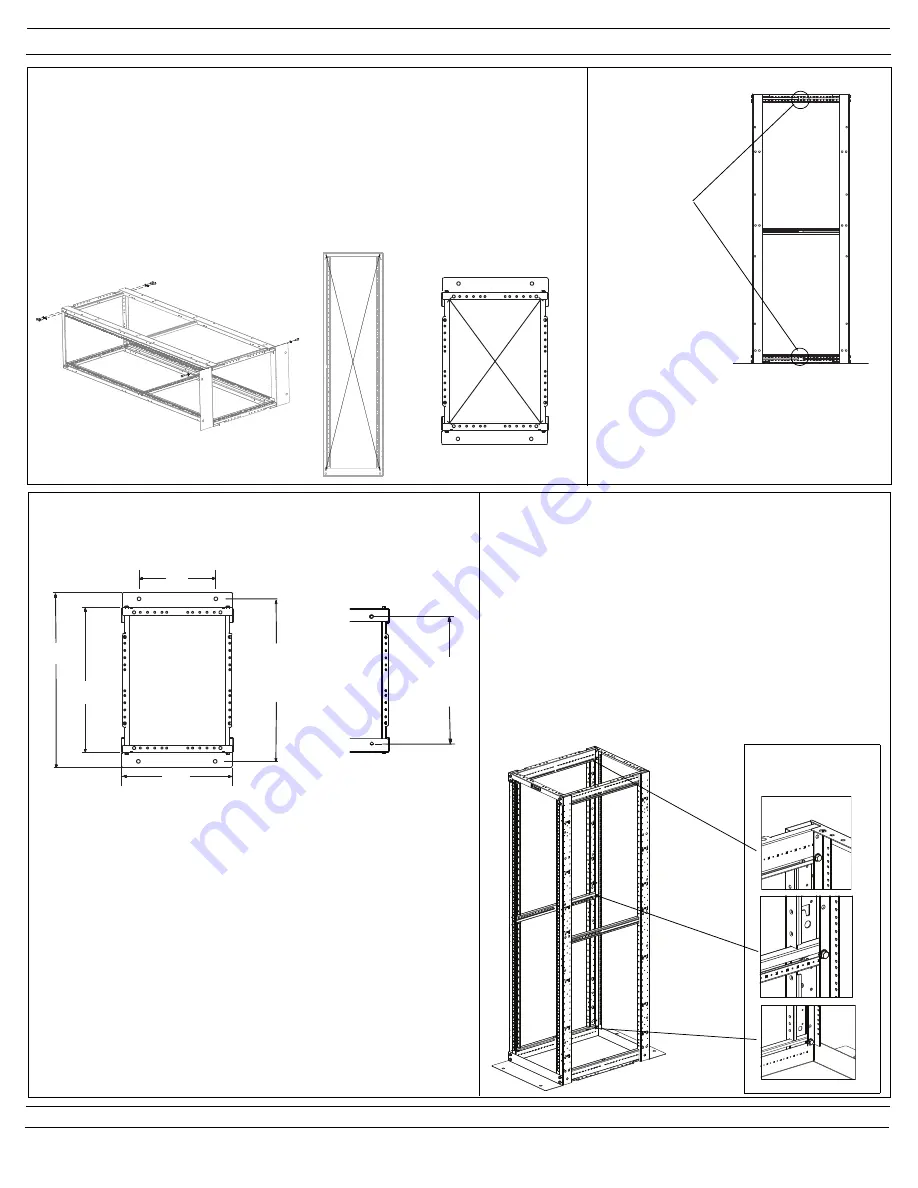
Step 3
Hinging side assembly on the two fasteners affixed in Step 2, rotate Side assembly upwards
to align mounting holes in the two top brackets. Install remaining (6) 3/8" Bolts and paint
piercing washers in the locations shown below. Stand the rack upright. Verify #12-24 tapped
holes or Cage nuts are EIA spaced at 18.31". Square the rack vertically by measuring the
distance from A to D, and B to C shown in 3.2. The difference in distance from A to D, and B
to C should be no greater than 1/8". Square the rack horizontally by measuring the distance
from E to H, and F to G shown in 3.3. The difference in distance from E to H, and F to G
should be no greater than 1/8".
Completely tighten all bolts to at least
14 ft.-lbs (19.0 N-m)
3.1
3.2
Grounding
Two hole ground lug attachment located on
the top and bottom rails of the side channel
assembly at the locations shown. Remove
masking before installing.
Grounding
Locations
Mount rack to floor using the location guide below for mounting
hole and overall size information.
Location Guide
Note:
Floor mounting bolts must be used in all applications in order to
provide maximum rigidity, load bearing capacity and safety.The maximum
weight load is 2500 pounds. The rack is designed for heavier equipment
to be mounted near the bottom and supported from front to back. Shelves
(sold separately) that mount on both the front and rear of the rack may
also be installed to support equipment. Manufacturers often provide a
shelf (or cradle) to support their specific equipment. In cases where the
manufacturer doesn’t provide a cradle, please contact Panduit engineer-
ing prior to installation for possible alternative mounting methods.
All dimensions are in inches.
X.XX
are dimensions for 30" deep 4 post racks
[x.xx] are dimensions for 23" deep 4 post racks
{x.xx} are dimensions for 36" deep 4 post racks
*x.xx* are dimensions for 42" deep 4 post racks
**x.xx** are dimensions for 23" wide 4 post racks
Adjustable EIA Mounting Rails
All 4 rails are fully adjustable. To set depth loosen (3) 5/16"-18 X
3/4" Mounting bolts and slide to desired position.
Re-tighten to
20 foot pounds to engage washers.
Bolt Orientation
Panduit recommends putting the front rails 1" back for optimal
thermal and cable management.
Front rails are to be recessed less than 1.5" to be compatible with
newer thermal ducts.
E
F
G
H
3.3
35.6 [28.6]
{41.6} *47.1*
30.0 [23.0]
{36.0} *41.5*
23.25
**27.25**
33.5 [26.5]
Turned Turned
Out Out
{39.5} *45.0*
Turned Turned
Out Out
16.00
**20.0**
26.7 [19.70]
Turned Turned
In In
{32.7} *38.2*
Turned Turned
In In