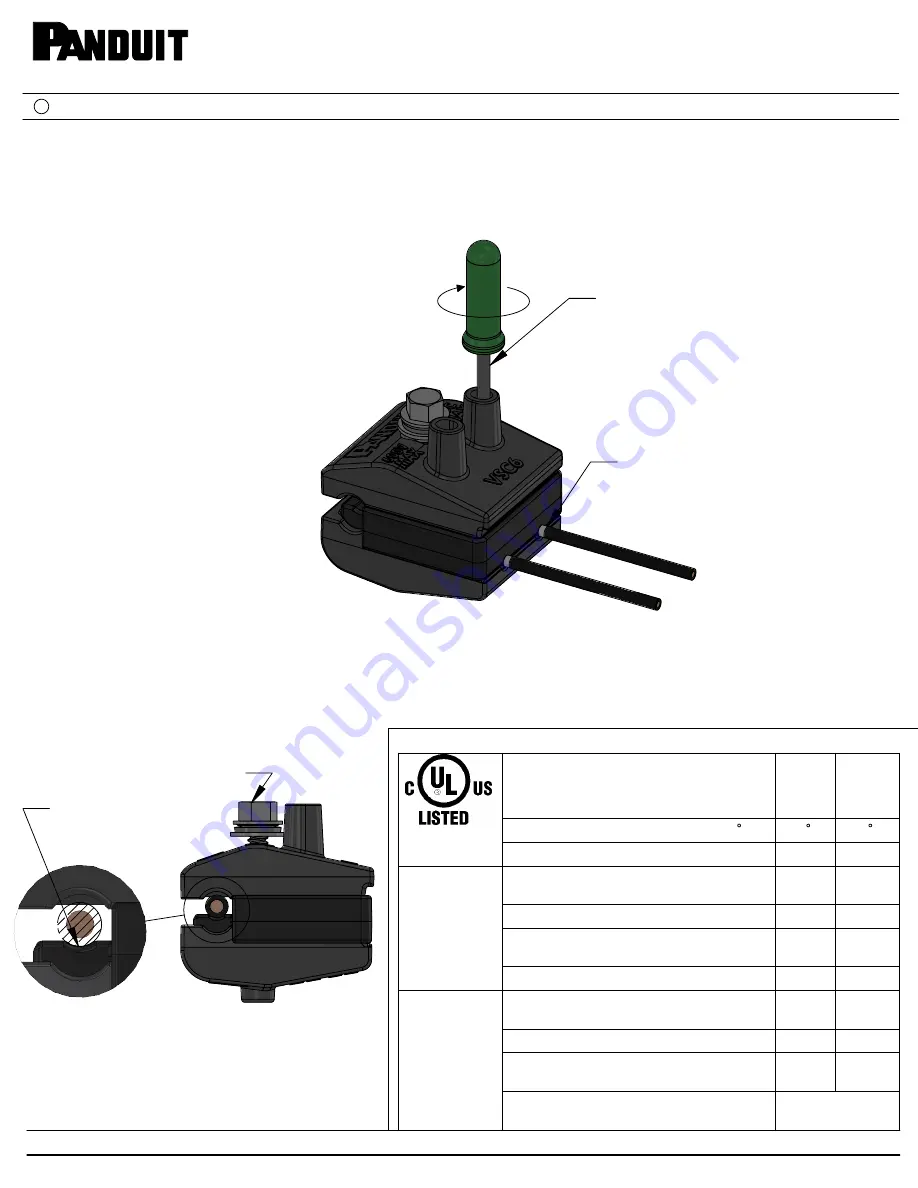
FIGURE 8: INSERT and CENTER the RUN-WIRE,
TIGHTEN HEX BOLT UNTIL THE
RATED TORQUE IS ACHIEVED
AND MAINTAINED FOR 5 SECONDS
MAIN FASTENER SIZE
VSC6: 5/16" SAE HEX
VSC3/0: 3/8" SAE HEX
Insert wire fully until
"Locating Mark" is flush
with connector body
at the wire insertion ports
FIGURE 7: INSERT SENSOR LEADS AND SECURE
(TORQUE TERMINAL SCREWS)
Use Torque-driver
(T10 Torx) to tighten
Terminal Screws to
Specified Torque.
Refer to Connector Ratings
Information (table) below
KEEP RUN WIRE
CENTERED WITH
THE CIRCULAR RECESS
OF OPENING
Page 3 of 3
For Technical Support: www.panduit.com/resources/install_maintain.asp
Step-by-Step Installation Procedure (
continued from page 2 of 3
):
9. See FIGURE 7: Insert a crimped, color-coded pair of AVT sensor leads into TAP WIRE terminals.
10. See FIGURE 7: Verify fully-inserted AVT sensor leads by verifying "location mark" is flush with connector ports.
11. See FIGURE 7: Use torque-driver (T10 Torx) to tighten terminal screws to specified Torque, as listed on Connector
packaging and provided in Connector Rating Information (see below).
Connector Rating Information:
12. See FIGURE 8: Properly position Connector onto phase conductor (RUN WIRE) and keep RUN WIRE centered
with the circular recess during next step.
13. See FIGURE 8: Use torque-driver (SAE Hex) to tighten hex bolt, while keeping RUN WIRE centered with the
circular recess of opening, until the specified Torque is achieved and maintained for 5 seconds.
Specified Torque is provided on Connector packaging and in Connector Ratings Information below.
WIRE
CONNECTOR
587H
PANDUIT CATALOG P/N
VSC6 VSC3/0
MAX. Operating Temperature ( C)
90 C
90 C
MAX. Operating Voltage (Volts)
600V
600V
RUN WIRE
Torque-driver Installation Tool,
SAE Hex Size (Main Fastener)
5/16"
3/8"
Installation Torque (Required)
40 in-lb 80 in-lb
Minimum Rated Wire Range, AWG
14 SOL
14 STR
4 SOL
4 STR
Maximum Rated Wire Range, AWG
6 STR
3/0 STR
TAP WIRE
Torque-driver Installation Tool Bit Size
(Recommend Wiha Tool P/N 28502) T10 Torx T10 Torx
Installation Torque (Required)
7 in-lb
7 in-lb
Rated Tap Wire Size, AWG
(terminated with F80-12-M ferrule)
14 STR
Class K
14 STR
Class K
Required Ferrule, Panduit Catalog P/N
& Crimp Tool, Panduit Catalog P/N
F80-12-M
CT-1160
T-PMPI-322-PC
(revision 02)
INSTALLATION INSTRUCTIONS
Panduit Corp. 2018
C
VeriSafe Insulation-Piercing Connector: VSC Series
VeriSafe Insulation-Piercing Connection Kit: VS-CKP Series
for
VeriSafe Sensor Lead Tapping on Cu-Only Conductors
TM
TM
TM


