


AP 2
/Architekturprojektor / Architecture Projector
PANI
Projection and Stage Lighting Vertriebs GmbH
3
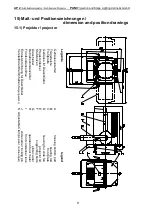
4) Montage des Projektors / Setting up projector
Das Anschlusselement für hängende und
stehende Montage ist der Normzapfen DIN 15560/
ø 28mm
.
The connecting part for suspended and
standing installation is the TV-Spigot DIN
15560/ ø 28mm.
4.1) Bügelverstellung / Yoke adjustment
Um an die Verwendung von Zubehör in Hinblick
auf den Gesamtschwerpunkt besser angepasst zu
werden, kann der Bügel (B 3/ 3) auch in einer der
beiden anderen Anschraubpositionen (B 1/
2
)
montiert werden.
When adapted to fit any existing accessory,
the yoke (fig.3/ 3) can be fitted on to the
projector in the proximity of the centre of
gravity using one of the other two threads for
mounting the yoke (fig.1/
2
) .
4.2) Projektorneigungswinkel / Projector angle of inclination
Abhängig von der Montageposition des Bügels
kann der Projektor über ± 90° aus der
horizontalen Lage geneigt werden. Somit können
Sie jeden Projektionswinkel im Raum ohne die
Verwendung eines Spiegels realisieren.
Depending on the mounting position of the
yoke, the projector can reach up to +/- 90° and
more from the horizontal position by being
tilted, so any desired angle position in space is
accessable without use of any mirror!
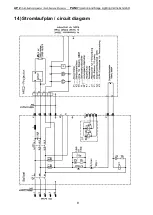
5) Elektrische Verbindungen / Electrical connections
Der Projektor wird mit dem Vorschaltgerät mit dem
montierten Kabel elektrisch verbunden. Das
Vorschaltgerät ist an ein Netz L1, L2, N, PE- 400 V/
230 V/ 50 Hz über das Anschlusskabel und den 5
pol. CEE- Stecker 0,15- 6/ 16 A anzuschließen!
The projector is connected to the ballast by
using the mounted cable. The ballast has to
be connected to a L1, L2, N, PE- 400 V/ 230
V/ 50 Hz power supply by connector cable
and the 5-pole CEE 0.15- 6/ 16 A plug.
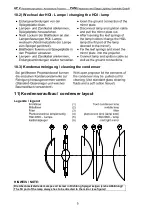
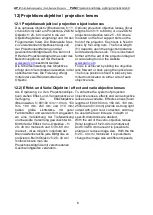
6) Frontlinse / Front condenser lens
(pos.I)
Es können grundsätzlich 3 Frontlinsen
zur Anpassung des Kondensors an das
Objektiv verwendet werden:
Principally it is possible to use 3 kinds of
front condenser lenses to adapt the
condenser to the projection lens:
Für Objektive / for projection lenses
Type
Best. Nr. / Order Code
f= 11 cm …. f= 27 cm
G 503
12401
Mit dieser Frontlinse ist der Projektor
With this front condenser lens the
standardgemäß ausgestattet.
projector is basically equipped.
f= 33 cm + f= 40 cm
G 505/II
12434
f= 50 cm + f= 60 cm
G 505
12402
Für längere Brennweiten ist der Projektor
aus lichttechnischen Gegebenheiten
nicht genug geeignet.
Wechsel der Frontlinse:
Nach Entfernen der 4 Rändelmuttern
kann die Frontlinse demontiert werden.
For longer focal lengths the projector is
not enough suitable for optical reasons.
Changing the front condenser lens:
After removing the 4 knurled nuts the
front condensor lens may be
dismounted.
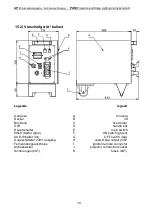
7) Elemente am Projektor / elements on the projector
An beiden Seiten des Projektors finden Sie
die Klemmung für die Neigungsverstellung
(Pos. K).
Am hinteren Gehäuseanbau befindet sich
der Betriebsstundenzähler (Pos.H).
On both sides of the projector you find
the clamps for the tilt adjustment
(pos.K).
At the rear housing extention you find
the operation hour meter (pos.H).
Summary of Contents for AP 2
Page 1: ......


