background image

17

9.

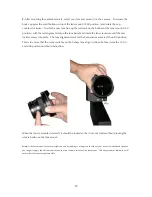
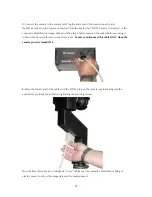
 You are now ready to turn on the power to the camera system.  Flip the switch upward and the

system will start up.  The status indicator on the processor will glow orange then red then the LED

should go out.  The status LED on the camera body should be flashing green to indicate the camera

is ready to scan.  If you have a Firewire converter connected please verify that the green LED on the

converter is glowing green.  If not please cycle the power to the Processor.

10.

 Now you should boot up your computer.

11. 

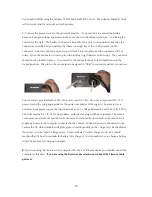
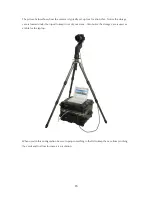
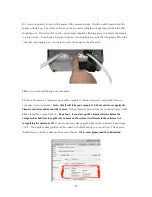
Once the camera is powered up and the computer is booted you may connect the Firewire

converter to your computer.  

Note: that it will take you computer 10-20 seconds to recognize the

Firewire converter and mount the camera.

  During this time you will see the converter’s green LED

blink off and then come back on.  

Be patient.


If you start up the camera software before the

computer has had time to register the camera on the system it will result in the software not

recognizing the camera at all.

  If you do not see a steady green light on the converter repeat steps

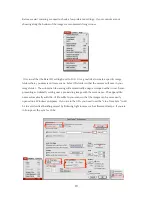
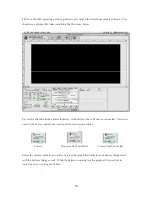
10-12.  The Apple System profiler can be useful in troubleshooting you connection.  The camera

should show up in the system profiler as seen below. 

 OS-X users please read the Addendum!

Summary of Contents for MARK TWO

Page 1: ...PANOSCAN MARK TWO OPERATION MANUAL V1 1 ...

Page 2: ...up the rest of the system 2 Connect the converter SCSI connection to the processor module DO NOT CONNECT THE FIREWIRE YET 3 Power up the processor module and verify that the green light on the converter is lighted 4 Assuming the computer is now running plug in the Firewire converter connection to the computer You will see the converter s green light blink off for a moment The red activity light on...

Page 3: ...limited and the 125th shutter speed may corrupt full resolution images For this reason we recommend scanning to the camera s hard drive when running OS X Sound The play sound after scanning in this new 6 0 3 version is not fully implemented There is only one tome available and it is a 3 second long tone Known Issues with ViewFinder 6 0 3 You may notice a lag when first clicking on the color balanc...

Page 4: ...nstalling and Configuring the ViewFinder Software 10 Memory Requirements 10 Scan to RAM Mode 10 System Requirements 11 Setting Up the System 22 Making Your First Scans 29 The Focus Tool 31 Saving Scans 32 Using the File Manager 34 Changing Filters 35 Cleaning the CCD 37 Focus Chart ...

Page 5: ...s would make the ideal panoramic camera solution The MK 2 camera is the unique result of combining Better Light s extraordinary scanning system with our custom designed camera body that accepts superb Mamiya Sekor optics This camera was designed from the ground up to provide the best possible image quality attainable in a panoramic scene The 645 format Mamiya lenses were selected because they cove...

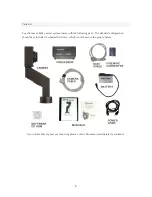
Page 6: ... system comes with the following parts The standard configuration should have included a wheeled hard case which is not shown in the picture below If you notice that any pieces are missing please contact Panoscan immediately for assistance ...

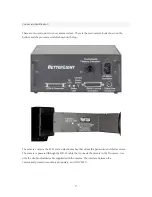
Page 7: ...dule shown on the top The camera contains the CCD and an electronics bay that drives the pan motor and shutter motor The camera is powered through the DB 25 cable that connects the camera to the Processor Use only the double shielded cable supplied with the camera The interface between the camera and processor module is proprietary and NOT SCSI ...

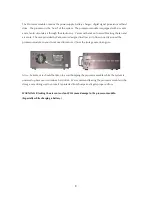
Page 8: ...oscan is designed to allow air to flow correctly around the processor module so you do not need to remove it from the storage case during use Also Extreme care should be taken to avoid bumping the processor module while the system is powered up because it contains a hard drive We recommend leaving the processor module in the storage case during use to ensure it is protected from bumps and it gets ...

Page 9: ...e application itself Preferences stored in this file are used to determine startup settings each time the software is launched You can alter these settings and save new preferences which will then be used on subsequent startups of the software You may also save and reload different settings files which you create each containing a complete set of camera control selections that are customized to yo...

Page 10: ... from the Largest Free Memory field within the About this Macintosh menu selection Otherwise the Scan to RAM checkbox will be disabled grayed out in the main control window If enough free memory exists the control software will borrow it from the System for the duration of the scan and then release it back to the System after writing the new image data to the computer s internal disk drive System ...

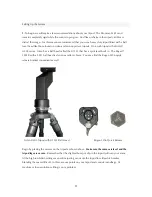
Page 11: ...has a spirit level built in The Bogen 3283B with a 3241 ball head is also an excellent choice You may find the Bogen 3296 quick release bracket convenient as well Gitzo G505 Tripod with G1321 Ball Head Bogen 3296 Quick Release Begin by placing the camera on the tripod as shown above Make sure the camera is level and the tripod legs are secure Remember that the slightest bump or slip in the tripod ...

Page 12: ...nment mark for the Panoscan camera is at the 6 00 position This is to ensure that the corner notches on the fisheye lens align to allow the lens to see the 12 00 and 6 00 positions without obstruction When the lens is mounted correctly it should be locked so that it cannot rotate without pressing the release button on the lens mount Trick If the lens mount is excessively tight you can try rubbing ...

Page 13: ...he socket before securing it to the connector with the two connector screws Connect or disconnect this cable ONLY when the camera power is turned OFF 4 Mate the female end of the cable with the DB 25 plug on the camera again making sure the connectors are firmly seated before tightening the securing screws Do not allow this cable to run alongside noisy cables such as computer HMI lamp cabling or e...

Page 14: ... SCSI 2 50 pin High Density shielded connector which is always internally terminated with active termination In most cases you will be using the Processor with the FireWire converter provided by Panoscan Begin by connecting the SCSI connector to the processor always being careful to mate the connector squarely and firmly into its fully locked position Avoid stress on this connector which might dam...

Page 15: ...ct connection Your camera is provided with an IEC 320 power cord for USA Use only an approved IEC 320 power cord with a plug appropriate for the power receptacles of the region The camera has a universal input power supply that operates from any AC voltage between 85 and 264 volts 100 to 240 volts nominal 47 to 63 Hz single phase without changing switches or jumpers The camera consumes a maximum o...

Page 16: ...ce the storage case is located under the tripod to keep it out of your scene Also notice the storage case is used as a table for the laptop When used in this configuration be sure to prop something in the lid to keep the case from pinching the cords and to allow for some air circulation ...

Page 17: ...a is powered up and the computer is booted you may connect the Firewire converter to your computer Note that it will take you computer 10 20 seconds to recognize the Firewire converter and mount the camera During this time you will see the converter s green LED blink off and then come back on Be patient If you start up the camera software before the computer has had time to register the camera on ...

Page 18: ...r It should say it has a Panoscan connected If not you need to check you connections and repeat the start up procedures Correct Processor Not Connected Camera Not Connected Below the camera indicator you will see a green bar graph that indicates your battery charge status with the battery voltage as well When the battery is running low the graph will turn yellow to indicate you are running out of ...

Page 19: ...camera will save in your image folder The automatic file naming will automatically assign a unique number to each scan preventing accidentally writing over a pre existing image with the same name The append file name automatically adds the tif file suffix to your scans so that the images can be more easily opened on a Windows computer If you are in the USA you need to set the Line Time Sync to 60 ...

Page 20: ...r in OS 9 Note It is very important to disable the automatic save after scan if you are shooting to the processor s hard drive with the Firewire converter or the system will freeze after the scan Each method of saving has advantages and disadvantages Saving to the host computer s RAM allows you to quickly open the image after a scan to inspect it The downside on scanning to the host computer s RAM...

Page 21: ...be viewed on a Windows machine at some point we recommend settung the Macintosh s screen gamma to at least 2 2 We recommend 2 4 on a Powerbook screen Using the camera with your screen set to a gamma seyying of 1 8 may result in your images looking under exposed on other machines To change the gamma of your monitor use the Monitors control panel to create a custom monitor profile Be sure to save th...

Page 22: ...nfirm that the Scan Area is dialed up to 100 5 Confirm that the Return after Scan is enabled 6 Check to make sure the camera cable is wrapped at least 1 2 turn counter clockwise to prevent the camera from pulling on the cable during a scan Note The pan motor is very powerful Failing to back wind the camera cable can result in damage to the cable computer and camera It is very important to check th...

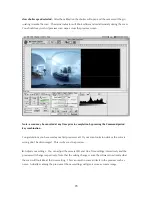
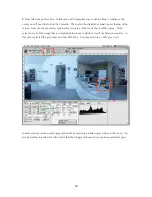
Page 23: ...riod key combination Congratulations you have made your first preview scan If your scan looks too dark or the color is wrong don t be discouraged This is why we do a preview 8 Adjust your settings You can adjust the camera ISO and Line Time settings interactively and the preview will change respectively Note that the setting changes cause the software to estimate what the scan will look like at th...

Page 24: ...select any area of the scene that is white or gray Don t select an area of the image that is completely blown out to white or it will not balance correctly In this case I selected the gray spots on a Macbeth chart You may also use an 18 gray card In most scenes you can usually get good results by selecting a white or gray object in the scene Up to 4 points may be selected Also notice that the hist...

Page 25: ...600K for Daylight for your IR filter then you will force the gain to be adjusted more drastically This will result in a reduced maximum ISO For example if you are in a candlelit room and you try to white balance to neutral you will end up with a very limited maximum ISO because the camera has to push the green and blue channels so hard to match the red channel You will likely see more noise in suc...

Page 26: ...affecting highlight or shadow values or to make changes in highlight values without affecting mid tone or shadow values etc Unlike most of the exposure and color balance controls discussed previously which alter the analog signals of the CCD prior to digital conversion tonal adjustments affect the digital translation tables which convert the CCD s raw luminance data expressed as EV on the horizont...

Page 27: ... it is required only exposure and color balance adjustments affect this data since a tone curve is not used To save 48 bit image data select None 14 bit from the Tone Curve popup menu The image file size will double but no other image parameters will be affected scan time remains the same for example When None 14 bit is selected the tone curve window turns light red to remind you that the curve is...

Page 28: ...es at full resolution lower resolution settings may allow faster line times MK2 Camera HD or Host RAM 24 bit color 8 16 bit mono 1 120 sec up to 2 2 MB sec MK2 to Camera HD 48 bit color 1 80 sec up to 2 8 MB sec MK2 to Host RAM 48 bit color 1 60 sec up to 2 2 MB sec For more detailed information about the tone curve settings and the using 48 bit color mode please refer to the Better Light manual ...

Page 29: ...ree to print this last page and mount the image on cardboard as a focus target After a location has been marked click the Go button in the Focus tab panel This will position the CCD at the indicated location and begin displaying focus information Focus data is displayed in both graphic and numeric form by rocking the lens s focus adjustment the best focus can quickly be determined After focus has ...

Page 30: ...30 texture can usually be used successfully for focus verification whether it is brightly lit or in the shadows You can read more about this feature in the Better Light ViewFinder manual ...

Page 31: ...the Command period key combination The Panoscan MK2 system features a dedicated internal disk drive for image storage in the processor module By default this is where the images are stored as they are scanned The fastest scans and the most efficient use of computing resources can be accomplished by using the digital processor module s internal disk drive as the initial destination for image data T...

Page 32: ...uickly move to any desired position in the list Note A single item in the list can be selected by pointing to its name and clicking Multiple adjacent items can be selected by holding down the Shift key while clicking on the first and last items of the contiguous group or by holding down the Shift key while clicking and dragging across the desired contiguous group of items It is OK to select empty ...

Page 33: ...computers Transfer rates vary with the performance of the host computer from one to several MB per second Retrieved files are stored as standard TIFF files and include the image notes described previously ...

Page 34: ...n the front of the camera The screws are captive to the front plate so you do not need to unscrew them all the way out Just loosen them far enough that the front plate separates freely from the camera body When you replace the front plate be sure the red alignment mark on the lens mount goes down toward the motor The release button should be on top Away from the motor Note The CCD is aligned to yo...

Page 35: ...s This will expose the CCD Once the CCD is exposed you may try to blow the dust off the CCD with canned air IMPORTANT Always hold canned air right side up and test shoot a couple of times before blowing on the CCD because the liquid propellant may come out in the first spray Always hold the can upright If blowing air on the CCD will not remove the dust you may try wiping the CCD with a clean camel...

Page 36: ...er cleaning repeat the sky test The streaks should be gone If you still see a problem contact Panoscan for more advise In some cases it may be best to send the camera in to Panoscan for professional cleaning ...

Page 37: ...37 ...
Reviews: