background image

Scale Length & 
Width

This “Scaling” Feature is used to adjust the error 
on the length and width, which may be caused by 
the thickness of the media.  The Denominator is 
the actual length, and the Numerator is the ideal 
length measured from the result.  For example, 
cutting a line with 500.0 mm length.  The 
procedure as follows:
1. Press the [LEFT ARROW] to choose the 
Numerator and select 500.0 mm,
2. Cut the length by sending a graph fi le,
3. Measure the length then use the [RIGHT 
ARROW] key to choose the Denominator and,
4. Press [UP ARROW / DOWN ARROW] 
changes the calues to the actual length.

[Tool Select]

Set smoothing 
cut

Enable this feature to make curves smoother.

Set Tangential 
Mode

Provide the emulation tangential-cutting
technique with thicker media types and small 
letter cuts.

Note: When the Offset value is setting at 0.000 
mm Set Tangential Mode will automatically set-
ting at disable.

Disable

Pouncing

It makes perforated paper patterns that are used 
together with a charcoal or chalk pounce bag.  
The patterns will allow you to transfer an image 
to surfaces for hand painting or cutting.

Place pouncing strip on the top of the cutting pad 
to protect the cutting pad during pouncing.

Setting Range: 0mm-200 mm, for 0 mm is used 
to disable the pouncing mode.
*

Pouncing tool is an optional item

Set Panel Setup

Setting to “Accept setup command”, the cutter 
will not accept any set up command from the 
software, the Force, Speed, Cutting Quality, and 
Offset must directly changed from the Control 
Panel of the cutter.

Save Parameter

It can save 4 patterns of cutting parameters for 
later use.

Save 1 to 4

Pattern 1

Over Cut

It will cut an excess margin from the fi rst and last 
line segments.

0.00mm- 1.00mm
0.05mm/step

0.00 mm

Restore default

It returns the settings values of the menu items to 
factory-default values.

4. Operation Procedure                                                  4-5

Summary of Contents for Vinyl Sign

Page 1: ... User s Guide SIGNWarehouse Warehousecom pan_man_rev1_0504 ...

Page 2: ... Computer 3 2 3 5 USB Port 3 3 4 Operation Procedure 4 1 Setting up Menu Panther II in On line mode 4 1 4 2 Setting up Menu Panther II in Off line mode 4 2 4 3 Description of Menu Items 4 3 4 4 Loading the Sheet Media 4 6 4 5 Loading the Roll Media 4 8 4 6 Tracking Performance 4 11 4 7 Adjusting the Cutting Force and Offset 4 12 4 8 Adjusting the Blade Depth 4 13 5 Maintenance 5 1 Cleaning the Cut...

Page 3: ...r Support 2 pieces 24 pieces of M6 screws 1 piece of M5 L shape hexagon screw driver 1 piece of M6 L shape hexagon screw driver 4 pieces of Hold Plugs 1 set of Desktop Support Brackets 2 pieces 4 pieces of Plastic Foot 4 pieces of M4 screws 12 pieces of M6 screws 1 piece of M4 L shape hexagon screw driver Accessory Bag 1 1 piece of User s compact Disk 1 piece of AC power cord 2 data cables 1 RS232...

Page 4: ...stalled blade and pen Control panel consists of 14 control keys and 1 LED and 1 LCM showing messages and menus Slitter Groove sheets off the extra media eas ily along this groove Platen provides the surface for holding and supporting media while performing cutting Teflon Cutting Strip provides the protection of blade when the blade is cutting Figure 1 1 1 Your Sign Cutting Plotter 1 2 ...

Page 5: ... Holds and supplies the roll media for cutting Roll Holder Guide Bushes Keeps the roll media in place when media is pulled from the roll Roll Holder Support Supports roll holders Stand Supports the cutting plotter body H shape Stand Supports the cutting plotter body 1 Your Sign Cutting Plotter 1 3 Stand Beam Stabilizes the body for larger cutters ...

Page 6: ...e AC power cord Serial Interface Connector RS232C used to connect the cutting plotter to a computer through a serial interface cable USB Connector used to connect the cutting plotter to a computer through a USB cable Only available with windows drivers Parallel Interface Connector used to connect the cutting plotter to a computer through a parallel interface cable 1 Your Sign Cutting Plotter 1 4 ...

Page 7: ... temporarily halts cutting in process or continues ON OFF LINE Key used to stop the cutting job or aborting the change of the setting Cut Test Key executes a cutting test for verifying the blade force and offset are correct Data Clear Key used to abort the data being received Tool Select Key used to select tools and set the conditions Misc Key used to selecting items mentioned in Chapter 4 Speed K...

Page 8: ...the machine accessories and supplies Keep the working area stable avoiding severe vibration Keep the temperature between 5 and 40 41 104oF in the workshop Keep the relative humidity between 30 and 70 in the workshop Protect the machine from dust and strong air current Prevent the machine from direct sunlight or extremely bright lighting The machine is on a level surface Caution 3 Connecting the Po...

Page 9: ...river 24 pieces of M6 screws 4 pieces of hold plugs Step 2 Remove the plotter body and the accessories from the shipped carton Place the stands upright on the H stand and follow the number 1 2 3 to assemble See Figure 2 1 2 2 Step 3 Then connect Part 2 and 1 Insert 4 screws into the holes on H stand and fasten them as shown in Figure 2 2 1H stand part 1 2 Stand beam part 2 3 Side part 3 2 Installa...

Page 10: ...o the holes on plotter s bottom and tighten them up as shown in Figure 2 5 Screw Figure 2 5 Note The serial number for your cutting plotter is on the underside of the machine Record this serial number on the front of this manual or other secure location for future reference Step 6 Insert the roll holder support with the screws into the holes of the stand then tighten them up as shown in Figure 2 6...

Page 11: ... 4 pieces 1 set of Roll Holder Support 2 pieces 1 set of Desktop Support Bracket 2 pieces 4 pieces of Plastic Foot 4 pieces of M4 screws 12 pieces of M6 screws 1 piece of M4 L shape hexagon screw driver 1 piece of M5 L shape hexagon screw driver 1 piece of M6 L shape hexagon screw driver for adjusting the screws of Roll Holders Step 2 Put the 4 Plastic Foot under the Roll Holder Support and insert...

Page 12: ...on the Roll Holder Assembly beside the bottom of the machine Then insert the M6 screws into the holes of Roll Holder support assembly and tighten them with M5 L shape screwdriver Like Figure 2 3 3 Step 5 Place the 2 roll holders into the holes of Roll Holder Support See Figure 2 3 4 M6 screws Desktop Support Brackets Roll Holder Support M6 screws Roll Holder Assembly Screw holes M6 screws Figure 2...

Page 13: ...on Figure 2 10 is the illustration of the blade holder Insert a blade into the bottom of the blade holder and remove the blade by pushing the pin Make sure that your fingers are away from the blade tip Step 1 Install blade Figure 2 11 Figure 2 11 2 Installation 2 6 Figure 2 10 Adjustment depth knob Pin Outward ring ...

Page 14: ...m more than film s thickness That is if the thickness of film is 0 5mm then blade s length is properly adjusted 0 6mm and it can completely cut through the film layer yet avoid penetrating the backing Step 4 Insert the blade holder into tool carriage Please note the outward ring of the holder must be placed into the grooves of carriage firmly see Figure 2 14 then fasten the case Figure 2 15 2 Inst...

Page 15: ...tting quality might be affected Increasing the cutting force might do the trick However once the blade is worn out and no longer provides a reliable cutting you should replace with a new blade The blade is a consumable and must be replaced as often as necessary to maintain the cutting quality The quality of the blade affects cutting quality So be sure to use a high quality blade to ensure good cut...

Page 16: ...sion Connecting to the Parallel Port Centronics 1 Connect a parallel cable to the cutting plotter and the host computer Figure 3 1 2 Set up the output port LPT1 or LPT2 from your software package 3 2 Serial Transmission Connecting to the Serial Port RS 232C 1 For IBM PC PS 2 users or compatibles connect the RS 232C cable to the serial connector of the assigned serial port COM1 or COM2 of your host...

Page 17: ...le to emulate HP GL or HP GL 2 commands therefore Use DOS com mands like TYPE or PRINT to output your file As long as the file is HP GL or HP GL 2 format the cutting plotter can output the data precisely 3 4 Interface of Macintosh Computer In order to operate the cutting plotter with a Macintosh computer e g Power Mac you need a MAC serial cable and a key span OR USB PIA cable please refer to Fig ...

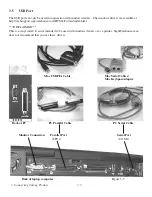
Page 18: ...MER This is a vinyl cutter It is not intended to be used with windows drivers or as a printer SignWarehouse com does not recommend that you use these drivers Mac Serial Cables Mac KeySpan Adapter Mac USB PIA Cable PC Serial Cable PC Parallel Cable Back of PC Serial Port COM 1 Parallel Port LPT 1 Back of laptop computer Figure 3 3 3 Connecting Cutting Plotters 3 3 Monitor Connection ...

Page 19: ... O M L W Top Menu Sending data Data in Processing Pause Setup Resume Force 80 gf OK Enter Speed 72 cm s Select OK Enter Up Speed 72 cm s Select OK Enter Quality Normal Select OK Enter Force Key Speed Key Offset Key Data Clear Tool Select Use to select Panther II in processing Use to select Pause Media Check Offset 0 275 mm OK Enter Clear data memory N Cancel OK Enter 1S 72 F 80 O 0 276 M Select OK...

Page 20: ...led Media Select OK Enter Media Back Forth Select OK Enter Paper Saving Mode Select OK Enter Set Communication Select OK Enter Select Language Select OK Enter Select Units Select OK Enter Scale Length Select OK Enter Firmware x x xx FPGA Vx x mm dd yy Scale Width Select OK Enter Force Key OFFSET KEY Data Clear Speed Key Cut Test Misc Tool Select 0 600 gram with an increment of 5 gf 0 000 1 000mm w...

Page 21: ...m 5 gram step 80 gram 2 82 oz Offset Key This sets the offset value for the blade during cutting 0 000 1 000mm 0 275mm 0 011 in Arrow Key 1 Move the carriage position on x axis and y axis 2 Choose the functions and change the value of the setting Enter 1 Press it to effect the displayed parameters The displayed parameters will be saved automatically 2 To set a new origin at the present tool carria...

Page 22: ...e speed of data transmission Data Bits refers to the size of one block of data and Parity is used to check if data was received correctly or not 9600 n 7 1 p 9600pbs 7 Bits with NO Parity 9600 o 7 1 p 9600pbs 7 Bits with ODD Parity 9600 e 7 1 p 9600pbs 7 Bits with EVEN Parity 9600 n 8 1 p 9600pbs 8 Bits with NO Parity 9600 o 8 1 p 9600pbs 8 Bits with ODD Parity 9600 e 8 1 p 9600pbs 8 Bits with EVE...

Page 23: ... 0 000 mm Set Tangential Mode will automatically set ting at disable Disable Pouncing It makes perforated paper patterns that are used together with a charcoal or chalk pounce bag The patterns will allow you to transfer an image to surfaces for hand painting or cutting Place pouncing strip on the top of the cutting pad to protect the cutting pad during pouncing Setting Range 0mm 200 mm for 0 mm is...

Page 24: ...ob without sending the file again Setting Range For Recut 1 99 with an increment of 1 For Copy 1 99 with an increment of 1 It will leave 1mm between each copy Note If the media is not large enough to continuous copy it will show as following If both functions are selected at the same time the cutter only executes the last setting Mark Positions for contour cutting This feature is making contour cu...

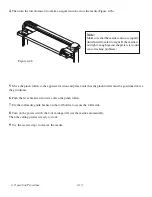
Page 25: ...ia covers the sensor the cutting plotter will size the media s width and length automatically Backside Figure 4 18 Paper Step 3 Then move the pinch rollers manually to the proper position Be sure the pinch rollers must be positioned above the grid drum The white marks on the main beam will remind you where the grid drums are Figure 4 19 Step 4 Push the lever backward to lower down the pinch roller...

Page 26: ...g force at the rear portion of the pinch roller support 3 Do not move it by holding its front rubber roller Figure 4 20 X Incorrect Figure 4 20 4 5 Loading the Roll Media 1 Put the roll media guide bushes on two roll holders Figure 4 21 Figure 4 21 4 Operation Procedure 4 8 Roll Media Guide Brushes ...

Page 27: ...ll media is firmly gripped see Figure 4 23 Then put the roll media on the roll holders Adjust the position of the roll media ensure that media flanges are able to run in the grooves of media guide bushes Figure 4 24 3 Load the media on the platen Please refer to 4 4 1 Loading the sheet media After loading the roll media flatten the media on the platen and hold the front edge of the roll media firm...

Page 28: ...e pinch rollers to the appraise location and please note that the pinch rollers must be positioned above the grid drums 6 Push the lever backward to lower down the pinch rollers 7 Fix the roll media guide bushes on the roll holder to secure the roll media 8 Turn on the power switch the tool carriage will size the media automatically Then the cutting plotter is ready to work 9 Use the reverse steps...

Page 29: ...ght edges of the media see Figure 4 27 If the media length is greater than 4m leave at least 25mm margin on the left and right edges of the media see Figure 4 28 Please refer to the paragraph Important Information at the beginning of the book Note Refer to the tutorial on Tracking on our website Figure 4 27 Figure 4 28 0 5mm 25mm Pinch roller 0 5mm 25mm Pinch roller or 25mm or 0 5mm 25mm Pinch rol...

Page 30: ...test position When the cutting test is completed a pattern appears Peel off the pattern to see if it can be easily separated from the media base If yes the setup tool force is appropriate If not or cut through the back paper press FORCE KEY to adjust the tool force until an optimum force is obtained If the pattern appears to be BB or CC layout press OFFSET KEY to adjust the offset value until AA p...

Page 31: ...t cut Check to ensure that the blade cuts all the way through the vinyl and does not cut the backing If it did not cut through the vinyl you will turn the depth adjustment knob on the blade holder clockwise to increase the depth of the blade If it cuts through the vinyl and into the backing you will turn the blade counter clockwise to decrease the blade depth You will continue the above steps unti...

Page 32: ...ve cleaners or strong detergents for cleaning They may damage the surface of the cutting plotter and the moving parts Cleaning Precaution Recommended Methods Gently wipe the cutting plotter surface with a lint free cloth If necessary clean with a damp cloth or an alcohol immersed cloth Wipe with water to rinse off any residue and dry with a soft lint free cloth Wipe all dust and dirt from the tool...

Page 33: ...um manually while cleaning Refer to Figure 5 1 Figure 5 1 5 3 Cleaning the Pinch Rollers 1 If the pinch rollers need a thorough cleaning use a lint free cloth or cotton swab to wipe away the accumulated dust from the rubber portion of the pinch rollers To prevent the pinch rollers from rotating while cleaning use finger to hold the pinch rollers not to rotate 2 If needed to remove the embedded or ...

Page 34: ...ction in your computer or a soft ware problem Why is the cutting plotter not functioning Possible Causes 6 1 Non Operational Problems Check the following first Does the AC power cord plug in properly Does the AC power cord connected to the power connector properly Does the power LED still illuminate Solutions If the LCM is able to display the message the cutting plotter should be in a normal condi...

Page 35: ...Correct the problem and re power on to reboot system This message indicates that there might be an obstruction to carriage relat ing to a problem on the Y axis Correct the problem and re power on to reboot system This message indicates that the blade up down sensor malfunctioned Re power on to re boot system If the problem still exists call tech support Make sure that your cutting space on the plo...

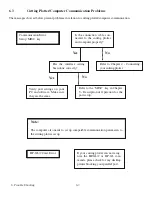
Page 36: ...ctly Refer to Chapter 4 Connecting your cutting plotter Verify port settings on your PC and software Make sure they are the same Refer to the MISC key in Chapter 3 Description of Operation for the port setup Note The computer also needs to set up compatible communication parameters to the cutting plotter set up HP GL 2 Cmd Error If your cutting plotter can not recog nize the HP GL 2 or HP GL com m...

Page 37: ...our cutting plot ters If not use software that has HP GL and HP GL 2 emulation supports and you can chose the following three drivers A3 size HP7475A A1 size HP7580A A0 size HP Draf Pro Exl or HP Draf Master Does your soft ware recommend using a different cable Refer to Chapter 4 connecting your cutting plotter Try using the recommended cable Does the software vendor provide a sample file Re power...

Page 38: ... for tool force is 80 gf or 2 82 oz Is the tool offset set up properly Adjust the tool force to obtain an optimum blade force Refer to chapter 3 FORCE and CUT TING TEST Is there any dirt adhered to the blade Adjust the tool offset to obtain an optimum val ue Default 0 275mm 0 011m Remove the blade and blade holder and clean them Please contact your dealer for technician support Yes Yes Yes Yes Yes...

Page 39: ...KEYs Cutting test Press CUT TEST position carriage by ARROW KEYS ENTER Speed Force Offset Press related key to adjust then repeat the step of Cutting Test for best cutting result Function Recut Copy Quality Setup and Communication Setup follow the instruction shown on LCM 6 As the cutting plotter receive data from host LCM displays as follow When you are at this state the only key you can press is...

Page 40: ...n fly out During operation do not touch any of the moving parts of this machine such as the carriage Also be careful that clothing and hair do not become caught Always connect the power cable to a grounded outlet Always use the accessory power cable that is provided Do not wire the power cable so that it becomes bent or caught between objects Do not connect the power cable to branching outlet to w...

Page 41: ...vinyl paper you need to use AUTO UNROLL MEDIA function see page 41 1 If the length of graphic is between 6 feet the cutting speed is better slower than 45cm sec and the cuting quality is set as Normal 2 If the length is longer than 10 feet the CUTTING SPEED is better slower than 30 cm sec 3 After loading the roll media all pinch rollers are raised at this stage flatten the media on the platen and ...

Page 42: ...s production Warning Never press the top release grip and pull the bottom release grip at the same time as the pictures shown below O CORRECT X INCORRECT Press down top release grip Press down Stop bar Pull up bottom release grip ENABLE Note In case the grips are clipped together due to incorrect operation please use a tweezers to pull out the stop bar when pressing down the top release grip Keep ...

Page 43: ...lers 8 If you are using VE LXI or Flexi sign Turn off Cutting Driver Options Go to the cut plot screen Then click your Properties button on the cut plot screen Click on the Cut tab Select the Cutter driver options located in the bottom tight hand corner Choose None and Click OK Click OK until you are back to the Production Manager Minimize your Production Manager Click the advance tab of your cut ...

Page 44: ... US Price Vinyl Express Blade Fits all Vinyl Express cutters PLTB ROLAND 30 30 US 14 00 PLTB ROLAND 45 45 US 11 00 PLTB ROLAND 60 60 US 11 00 Item Part No Description US Price Blade Holder P BK02019A 1 oz US 75 00 Item Part No Description US Price Safe Blade P ZZ02005A 2 oz US 1 00 Item Part No Description US Price Vinyl Cutting Strip P ZZ00558A 1 oz US 10 00 Paper Cutting Strip P MZ07014A 1 oz US...

Page 45: ...25mm Repeatability 0 1mm Buffer Size 4 MB Interfaces USB Parallel and Serial RS 232C Commands HP GL HP GL 2 Configurable Origin Yes Curve Arc Smoothing Yes Test Cut capability Yes Replot Function Yes Copy Function Yes Pouncing Function Yes Control Panel LCM 20 digits x 2 lines 14 Keys 1 Power LED Dimension HxWxD mm HxWxD in 414 x 930 x 490 16 3 x 36 6 x 19 2 1166 x1080 x 667 45 9 x 42 5 x 26 3 116...

Reviews: