background image

10

art.nr.bruk-S2-eng, Rev. 2015-01

Panthera 

AB reserves the right to make technical changes

ADJUSTMENTS

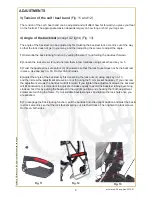
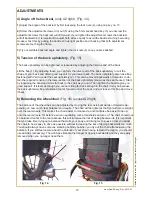
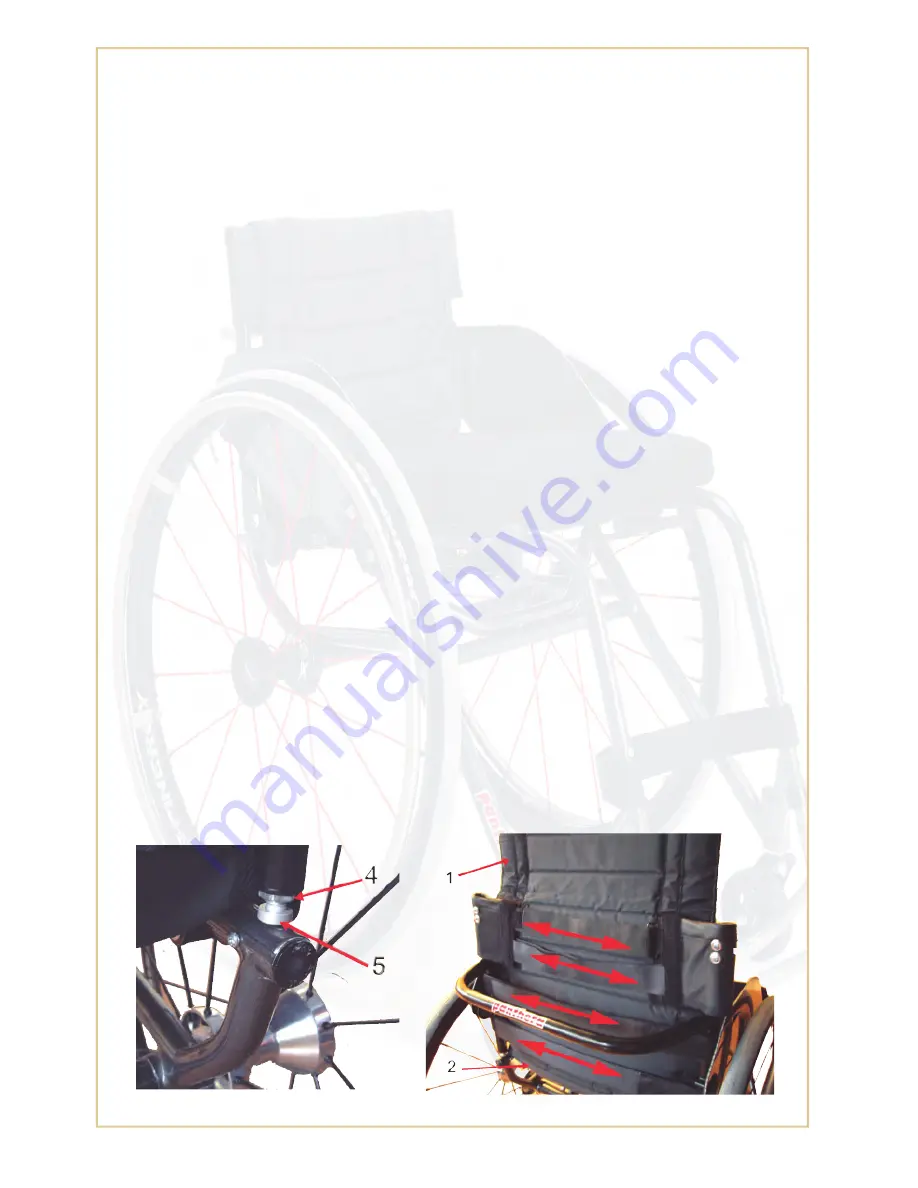
4) Angle of the backrest

, (only U2 light)


(Fig. 14).

1)

 Adjust the angle of the backrest by first loosening the lock nuts (4), using cap key no. 13,

2)

 Screw the adjustment screws in or out (5) using the 5mm socket head key. If you unscrew the

adjustment screws the backrest will tilt forward. If you tighten the adjustment screws the backrest
will tilt backwards. It is important to adjust both sides equally to avoid the backrest tubing becoming
crooked. Test this by putting the backrest in upright position and checking that both adjustment 
screws are touching the frame.

3)

 Try out suitable backrest angle and tighten the lock nuts (4) once you are satisfied..

5) Tension of the back upholstery. 

(Fig. 15)

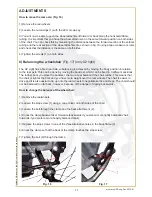
The back upholstery can be tightened or loosened by adjusting the Velcro band at the back. 

Lift the flap (1). By adjusting these you can form the lower part of the back upholstery to suit the 

shape of your back and obtain good support for your lower back. The back upholstery also has a flap 

fastened with Velcro under the seat upholstery (2). This can be moved backwards or forwards to ob-
tain the required tension in the lower section of the back upholstery (known as the seat bucket). Start 
by loosening the band and sit as far back in the chair as you can. Then tighten the band to give you
good support. If it feels as though you are not sitting far back enough in the chair it may be because 

the back upholstery flap is fastened too far forward under the seat. Undo or loosen this flap and move 

it back.

6) Balancing the wheelchair 

(Fig. 16)


(except U2 light)

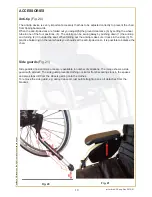
The balance of the wheelchair can be adjusted by moving the rear axle backwards or forwards de-
pending on how much ‘rear balance’ you require. The chair will be lighter at the front with more weight 
over the rear wheels. This makes the chair easier to manoeuvre and it will also be easier to tip up 
onto the rear wheels, for instance, when negotiating curbs, thresholds and so on. The chair should not 
be balanced too far to the rear because this will increase the risk of tipping backwards. It is important 
that you take time trying out a balance that suits your body and driving techniques so that you adapt 
the chair to be as easy to drive as possible, without increasing the risk of tipping backwards too much. 
You should always have someone standing behind you when you try out the chair after adjusting the 
balance. If you still feel unsure about the balance of your chair having tested it thoroughly you should 
use anti-tips (accessory). The anti-tips eliminate the danger of tipping backwards and they are easily 
removed when you no longer need them.

Fig. 14

Fig. 15

Summary of Contents for S2

Page 1: ...uk S2 eng Rev 2015 01 Panthera AB reserves the right to make technical changes Manual Panthera AB Gunnebogatan 26 SE 163 53 Spånga Sweden 46 8 761 50 40 www panthera se panthera panthera se S2 S2 Swing U2 U2 Light ...

Page 2: ... drive and provides a comfortable and ergonomic sitting posture The chair is designed to allow you to lift it easily in and out of your car The chassis has narrow outer dimensions in the most lightweight design currently available We have also designed the framework tubing of the chassis to provide you with a balanced and ergonomically correct grip when lifting the chair in and out of the car To b...

Page 3: ... seat angle of 4 degrees which also allows new options for finding a good seating position also for those who kick drive or need a flatter sitting position for other reasons S2 Swing is also available as S2 Swing short Panthera U2 Panthera U2 is a modern active chair The slimline front and ergonomic design makes it wonderfully smooth to drive and many people discover a better sitting position This...

Page 4: ...rest leaning stretching backwards worn tyres poorly pumped tyres and unforeseen changes in the surface you are driving on WARNING A Panthera wheelchair is designed to be as easy to drive as possible and because of this it reacts quickly to the actions you perform If you perform the wrong actions the chair can tip backwards if you do not have anti tips The chair can potentially tip up and it is not...

Page 5: ...ure the chair is either too nar row or the side guards need to be adjusted The seat is designed to be used with a cushion Driving If the distance between the lowest point of the footrest and the surface is small less than 40 mm the footrest can get caught on bumps in the surface and cause you to fall forwards Transfers lifting chair and user Fig 2 and 3 The chair is lightweight and for this reason...

Page 6: ...or fork 6 Tyre 7 Footrest 8 Castor wheel 9 Chassis 10 Rear axle 11 Quickrelease hub 12 Backrest release 13 Push rim 14 Brake OVERVIEW S2 Swing Swing short Fig 5 1 Backrest 2 Air valve 3 Rear wheel 4 Seat cushion 5 Castor fork 6 Tyre 7 Footrest 8 Castor wheel 9 Chassis 10 Rear axle 11 Quickrelease hub 12 Backrest release 13 Push rim 14 Brake 15 Foot plates 16 Footrest release Fig 4 Fig 5 ...

Page 7: ...wheel 4 Seat cushion 5 Castor fork 6 Tyre 7 Footrest 8 Castor wheel 9 Chassis 10 Rear axle 11 Quickrelease hub 12 Backrest release 13 Push rim OVERVIEW U2 Light Fig 7 1 Backrest 2 Air valve 3 Rear wheel 4 Seat cushion 5 Castor fork 6 Tyre 7 Footrest 8 Castor wheel 9 Chassis 10 Rear axle 11 Quickrelease hub 12 Brake 13 Push rim Fig 7 Fig 6 ...

Page 8: ...n of the backrest upholstery 6 The balance of the wheelchair 1 Tension of the seat upholstery Fig 8 The rear section of the seat upholstery can be tightened or loosened by adjusting the Velcro band underneath the seat as shown in fig 8 This allows you to vary your sitting height by about 2 cm up or down 2 Height of the footrest Fig 9 and 10 The footrest can be adjusted up or down Remove the two sc...

Page 9: ...st lock eccentrics 3 downwards so that the lock faucet does not fix the backrest in place Use cap key no 19 Do this on both sides 4 Adjust the angle of the backrest by first loosening the lock nuts 4 using cap key no 13 and then screw the adjustment screws in or out 5 using the 5 mm socket head key If you unscrew the adjustment screws the backrest will tilt forward If you tighten the adjustment sc...

Page 10: ...s the seat bucket Start by loosening the band and sit as far back in the chair as you can Then tighten the band to give you good support If it feels as though you are not sitting far back enough in the chair it may be because the back upholstery flap is fastened too far forward under the seat Undo or loosen this flap and move it back 6 Balancing the wheelchair Fig 16 except U2 light The balance of...

Page 11: ...ation to the rear axle This can be done by moving the backrest which can be fixed in 3 different positions The further back you place the backrest the more rear balanced the chair will be This means that the chair is light at the front and you have more weight over the rear wheels The chair is easier to drive and it is also easier to tip up onto the rear wheels to negotiate kerbs and steps The cha...

Page 12: ... tyre is worn or changing to another type of tyre the function of the brake will change Check the function of the brake regularly High brake Fig 19 The brake should be adjusted to go 3 4 mm into the tyre when in locked position If a slight adjust ment is required this can be done by rotating the locking arm adjustment so that the brake goes further in out on the tyre depending on the direction in ...

Page 13: ... down 1 the anti tip and turning 2 it in under the seat When folding out the anti tip make sure it locks in the slots 3 To practice balancing on the rear wheels you should set the anti tip device so it is possible to balance the chair Side guards Fig 21 Side guards are a common accessory available in number of variations The image shows a side guard with armrest The side guard prevents clothing or...

Page 14: ... 1 Remove any side guards by pulling them straight up 2 Remove any cushions and fold the backrest forward by pulling wire 1 see Fig 26 3 U2 light has no backrest lock just remove any cushions and fold the backrest forward 4 S2 Swing has removable footrest push the button and swing the footrest sideways and then lift straight up Fig 25 4 Disengage the rear wheels by pushing the button in the centre...

Page 15: ...the chair has been securely fastened apply the wheelchair brakes if the chair is equipped with them We also recommend that the anti tips should be folded out if the chair is equipped with anti tips Ensure that all the belts are securely attached and fastened to the profile rail on the floor of the vehicle and that all the belts are pulled tight Securing the user in a vehicle Fig 29 and 30 If the u...

Page 16: ... Unwin low profile rail Test dummy Hybrid III dummy weight 76 3 kg Panthera S2 Swing Attachment equipment Unwin Belt 4 point with snap hook User seatbelt Unwin 3 point seatbelt high deflector Fastening Unwin low profile rail Test dummy Hybrid III dummy weight 75 kg This crash test was conducted in cooperation with Unwin which produces attachment equipment for wheelchairs For further information ab...

Page 17: ...s The tyres can be pumped by screwing the top off the valve and filling with air using an appropriate valve adapter The tyre can take 8 kg of pressure Check that all the screws and nuts are securely fastened Check that the chair has not been damaged If damage has occurred contact us immediately at Panthera AB Twice a year you should Lubricate the ball bearings for the brakes with some drops of oil...

Page 18: ...38 38 38 38 8300 8360 8420 8480 8716 8776 4744 4804 4864 4924 5160 5220 100 100 100 100 150 150 8 8 8 8 8 8 Weights are measured with brake attached S2 short Seat width cm Total dimensions Total width Total length Total height Seat Seat angle Seat height rear Seat height front Seat depth Back Backrest angle Transport dimensions Width Length Height Weight Total g Transport User weight kg Air pressu...

Page 19: ... 5 46 49 52 71 71 71 38 38 38 8184 8244 8304 4584 4644 4704 100 100 100 8 8 8 Weights are measured with brake attached S2 large Seat width cm Total dimensions Total width Total length Total height Seat Seat angle Seat height rear Seat height front Seat depth Back Backrest angle Transport dimensions Width Length Height Weight Total g Transport User weight kg Air pressure in tyre bar 39 42 45 50 65 ...

Page 20: ... 45 40 40 40 40 7 8 5 7 8 5 7 8 5 7 8 5 49 52 55 58 64 64 64 64 38 38 38 38 9660 9720 9780 10016 6104 6164 6224 6460 100 100 100 150 8 8 8 8 Weights are measured with brake attached S2 swing short Seat width cm Total dimensions Total width Total length Total height Seat Seat angle Seat height rear Seat height front Seat depth Back Backrest angle Transport dimensions Width Length Height Weight Tota...

Page 21: ...7 50 53 72 72 72 72 72 38 38 38 38 38 8270 8330 8390 8450 8686 4714 4774 4834 4894 5130 100 100 100 100 150 8 8 8 8 8 Weights are measured with brake attached U2 light Seat width cm Total dimensions Total width Total length Total height Seat Seat angle Seat height rear Seat height front Seat depth Back Backrest angle Transport dimensions Width Length Height Weight Total g Transport User weight kg ...

Page 22: ...22 art nr bruk S2 eng Rev 2015 01 Panthera AB reserves the right to make technical changes NOTES ...

Page 23: ...23 art nr bruk S2 eng Rev 2015 01 Panthera AB reserves the right to make technical changes NOTES ...

Page 24: ...24 art nr bruk S2 eng Rev 2015 01 Panthera AB reserves the right to make technical changes Panthera AB Gunnebogatan 26 163 53 Spånga Sweden 46 8 761 50 40 www panthera se panthera panthera se ...

Reviews: