EM
B
R
OI
D
ER
Y
B
A
S
IC
S
18
Hooping a Structured Cap
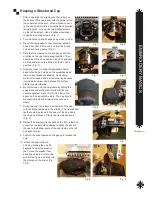
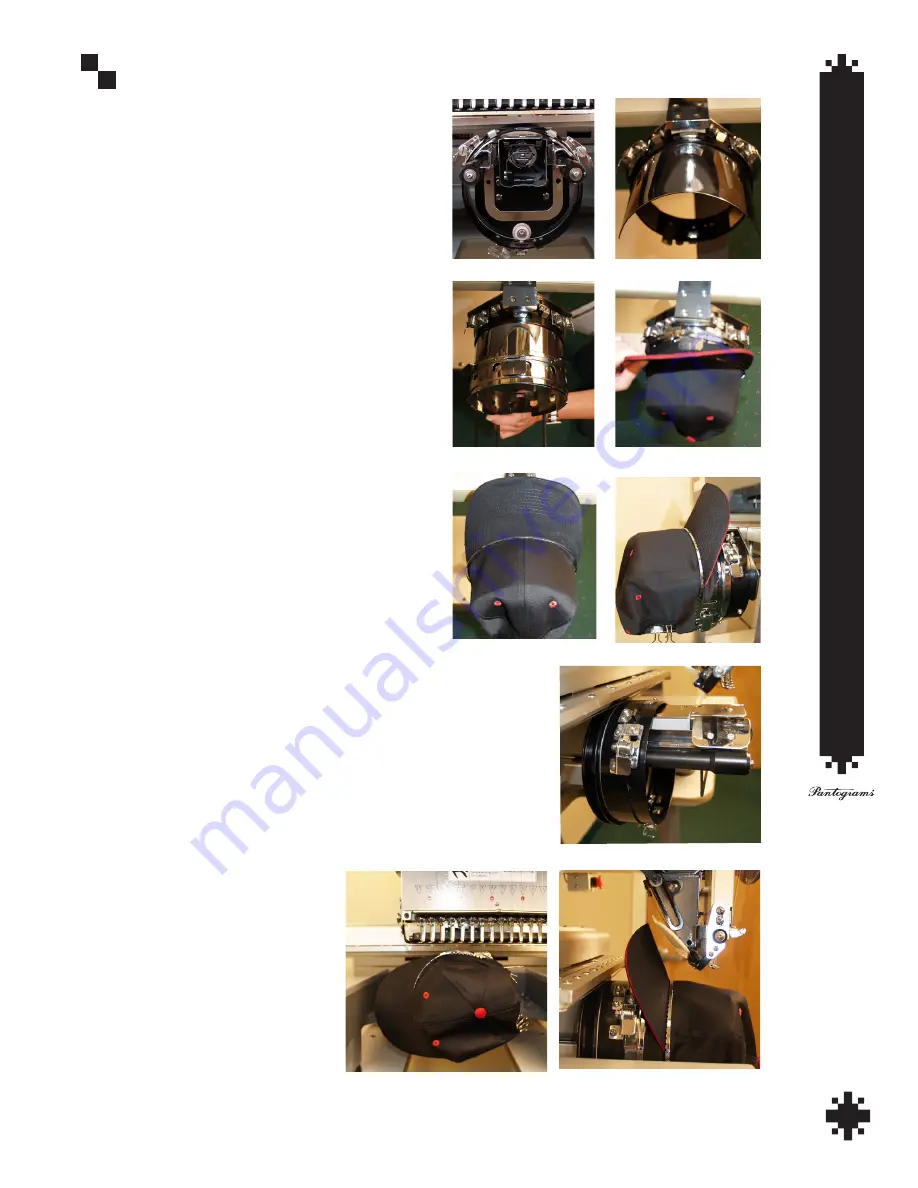
1. Attach cap driver by aligning the four rollers on
the bottom of the cap driver with the guide rail on
the underside of the arm. When aligned correct-
ly, the cap driver will slide smoothly back towards
the patograph. Line up the two Phillips screws
on the left and right. Use a Phillips screwdriver
to tighten mounting screws. (Fig. 1)
2. Turn machine on and change hoop mode to Cap.
3. Mount the cap gauge to your machine tabletop.
Attach it so that the mount is up and the thumb
screws are facing down. (Fig. 2)
4. Note that the clamps on the cap gauge and the
notches on the cap frame snap together. They
should be at the 10 oclock and 2 oclock positions
on both and also on the bottom at the 6 oclock
position. (Fig. 3)
5. Grab your cap. Un-snap the adjustable head
band in the back. Fold down the sweatband and
remove any cardboard packing. No backing
material is needed with a structured cap because
it contains buckram which makes the surface
stable for embroidering.
6. Mount the cap onto the cap frame by sliding the
sweatband under the silver block with the red
center alignment mark. (Fig. 4) Line the center
seam on the cap with this mark. The cap should
be covering the bottom two posts on the cap
frame.
7. Swing the cap frame band over the bill of the cap
with the bill sandwiched in the middle. The frame band
teeth should be placed in the seam of the cap where
the cap and bill meet. Clamp the frame base down.
(Fig. 5)
8. Gather the hat around to the back so the front is flat and
snug. Use the
bent office clamps
to attach the back of
the cap to the bottom posts of the cap frame on the left
and right. (Fig. 6)
9. Push all the snap clamps on the gauge to release the
cap.
10. Attach the cap to the ma-
chine by rotating the cap 90
degrees to clear the presser
feet. Once the presser feet
have been cleared, rotate cap
with bill facing up and snap into
the clamps on the driver. (Fig.
7,8,9)
Fig. 1
Fig. 2
Fig. 3
Fig. 4
Fig. 5
Fig. 6
Fig. 7
Fig. 8
Fig. 9
Summary of Contents for GS1501
Page 30: ...GETTING STARTED 28 ...
Page 31: ...GETTING STARTED 29 The Control Panel Display ...
Page 62: ...EMBROIDERY BASICS 28 Notes ...
Page 64: ...MACHINE BASICS 2 ...
Page 65: ...MACHINE BASICS 3 ...
Page 70: ...MACHINE BASICS 8 ...
Page 71: ...MACHINE BASICS 9 ...
Page 78: ...MACHINE BASICS 16 Notes ...

