EM
B
R
OI
D
ER
Y
B
A
S
IC
S
20
Hooping a Large Item or Jacket
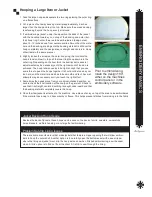
1. Take the large hoop and separate the two rings placing the outer ring
on a flat surface.
2. Cut a piece of cut-away backing material approximately 2-inches
larger then the hoop and lay it on top. Make sure the excess backing
is extending beyond the hoop evenly all around.
3. If embroidering a jacket, unzip it and position the back of the jacket
with the neckline towards you, on top of the backing and outer (bot-
tom) hoop ring. Center the area to be embroidered (design area)
about 9 - 10 inches down from center neckline. Smooth out the mate-
rial and the backing, making sure the backing material is still over the
hoop completely and the design area is straight and centered. Hoop
other items in the same manner.
4. Slightly loosen the screw on the outer hoop ring, that controls the
hoop’s tension. Now try to push the inner (top) hoop down into the
outer ring. Depending on the how thick the item/jacket is, several
adjustments may be necessary until the right amount of tension is
achieved. The hoop tension needs to be tight enough that you use
some force to push the hoops together. It should not be too easy nor
too hard, and the material inside has to be smooth and taut. Several
attempts may be necessary until you reach the right affect.
5. Sometimes the hoops move from your original intended position, so
double check the final location of the hoop on the garment. Check to
see that it is straight, centered, nothing is caught underneath and that
the backing material completely covers the hoop.
6. Once the item/jacket is attached to the machine. Lay a piece of solvy on top of the area to be embroidered
if the material has a nap to it like corduroy or fleece. This helps prevent stitches from sinking into the fabric.
Jacket Backing Hoop Usage
Besides the back of jackets, these hoops can be used on the back of shirts, sweaters, sweatshirts,
horse blankets, multiple hooping or any large flat embroidering.
Problem Solving Lining Issues
There are some manufacturers that make jackets that feature a zipper opening that will allow embroi-
ders to hoop the outer shell. Another option is to carefully open the bottom seam with a seam ripper
where the lining and jacket meet, slip the hoop inside and when finished embroidering, sew the seam
close. A third option is to find out from the client if it is OK to sew through the lining.
Prior to embroidering,
rotate the design 180°
either on the machine’s
control panel or in the
embroidery software.
Summary of Contents for GS1501
Page 30: ...GETTING STARTED 28 ...
Page 31: ...GETTING STARTED 29 The Control Panel Display ...
Page 62: ...EMBROIDERY BASICS 28 Notes ...
Page 64: ...MACHINE BASICS 2 ...
Page 65: ...MACHINE BASICS 3 ...
Page 70: ...MACHINE BASICS 8 ...
Page 71: ...MACHINE BASICS 9 ...
Page 78: ...MACHINE BASICS 16 Notes ...


