background image


25 


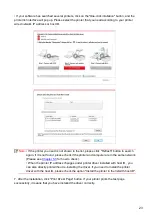
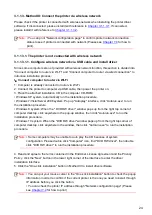
• Click "One

-click installation" button if your software has searched only one printer, and enter into 

installation process to complete automatic network configuration and driver installation. 


Summary of Contents for M6503 Series

Page 1: ...It is recommended that you read this Guide carefully before using the printer Pantum M6503 Series SKD Monochrome Laser MFP ...

Page 2: ... corresponding license agreement and they are referred for instructions only All other product and brand names herein may be the registered trademarks trademarks or service marks of their respective owners and they are referred for instructions only Copyright The copyright of this User Guide is owned by Zhuhai Pantum Electronics Co Ltd It is prohibited to copy translate modify and transmit this Us...

Page 3: ... printer follows the provisions of Class 1 laser products under CFR standard The printer has a Class III b laser diode which has no laser radiation leakage among laser components The laser components shall complies with the requirements of U S Code of Federal Regulations 21 CFR 1040 IEC 60825 1 The following label is attached to the laser components inside the printer Reclamation and recycling To ...

Page 4: ...ing the printer make sure the power is turned off Plugging and unplugging the power cord plug with a wet hand can result in an electric shock The fuser unit is hot when and after printing Touching the fuser unit the shaded area as shown may cause burns The fuser unit is attached with a high temperature warning label Please do not remove or damage this label ...

Page 5: ... device which otherwise may result in fire or electric shock Take care not to spill liquids onto the equipment 12 Do not disassemble the equipment so as to avoid the risk of electric shock Necessary repairs may only be carried out by professional maintenance personnel Opening or removing the cover could result in an electric shock or other potential hazards Incorrect disassembly and assembly could...

Page 6: ... using this product below the specified voltage range please refer to the product precautions or call Pantum Aftersales Service Centre if the toner comes off the printed contents or the equipment starts slowly 23 This product is sold as a complete machine The consumers can go to Pantum Aftersales Service Centre to purchase parts they need If the product sold is inconsistent with the package list p...

Page 7: ...ls please separate the battery from other types of waste and deliver it to your local battery recycling systems for recycling Warning 1 The battery of this product is non rechargeable and it should never be dismantled crushed heated or burned Improper replacement operations may cause ire and burns 2 The battery should be placed beyond the reach of children to prevent them swallowing To protect nat...

Page 8: ...stallation 35 3 1 3 Method of driver unistallation 42 3 2 macOS system driver installation 42 3 2 1 Driver installation 42 3 3 Add printer to macOS system 45 3 3 1 Add up the printer via USB 45 3 3 2 Add up the printer via wireline connection 45 3 3 3 Add up the printer via wireless connection 45 3 3 4 Add AirPrint printer 46 4 Wired Network Settings For printer models that support wired network p...

Page 9: ...arations 59 6 3 3 How to use AirPrint mobile printing 59 7 General Settings 61 7 1 System Settings 61 7 1 1 Toner Save Setting 61 7 1 2 Language Setting 62 7 1 3 Restore to Factory Settings 63 7 1 4 Sleep Time Setting 64 7 1 5 Auto shut off setting 65 7 2 Network Settings 66 7 3 Network Information 67 7 4 Information report 68 8 Print 69 8 1 Print Function 69 8 2 Open Help Document 70 8 3 Duplex P...

Page 10: ...Fax 106 11 1 Connect Devices 106 11 2 Fax Settings 106 11 3 Fax Functions 109 11 3 1 Send Fax 109 11 3 2 Receive Fax 112 11 3 3 Other Scan Functions 113 11 4 Contacts 119 11 5 Cancel Fax 120 11 6 Pantum PC Fax Software 120 11 6 1 Open With 120 11 6 2 Sending Fax with PC Fax 121 11 6 3 Basic Settings for PC Fax 122 11 6 4 Other Functions for Sending Fax with PC Fax 123 12 Routine Maintenance 125 12...

Page 11: ...enu Structure 140 15 Product Specifications 141 15 1 Overview of the Specifications 141 15 2 Print Specifications 142 15 3 Copy Specifications 142 15 4 Scan Specifications 142 15 5 Fax Specifications For M6600 Series models only 143 ...

Page 12: ...imum volume of output tray is 100 pages Support full color scanning Support the function of scanning to email Series Name M6550 Series M6600 Series Picture Basic Function Print Copy Scan Fax Basic Models USB Model NET Model Wi Fi Model Basic Specifications The maximum print speed of A4 paper is 22ppm and that of letter paper is 23ppm Support scan for automatic document feeder The maximum volume of...

Page 13: ... Cord CD ROM Quick Setup Guide Pantum Warranty Phone Phone Cord Spiral Cable Note The Pantum Warranty may not be attached in some regions M6600 Series come with phone phone cord and spiral cable in some countries Volume control is not available with the phone ...

Page 14: ...3 1 3 Product View Side view 1 No M6200 M6500 Series 1 Cover 2 Output Bin 3 Control Panel No M6550 M6600 Series 1 Automatic document feeder 2 Cover 3 Output Bin 4 Control Panel ...

Page 15: ... Platen 2 Scanning Platform 3 Output Tray 4 Automatic Feed Paper Deflector 5 Paper Stop 6 Feeder Tray 7 Automatic Feeder Tray 8 Power switch No M6550 M6600 Series 1 Glass Platen 2 Scanning Platform 3 Output Tray 4 Automatic Feed Paper Deflector ...

Page 16: ...ch in the OFF state to turn on the power supply of the printer 2 OFF long pressure the power switch for about 3s in the ON state to turn off the power supply of the printer The self locking type power switch of the printer has two modes lock and disconnect 1 ON short press the power switch in the OFF state to turn on the power supply of the printer 2 OFF short press the power switch in the ON stat...

Page 17: ...er Cartridge Service Life of the Laser Toner Cartridge Type Average Print Volume Laser Toner Cartridge with Standard Capacity About 1600 Pages The above data is based on ISO IEC 19752 standard Note The model is subject to increase without notice Consumables capacity may vary with different using types It s not recommend using consumables other than the original Pantum consumables Any damages cause...

Page 18: ...Box 1 5 2 Steps of Filling the Easily Refilled Laser Cartridge Steps Diagram Description 1 Hold the laser toner cartridge with the toner port side down and shake it vertically around 5 6 times 2 Open the cover of the waste toner port 3 Pour out the waste toner from the waste toner box 4 Close the cover of the waste toner port 5 Open the cover of the toner refilling port ...

Page 19: ...8 6 Align the mouth of the toner bottle to the toner refilling port 7 Pour the toner into the toner box 8 Close the cover of the toner refilling port 9 The toner refilling is completed ...

Page 20: ...Button Press this button to switch to power saving status or wake the machine from power saving status 3 Status Light This light indicates the ready alarm and other status of the printer Green light Normal Orange light Warning Red Light Error 4 Scan Button Press this button to enter into scan mode 5 Copy Button Press this button to enter into copy mode 6 ID Card Copy Button Press this button to en...

Page 21: ...ctly 4 Junk Fax When you receive a Fax press this button to add the currently received Fax number to the junk Fax number list 5 Power Saving Wake up Button Press this button to switch to power saving status or wake the machine from power saving status 6 Wi Fi Button Short press Wi Fi button to turn on direct Wi Fi connection of the printer and automatically print out Mobile Device Wi Fi Connection...

Page 22: ...nto the device 13 Menu Button Press this button to access the menu options to make the settings 14 Back Button Press this button to go back to the upper level page 15 and Press this button to browse through each menu and its options 16 OK Button Press this button to save the settings 17 Status Light This light indicates the ready alarm or other statuses of the printer Green light Normal Orange lig...

Page 23: ...s User Guide may result in poor print quality increased paper jam and excessive wear of the printer Properties such as weight composition texture and humidity are important factors affecting the printer performance and output quality Please note the following matters when selecting the print media 1 Desired print effect The print media selected should meet the requirement of the print tasks 2 Surf...

Page 24: ...els of full sheet only There is no guarantee that all the labels in the market can meet corresponding requirements Use wrinkled blistered or damaged label papers Envelope Envelopes should be loaded evenly Use wrinkled nicked stuck or damaged envelopes Use envelopes with clips snaps windows or coated linings Use envelopes with self adhesive stickers or other synthetic materials Transparent Film Onl...

Page 25: ...g area Usage Paper Size Top and Bottom Margins A Left and Right Margins B Print A4 5 mm 0 197 inch 5 mm 0 197 inch Letter 5 mm 0 197 inch 5 mm 0 197 inch Copy A4 5 mm 0 197 inch 5 mm 0 197 inch Letter 5 mm 0 197 inch 5 mm 0 197 inch Scan A4 5 mm 0 197 inch 5 mm 0 197 inch Letter 5 mm 0 197 inch 5 mm 0 197 inch ...

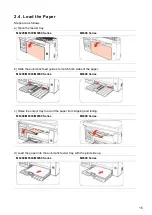
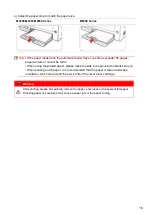
Page 26: ... the automatic feed guides to match both sides of the paper M6200 M6500 M6550 Series M6600 Series c Raise the output tray to avoid the paper from slipping and falling M6200 M6500 M6550 Series M6600 Series d Load the paper into the automatic feeder tray with the print side up M6200 M6500 M6550 Series M6600 Series ...

Page 27: ...d in When using the printed paper please make the side to be printed the blank side up When printing on A5 paper it is recommended that the paper is fed in landscape orientation which can extend the service life of the laser toner cartridge Warning After printing please immediately remove the paper envelopes or transparent film paper Stacking paper or envelopes may cause a paper jam or the paper c...

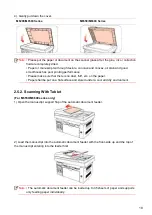
Page 28: ...B5 Letter Custom 2 5 1 Scanning With Tablet Steps of Use 1 Raise the cover M6200 M6500 Series M6550 M6600 Series 2 Load the manuscript face down M6200 M6500 Series M6550 M6600 Series 3 Align the manuscript to match the appropriate paper size Note If the manuscript does not match with any size marker please align the upper left corner of the manuscript with the arrow ...

Page 29: ...ake sure that there is no dust fluff etc on the paper Paper shall be put on a flat surface and stored under a cool and dry environment 2 5 2 Scanning With Tablet For M6550 M6600 series only 1 Open the manuscript support flap of the automatic document feeder 2 Load the manuscript into the automatic document feeder with the front side up and the top of the manuscript entering into the feeder first N...

Page 30: ...o computer via USB cable power the printer and computer on 2 Place the attached installation CD in the computer CD ROM Windows XP system automatically run the installation procedure Windows 7 Vista Server 2008 system Pop up Autoplay interface click Autorun exe to run the installation procedure Windows 8 system When the DVD RW driver window pops up from the right top corner of computer desktop clic...

Page 31: ...llation process The process may need some time and the duration is related to your computer configuration please wait patiently 5 After the installation click Print Test Page button If your printer prints the test page successfully it means that you have installed the driver correctly ...

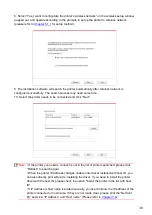
Page 32: ...ow pops up from the right top corner of computer desktop click anywhere in the window then click Autorun exe to run the installation procedure Note Some computers may be unable to auto play the CD beacase of system configuration Please double click Computer icon find DVD RW driver then double click DVD RW driver to run the installation procedure 5 Read and agree to the terms contained in the End U...

Page 33: ...One click installation button to enter installation process if your software has searched only one printer The process may need some time and the duration is related to your computer configuration Please wait patiently ...

Page 34: ...s not found please check if the printer and computer are in the same network Please see Chapter 5 3 for how to check When the printer IP address changes under printer driver installed with host ID you can also directly print without re installing the driver If you need to install the printer driver with the host ID please check the option Install the printer in the list with host ID 7 After the in...

Page 35: ... Windows 7 Vista Server 2008 system Pop up Autoplay interface click Autorun exe to run the installation procedure Windows 8 system When the DVD RW driver window pops up from the right top corner of computer desktop click anywhere in the pop up window then click Autorun exe to run the installation procedure Windows 10 system When the DVD RW driver window pops up from the right top corner of compute...

Page 36: ...25 Click One click installation button if your software has searched only one printer and enter into installation process to complete automatic network configuration and driver installation ...

Page 37: ...utomatic network configuration and driver installation Note When the printer IP address changes under printer driver installed with host ID you can also directly print without re installing the driver If you need to install the printer driver with the host ID please check the option Install the printer in the list with host ID 6 After the installation click Print Test Page button If your printer p...

Page 38: ...here in the window then click Autorun exe to run the installation procedure Note Some computers may be unable to auto play the CD beacase of system configuration Please double click Computer icon find DVD RW driver then double click DVD RW driver to run the installation procedure 4 Read and agree to the terms contained in the End User License Agreement and the Privacy Policy click the Next button ...

Page 39: ...one printe and the wireless network configuration interface will pop up input the SSID and password that you need then click Confirm button and enter into installation process The process may need some time and the duration is related to your computer configuration please wait patiently ...

Page 40: ...elect Configure the print via USB and install on the printer list interface and check the USB printer option Click the Confirm button and the wireless network configuration interface will pop up Input the wireless SSID and password that you need then click Confirm button and enter into installation process The process may need some time and the duration is related to your computer configuration pl...

Page 41: ...ting function 1 Turn the power of printer and computer on 2 Connect computer to the Wi Fi Direct network of the printer please refer to Chapter 5 2 2 for setup method 3 Place the attached installation CD in the computer CD ROM Windows XP system automatically run the installation procedure Windows 7 Vista Server 2008 system Pop up Autoplay interface click Autorun exe to run the installation procedu...

Page 42: ...installation interface 5 Click on the One click installation button in Method III and enter into installation process The process may need some time and the duration is related to your computer configuration please wait patiently 6 After the installation click Print Test Page button If your printer prints the test page successfully it means that you have installed the driver correctly ...

Page 43: ...ight top corner of computer desktop click anywhere in the window then click Autorun exe to run the installation procedure Note Some computers may be unable to auto play the CD beacase of system configuration Please double click Computer icon find DVD RW driver then double click DVD RW driver to run the installation procedure 4 Read and agree to the terms contained in the End User License Agreement...

Page 44: ...One click installation button to enter installation process if your software has searched only one printer The process may need some time and the duration is related to your computer configuration Please wait patiently ...

Page 45: ...f the printer and computer are in the same network Please see Chapter 5 3 for how to check When the printer IP address changes under printer driver installed with host ID you can also directly print without re installing the driver If you need to install the printer driver with the host ID please check the option Install the printer in the list with host ID 6 After the installation click Print Tes...

Page 46: ... When the DVD RW driver window pops up from the right top corner of computer desktop click anywhere in the window then click Autorun exe to run the installation procedure Note Some computers may be unable to auto play the CD beacase of system configuration Please double click Computer icon find DVD RW driver then double click DVD RW driver to run the installation procedure 3 Read and agree to the ...

Page 47: ...t top corner of computer desktop click anywhere in the pop up window then click Autorun exe to run the installation procedure Windows 10 system When the DVD RW driver window pops up from the right top corner of computer desktop click anywhere in the window then click Autorun exe to run the installation procedure Note Some computers may be unable to auto play the CD beacase of system configuration ...

Page 48: ...dress and Host name Please refer to Chapter 7 4 11 The software installs the driver automatically and the installation process may need some time The duration is related to your computer configuration please wait patiently 12 After the installation click Print Test Page button If your printer prints the test page successfully it means that you have installed the driver correctly 3 1 2 3 Installati...

Page 49: ...le to auto play the CD beacase of system configuration Please double click Computer icon find DVD RW driver then double click DVD RW driver to run the installation procedure 4 Read and agree to the terms contained in the End User License Agreement and the Privacy Policy click the Next button in the lower right corner of the interface to enter the driver installation interface 5 Click on the Manual...

Page 50: ... and click Next Note If the printer you need to connect is not in the list of printers searched please click Refresh to search again When the printer IP address changes under printer driver installed with host ID you can also directly print without re installing the driver If you need to install the printer driver with the host ID please check the option Install the printer in the list with host I...

Page 51: ... RW driver window pops up from the right top corner of computer desktop click anywhere in the pop up window then click Autorun exe to run the installation procedure Windows 10 system When the DVD RW driver window pops up from the right top corner of computer desktop click anywhere in the window then click Autorun exe to run the installation procedure Note Some computers may be unable to auto play ...

Page 52: ...of printers searched please click Refresh to search again When the printer IP address changes under printer driver installed with host ID you can also directly print without re installing the driver If you need to install the printer driver with the host ID please check the option Install the printer in the list with host ID If IP address or host name is added manually you need to know the IP addr...

Page 53: ...g to instructions on uninstall window 4 Restart computer after finishing unloading 3 2 macOS system driver installation Driver installation under macOS system is divided into 2 steps driver installation and adding a printer If you are going to print in AirPrint mode there is no need to install a driver and you just need to add a printer directly When you are installing a driver with wired or wirel...

Page 54: ...ment and then click Continue 5 Click Agree on the prompt window popping out to accept the licensing agreement 6 Read the Privacy Policy and press Continue 7 In the popped up prompt window press Agree to accept the Privacy Policy 8 Click Install ...

Page 55: ...etwork via wireless network configuration tool refer to Chapter 5 1 1 for how to make configuration When configuration is completed unplug USB cable and then on the pop up Add Printer interface you may add the network connected printer refer to Chapter 3 3 for how to add printer Click No you can add a USB connected printer on the pop up Add Printer interface refer to Chapter 3 3 for how to add pri...

Page 56: ...ces Printers Scanners of computer 5 Click button to select Add Printer or Scanner 6 Select printer and then select the corresponding printer mode from the Use menu popping out 7 Click Add 3 3 3 Add up the printer via wireless connection 1 Turn the power of printer and computer on 2 Make sure the wireless network connection between computer and printer is set up Note In case of basic structure mode...

Page 57: ...elect Add Printer or Scanner 5 Select printer and select Secure AirPrint data encryption or AirPrint no encryption in the Use option box 6 Click Add Note When the printer is connected to computer with USB cable the system will recognize and add AirPrint automatically If AirPrint printer of network connection is added then the connecting USB cable should be disconnected first before adding the prin...

Page 58: ...e Printer to Network Please refer to Chapter 3 1 to see the installation steps of NET Model 4 2 Control the Network Printer User can control the network settings through the built in WEB Server in the printer 4 2 1 View or Change Network Settings 1 View the IP address of the printer on its control panel according to steps in Section 7 3 2 Type the IP address into the Web browser apos s address bar...

Page 59: ...Server Login Password You can manage the printer through User Management Steps 1 After opening the built in WEB server log in default user name is admin default password is 000000 2 Click User Management to execute proper actions ...

Page 60: ... to access point via network cable Wi Fi Hotspot The wireless computer is directly connected with the wireless device 5 1 Basic structure mode You can connect a computer to your printer via access point wireless router as the medium Access point wireless router connection is divided into wireless network setup and Wi Fi Protected Setup WPS Note The machine with the fax feature supports automatic s...

Page 61: ...to network 3 A printer that has wireless network function 5 1 1 2 Setup methods of wireless network setup tools 1 Take the wireless network setup tool in computer 1 Windows system Click the Start menu All programs Pantum Product name Wireless network setup tool 2 Mac system click Go Applications Pantum Utilities Wireless Network Configuration Tool on the computer Finder menu bar 2 Use USB cable to...

Page 62: ...eless network configuration tool by default Complete configuration according to interface prompt Note The SSID you selected should be consistent with the SSID of access point wireless router connected to your computer 2 Please tick No to configure other wireless network needed to connect to Complete configuration according to interface prompt ...

Page 63: ...ar text Some models can automatically match the encryption method no manual selection is required 2 2 The computer is not connected to wireless network Input the SSID case sensitive and password of access point wireless router in the interface below Complete configuration according to interface prompt Note If you do not know the SSID of access point wireless router please click Print Wireless Netw...

Page 64: ...tion Select No I don t have a USB cable in the interface below and then click Next 1 Use WPS method to perform steps below to start wireless network on printer Please refer to Chapter 5 1 2 for detailed WPS configuration ...

Page 65: ... Preliminary preparations 1 The access point wireless router supports Wi Fi Protected Setup WPS 2 A printer that has wireless network function 5 1 2 2 Wi Fi Protected Setup WPS method 1 Turn on the power of printer and access point wireless router 2 Make sure the printer is in ready state Note If the printer is in sleep mode it can be woken up by pressing any key on the control panel of printer 3 ...

Page 66: ...function of the printer by tapping the Wi Fi button on the printer panel Note Tap the Wi Fi button on the printer panel and the printer will automatically print the Mobile device Wi Fi connection guide page for Wi Fi connection of a mobile device 5 2 3 Wi Fi Hotspot Configuration When the wireless hotspot of printer is active the user can connect to it directly by searching The wireless hotspot is...

Page 67: ... to turn firewall off and then try to search the printer again Inspect if the IP address assignment of printer is correct You can inspect IP address by printing the network setup information page of printer out Please refer to the following steps to check if printer and computer are in the same network 1 Select Command prompt as shown below a Windows 8 10 system Select Search button in the Start M...

Page 68: ...o search Pantum Mobile Printing Download and install How to download it for iOS mobile device Click the App Store icon Search interface input PANTUM or Pantum print in the search bar Download and install on the interface of iOS device to download 6 1 3 How to use this Pantum APP 6 1 3 1 For Android Devices 6 1 3 1 1 Preliminary preparations 1 A printer that has wireless network function 2 Android ...

Page 69: ...uide attached 6 2 Mopria mobile print Mopria mobile print requires installing Mopria Print Service on the Android device You can print photos emails webpages and files 6 2 1 The operating systems and applications which support Mopria mobile printing 1 Mopria mobile printing is suitable for Android4 4 or higher version 2 Mopria mobile printing is supported by applications e g Microsoft Office 1 01 ...

Page 70: ... pages 8 Tap print Note If printing fails please inspect if the Android device is connected to the wireless network where the printer is connected to If the Android device cannot detect any printer please inspect if power of the printer is turned on and if the printer is turned on 6 3 AirPrint mobile print Only printers that support AirPrint function can realize AirPrint printing Please check if t...

Page 71: ... select your Pantum printer 7 Set printing parameters such as number of copies to print 8 Tap print Note If printing fails please inspect if the iOS device is connected to the wireless network where the printer is connected to If the iOS device cannot detect any printer please inspect if power of the printer is turned on and if the printer is turned on ...

Page 72: ...or to select System Settings and press OK button 3 Select Toner save set by pressing or and press OK to enter the toner saving mode M6200 M6500 M6550 Series M6600 Series Note For non Wi Fi Model Printer the Wi Fi button works as one key toner saving button When this menu is placed on the bottom interface of selecting Close Open symbol of the options displayed in the menu will not update in time af...

Page 73: ...trol panel 1 Press Menu button to enter the menu interface 2 Press direction pad or to select System Setting and press OK button 3 Press or to select Language set and then press OK to do language setting M6200 M6500 M6550 Series M6600 Series Note Product s actual region determines the Language Setting ...

Page 74: ...tore the default settings of the printer 1 Press Menu button to enter the menu interface 2 Press direction pad or to select System Setting and press OK button 3 Select Restore set by pressing or and then press OK to restore factory settings M6200 M6500 M6550 Series M6600 Series ...

Page 75: ...u button to enter the menu interface 2 Press direction pad or to select System Setting and press OK button 3 Press direction key or to select Sleep time set option and press OK key to set the corresponding sleep time M6200 M6500 M6550 Series M6600 Series Note When the printer is in dormant status you can wake it up just by pressing Power Saving button sending print scan Fax task or opening or clos...

Page 76: ... delay M6200 M6500 M6550 Series M6600 Series Note Set auto off condition Shutdown under no port state default configuration no port is connected Wi Fi function deactivated printer is under standby or sleep mode Shutdown under idle state the printer is under standby or sleep mode If auto off condition is satisfied printer will be off at the preset time After printer is off power consumption is 0 5W...

Page 77: ...gs You can view or set the network status through Network Settings 1 Press Menu button to enter the menu interface 2 Navigate to Network Set option and press OK to configure the network M6200 M6500 M6550 Series M6600 Series ...

Page 78: ...sers can check the network status through Network Information 1 Press Menu button to enter the menu interface 2 Navigate to Network Info option to check the relevant information on the network M6200 M6500 M6550 Series M6600 Series ...

Page 79: ...n report print You can print product report according to needs M6200 M6500 M6550 Series M6600 Series Printable product reports include Print Demo Page Print information Page Print Menu Structure Print Menu Setting Print network configuration Print network Service Print mail address Print Group Mail Print FTP address Print Wi Fi hotspot and Print Wi Fi Configuration Note The product report above is...

Page 80: ...ram Manual Duplex Collate Print Reverse Print N in 1 Poster Print for Windows Operation System only Zoom Print Custom Size Note You can select the 2 x 2 Poster printing from Layout options in the settings interface to use the poster printing function You can open the Printing Preferences and click Help button to check the specific function explanation For information about how to open the help doc...

Page 81: ... Open Help Document You can open the Printing Preferences and click Help button for Windows Operation System only The help document contains the user guide where you can find the information on print settings ...

Page 82: ... 2 1 It is recommended to use the standard paper Some paper media are not suitable for the duplex printing Trying the duplex printing may damage the printer When Paper Type is Thick Paper or Transparent Film please do not try Duplex Print If you choose Reversed Order printing in Printing Preferences dialog box Manual Duplex will not be supported when 2 x 2 Poster printing Paper may get jammed or c...

Page 83: ...72 b Select Pantum printer Click Preferences to set printing c Set options in Manual Duplex of the Basic tab and click OK after completing the settings ...

Page 84: ...If you choose not to raise the output tray we recommend that you immediately remove the printed paper output from the printer e Send the print task after choosing Manual Duplex then the following prompt window will appear telling you the next specific operations Interfaces are different depending on the models ...

Page 85: ... side g You can click Close button to close this prompt window and it will not appear until the next Manual Duplex job comes in 8 4 Cancel Print Job You can press the Cancel button on the control panel to cancel the print job you want to cancel during the printing process or cancel the print job in the printing pool ...

Page 86: ...75 8 5 Mac System Print Operation Steps 1 After installing the printer s driver click on System Preferences on the bottom left corner 2 After the window pops up click on Print and Scan ...

Page 87: ...rint 4 Select printer 1 For USB Model printer plug the USB cable the corresponding printer will automatically show in the left list 2 For NET Model printer plug the network cable click on symbol at the bottom of the left list to add printer ...

Page 88: ...77 3 For Wi Fi Model printer select the Wi Fi icon on the top right corner of the page click on Open Network Preferences in the list After the window pops up click on SSID ...

Page 89: ...78 Select the corresponding SSID 5 Open the document to be printed click on Document Print ...

Page 90: ...79 After the window pops up set the printing parameters and press the Print button on the top right corner ...

Page 91: ...e exclusive 9 2 Copying method 1 Press copying key ID card copying key receipt copying key on control panel 2 Put the original document in automatic document feeder ADF supporting common copying only with right side up or put it on glass platform with right side down for the method on how to put original document see 2 5 3 Set copying quantity with direction or number key according to types 99piec...

Page 92: ... key or restarting machine 9 4 1 Image quality Select corresponding image quality mode for original document used in order to improve copying effect There are 4 modes in total Automatic default mode Text image applicable to original text and image Image applicable to original image Text applicable to original text Note The image quality mode supports automatic mode only after poster and collated c...

Page 93: ... be copied on one piece of paper with multipage setting The multipage includes 3 modes Two in one Horizontal four in one vertical four in one Note Multipage and resizing function cannot be set at the same time 9 4 5 Clone Clone setting enables the printing of many original images on one piece of paper The clone copying includes 3 modes 2x2 3x3 4X4 Note The clone and resizing function cannot be set...

Page 94: ...al document on several pieces of paper The poster copying includes 3 modes 2x2 3x3 4X4 Note The poster and resizing function cannot be set at the same time 9 4 7 Collated copy The collated copy function supports ADF copying only The collated copy includes 2 modes Open Closed ...

Page 95: ...paper card paper tagboard and thin paper Note After multipage and clone function are set paper dimension supports A4 and Letter only If original documents are copied with ADF mode paper dimension supports common paper only 9 5 ID card copying setting Change relevant setting with copying setting menu for better copying effect 1 Press ID card copying key on control panel and then press OK key to ent...

Page 96: ...at orange left half area of glass platform Half page up down half page left right or long side of A5 paper put ID card at blue area of glass platform Note After setting the arrangement mode can keep valid before startup after startup the arrangement mode will recover to default setting 9 5 2 Intensity For intensity setting see 9 4 2 9 5 3 Paper setting ID card copying supports A4 and Letter paper ...

Page 97: ...s OK key to enter copying setting interface 2 Press direction key to select options and then press OK key to enter setting interface 3 Press direction key to select option to be set and press OK key to set option 9 6 1 Intensity For intensity setting see 9 4 2 9 6 2 Paper setting The receipt copying supports A4 Letter B5 A5 A6 and Executive paper dimension ...

Page 98: ...own on the glass platen M6200 M6500 Series M6550 M6600 Series Note During copying please do not open the cover to avoid any adverse impact on the image quality For the information on Steps of Using Paper and Manuscript please refer to Chapter 2 5 2 Press Scan on the Control Panel and press direction pad or to select Single Page Scan or Merge Scan to enter into the Scan mode Note For the informatio...

Page 99: ...u can save them as PDF TIFF or JPEG 3 Press Start button to start scanning 4 Paper comes out from the ADF output exit and the scan completes 10 1 3 Single Page Scan The default scan mode of control panel is Single Page Scan mode For the specific steps of scan operation please refer to Chapter 10 1see 10 1 4 Merge Scan When you want to merge multi page scanned documents into one PDF please use Merg...

Page 100: ...the control panel Press Start button scan the next page Press OK button end the scanning 5 Put the document to be scanned on the glass platen and press Start button to continue to scan the second page For ADF scanning it can run continuous scan directly 6 Repeat the operation as described in the step 5 to scan multi pages till you press OK button to end this operation 7 After completing the operat...

Page 101: ...s as follows Type the IP address in the Web browser apos s address bar to access the embedded Web server of the printer Click on Setting SMTP to set the relative parameters of the SMTP Protocol After finishing setting click on Apply to save Click on E mail Address Book in the left setting column to enter into the settings interface of the email ...

Page 102: ...n Press or to select Scan to E mail and press OK button Press or to select E mail Address Book or Group Mail and press OK button Press or to select address or group and then press OK button press Start button to start scan Please follow these instructions on the settings for group emails Set the group name for group e mail sending by webpage and set the members i e the receivers in the group of gr...

Page 103: ... password and install IIS Component on the computer 1 Operation Steps Type the IP address in the Web browser apos s address bar to access the embedded Web server of the printer Click on Setting FTP to enter into FTP Setting interface Click New the following window will pop up Set the relative parameters of the FTP Protocol After complete setting click on Submit ...

Page 104: ...o FTP and press OK button Press or to select the server and press OK button Press Start button to start scan Note The relative parameters setting of the FTP Protocol are as follows FTP Server IP Address of the server such as 10 10 145 100 Port Number Default port number is 21 Login Name For example anonymous Password such as anonymous login needs no password Confirm Password For example anonymous ...

Page 105: ... and start scan Note Pantum scan application software can scan pictures and support 5 formats of files BMP JPG TIF PDF and PNG This product complies with the TWAIN and Windows Image Application WIA standard If using the application which supports TWAIN and WIA standard users can use the scan function and directly scan the images to the open application The handbook requires Office Software Word an...

Page 106: ... 1 Keyboard shortcuts Alt I P S to open the application s window 2 Click on Device option and select TWAIN Scan click the Custom Insert button below 3 After the window pops up set the scan information in the right list of Basic Setting and Advanced Setting Click on Scan and start scan ...

Page 107: ...bove picture to select a scanning port as shown below 10 2 2 2 Photoshop Operation Steps 1 Launch Photoshop click on File Import on the top left corner select TWAIN Scan as is shown below 2 After the window pops up please refer to Step 3 of 10 2 2 1 to see the specific operation steps ...

Page 108: ...ndows Server 2003 1 Office Software Word and Excel Operation Steps 1 Keyboard shortcuts Alt I P S to open the application s window 2 Click on Device and select WIA Scan click the Custom Insert below 3 The prompt window as is shown below set the scan information ...

Page 109: ...cture the advanced properties interface will pop up then users can set the scan After finishing the settings click on the OK button then Scan button to start scan 2 Photoshop Operation Steps 1 Launch Photoshop click File Import on the top left conrner and select WIA Scan as is shown below ...

Page 110: ...ecific operation steps 10 2 3 2 WIA 2 0 Scan Windows Vista Windows Server 2008 and later versions Operation Steps 1 Click on Start All Programs Device and Printer on the left bottom of the desktop 2 When the pop up window appears select the printer you want to use and right click the mouse ...

Page 111: ...and click Scan on the bottom right corner and start scan 10 2 4 Cancel Scan Job During the scanning two ways are available to cancel the job 1 Press Cancel button on the control panel to cancel the job 2 Click Cancel button on the scan progress bar interface of the computer to cancel the job ...

Page 112: ... 1 ICA Scan 10 3 1 1 Open ICA via Print and Scan Operation Steps 1 After installing the printer driver click System Preferences icon on the bottom left corner of the computer desktop 2 After the window pops up click on Print and Scan ...

Page 113: ...102 3 After the window pops up click on Scan 4 Click on Open Scanner and the scan window will pop up ...

Page 114: ...103 5 Click on Show Details on the bottom right corner to set the scan parameters 6 Click on Scan on the bottom right corner and start scan ...

Page 115: ...ard shortcuts command shift C to open the window Find Image Capture in Applications or conduct keyboard shortcuts command shift A to directly switch to Applications and click to launch the application 2 After selecting the printer in the left list set the scan parameters in the right list Click on Scan on the bottom right corner and start scan ...

Page 116: ...hop as an example Operation Steps 1 Launch Photoshop click on File Import on the top left corner and select TWAIN Scan as is shown below 2 After the window pops up please refer to Step 3 of 10 2 2 1 to see the specific operation steps ...

Page 117: ...plug of the port 4 To connect the included phone handle plug the phone cord into the printer apos s port Connec the other end of the phone cord to the phone handle 5 To connect the telephone device alone plug the phone cord into the printer apos s port Plug the other end of the phone cord to the telephone s port 6 When you are finished with connecting auxiliary devices connect all devices to their...

Page 118: ...g With Delay Sending you can set the Fax number and time within 24 hours for Delay sending to send the Fax job on the time you set 6 Forward the Received Forward the Received option has two suboptions If you select the Forward to Fax suboption and enter the number to which you want to forward the Fax the printer will send the Fax to the forwarded number rather than printing it when you receive a F...

Page 119: ... Menu Settings 1 When the machine is ready press the menu button and press the up button or the down button to select Fax settings 2 Press the OK button to enter the Fax setting options and press the up button or the down button to enter the Fax settings ...

Page 120: ... receiving Fax 3 Compatibility If Fax is sent or received abnormally due to disturbance on telephone line try to switch to VOIP compatibility mode 4 National area Set different national areas based on demand 5 Fax Report You can use the options in Fax Report to print the Fax report as you need 11 3 Fax Functions 11 3 1 Send Fax Send a Fax from a flatbed scanner 1 Put the document face down on the ...

Page 121: ...110 3 Press the Start button to start scanning the document 4 Press the OK button to initiate the Fax job ...

Page 122: ...5 g m2 or 20 pounds In order to prevent damage to this product do not use a manuscript with correction tape correction fluid paper clips or staples on it In addition do not load photos small manuscripts or brittle manuscripts into the automatic document feeder 2 Adjust the guide plate until it lies close to the stack of paper 3 Press the Fax button and use the number buttons to enter the Fax numbe...

Page 123: ... direction pad or to select 2 Receive Settings option and press OK button 4 Press direction pad or to select 1 Answer Mode option and press OK button 5 Press direction pad or to select 1 Fax Mode option and press OK button 6 Go back to the previous menu press direction pad or to select 2 Number of Rings option and press OK button to set the number of rings Then the printer will receive the Fax aut...

Page 124: ...taken and the machine starts to receive the Fax Note To use the remote receiving mode please set the remote code to Turn On The default for remote code is 90 You can modify it by the path Menu 3 Fax Settings 2 Receive Settings 7 Remote Code Turn On edit 11 3 3 Other Scan Functions Group Sending You can use this product to send a Fax message to multiple Fax numbers and the maximum for group sending...

Page 125: ...114 3 You can press the OK button and enter each Fax number to which you want to send Fax 4 When the input is complete press the Start button to start scanning documents ...

Page 126: ...rough the Control Panel When this process is complete the printer will scan the document to the memory and get back to Ready state The specific operations are as follows 1 On the Control Panel click on the Fax button to enter the Fax mode 2 Press the OK button to enter the Fax Settings interface and press or button to select Delay Sending ...

Page 127: ...k to Ready state Fax Forwarding You can forward the Fax you receive When you receive a Fax job it will be stored in memory at first Then the printer dials the Fax number you have specified and send the Fax If the printer cannot forward a Fax because of an error for example the number is busy and fails with repeated redial attempts the printer will print the Fax ...

Page 128: ...Forward to Fax enabled if you enable Forward and Print when you receive a Fax the printer will print the Fax and also forward one copy of the Fax to the forwarded number you have set The specific operations are as follows 1 On the Control Panel click on the Fax button to enter the Fax mode 2 Press the OK button to enter the Fax Settings interface and press or button to select Forward the Received ...

Page 129: ...ings Send Settings 2 Set the redial attempts and interval as you want 3 When you complete the setup press the OK button to save the settings Auto Shrink When the paper size of the received Fax does not match the size specified in the printer the received Fax will be shrinked according to the user defined paper size to match the paper size in the printer If you disable the Auto Shrink option the Fa...

Page 130: ...ax interface press the Contacts button to enter the speed dial interface enter the speed dial number and the system will automatically search for it If the speed dial number exists the corresponding information is displayed then press the Start button to begin the Faxing If the speed dial number does not exist an error message is displayed You can store 200 speed dial numbers at the maximum Group ...

Page 131: ...u and then press OK key 3 Use direction key or to check work to be handled and then press OK key to select work canceled 4 Press OK key to confirm work to be cancelled 11 6 Pantum PC Fax Software Pantum PC Fax function allows you to send a document from your computer as a Fax 11 6 1 Open With 1 Open a Fax file that you want to send 2 Click File click Print and the Print dialog pops up ...

Page 132: ... Fax The operation steps for sending Fax with PC Fax are as follows 1 Open the PC Fax software and the Pantum will send Fax interface appears 2 Enter the Name and Fax Number then click Add to recipient list If you want to send the Fax to multiple addresses you can continue to enter their Name and Fax Number then click Add to recipient list ...

Page 133: ...the Fax that is sent with the PC Fax The specific operations are as follows 1 Open the PC Fax software 2 Select Pantum M6600NW Series Fax as the printer click Printing Preferences and the Fax Settings interface appears 3 Select the Paper Orientation and Resolution as you want 4 When you finish the selection click OK to save the settings ...

Page 134: ...list on the printer 3 You can perform operations on the information in Contacts including Add Delete Modify Manage Groups Import and Export 4 Click Write to update the Contacts list to the printer end Use the Contacts in PC Fax 1 Open the PC Fax software and the Pantum will send Fax interface appears 2 Click Show Contacts and the Contacts interface pops up on the right Connect the printer to the c...

Page 135: ...PC Fax software and the Pantum will send Fax interface appears 2 Check Use Cover at the bottom left corner and click Cover Settings to enter the Cover Settings interface 3 You can set the cover Style and the Basic information on right of the Cover Settings interface and preview the cover on the left 4 When you complete the setup click the OK button to save the cover ...

Page 136: ...rn off the main power switch and unplug the power cord USB cable phone cord and the network cable M6200 M6500 Series M6550 M6600 Series 2 Use a soft cloth to wipe the outside of the printer and remove the dust M6200 M6500 Series M6550 M6600 Series 3 Raise the cover and gently wipe the platen glass with a soft cloth M6200 M6500 Series M6550 M6600 Series ...

Page 137: ...is locked M6200 M6500 Series M6550 M6600 Series 5 Open the output bin by the upper right ridge of the concave section M6200 M6500 Series M6550 M6600 Series 6 Remove the laser toner cartridge along the guides M6200 M6500 Series M6550 M6600 Series ...

Page 138: ...the laser toner cartridge put the cartridge in a protective bag or wrap it with thick paper to avoid direct light damaging the photosensitive drum 7 Gently wipe the dustproof mirror of laser scanning surface with a cotton swab or a dry and lint free soft cloth with a little alcohol M6200 M6500 Series M6550 M6600 Series 8 Clean the inside of the printer by using a dry and lint free cloth to gently ...

Page 139: ...laser toner cartridge is combustible Please do not put the laser toner cartridge near any source of ignition so as to avoid causing a fire When removing or disassembling the laser toner cartridge please pay attention to the toner leakage problem In case of the toner leakage resulting in that the toner contacts with your skin or splashes into your eyes and mouth please immediately wash with clear w...

Page 140: ...ive cover please immediately install the laser toner cartridge into the printer so as to avoid photosensitive drum damage caused by exposing to too much direct sunlight or indoor light While installing the laser toner cartridge do not touch the surface of the photosensitive drum so as not to scratch it Replacement steps are as follows 1 Turn off the printer and raise the scanning platform until it...

Page 141: ...idge and gently shake around 5 to 6 times so as to make the toner evenly distributed inside the cartridge 5 Remove the cartridge protector blister cover insert the cartridge along the guides into the printer then push it firmly along the direction of the arrow until you hear a click assuring you that the cartridge is fully inserted M6200 M6500 Series M6550 M6600 Series ...

Page 142: ...ner cartridge into the printer if there is any please tear off the seal and then install the cartridge 6 Cover the output bin and close the scanning platform M6200 M6500 Series M6550 M6600 Series 7 Restart the printer and use the control panel to print an information page ...

Page 143: ...perly Whether the computer port is properly configured and is connected to the proper printer port 13 1 Clearing Jammed Paper Note Remove the jammed paper in accordance with the following steps close the upper cover and tidy the paper in the tray then the printer will automatically resume printing If the printer cannot automatically start printing please press the button on the control panel If th...

Page 144: ... the concave section M6200 M6500 Series M6550 M6600 Series 3 Remove the laser toner cartridge along the guides M6200 M6500 Series M6550 M6600 Series 4 Gently draw the jammed paper out along the paper output direction M6200 M6500 Series M6550 M6600 Series ...

Page 145: ...pair 13 2 Error Message Error message Cause Measure Close Output Bin The paper bin is not fully closed Close Output Bin No Laser Toner Cartridge Detected The laser toner cartridge is installed incorrectly or laser toner cartridge is damaged The laser toner cartridge is installed correctly or new laser toner cartridge is replaced Toner Low Cartridge toner is low Replace New Laser Toner Cartridge Th...

Page 146: ...r is damaged Please contact Pantum Customer Service Copy Image Abnormal The scanner is dirty or defective The laser toner cartridge is dirty or damaged Clean the scanner Clean the laser toner cartridge or replace it with a new one Printer Problems The printer does not work Power cord of the device is not properly connected Data cable of the device is not properly connected The print driver is inst...

Page 147: ...The print media is beyond the usage specification range There is foreign matter in the feed channel The feed roller is dirty Internal parts failure Remove excess paper from the tray If you print on special print media please use the manual feeder tray Make sure to use the paper that meets specifications If you print on special print media please use the manual feeder tray Clean the feed channel Cl...

Page 148: ...s appear when copying and scanning the platen glass may be dirty The scanner is dirty or damaged Please use the print media within the specification range Clean the feed channel Clean the platen glass White spots The print media that does not meet usage specification is used For example the media is damp or too rough The feed channel is dirty The internal part of the laser toner cartridge is damag...

Page 149: ...part of the laser toner cartridge is damaged The feed channel is dirty The transfer voltage inside the printer is abnormal Scanning exposure If black background or gray background appears when copying and scanning the platen glass may be dirty Please use the print media within the specification range Clean the feed channel inside the printer Please close the cover on the manuscript and then carry ...

Page 150: ...toner cartridge is not charged If all black image appear when copying and scanning maybe it is scanning exposure and the cover on the manuscript is not properly closed The scanner is damaged Ensure to install the cartridge correctly Please first close the cover on the manuscript and then carry out copying and scanning The toner does not adhere to the paper The print media that does not meet usage ...

Page 151: ... this printer on the panel menu you may know and set various functions The steps of printing are as follows 1 Press Menu to enter the menu setting interface 2 Press or to select Info report 3 Press OK and then or to select Prt Menu Frame 4 Press OK to print ...

Page 152: ... wrappage with random cartridges M6550 M6600 Series 8 5Kg No wrappage with random cartridges Print Environment Preferred Temperature Range for Printing 10 32 C 50 F 90 F Preferred Moisture Range for Printing 20 80 Power Voltage 110V Model AC100 127V 10 50Hz 60Hz 6A 220V Model AC220 240V 15 10 50Hz 60Hz 3A Noise Print 54dB Standby 30dB Power Consumption Print Average 370W Maximum750W Standby 45W Ne...

Page 153: ...600 Series A4 22ppm Letter 23ppm Print Time of First Page 7 8sec Print Language GDI 15 3 Copy Specifications Copy Speed 22cpm A4 23cpm Letter FCOT Flatbed 10 seconds ADF 12 seconds Maximum Pages for Successive Print 99 pages Zoom Ratio 25 400 Other Copy Functions ID copy Receipt copy N up copy Clone copy 15 4 Scan Specifications Scan Type Flatbed ADF M6550 Series Maximum Scan Size Flatbed 216 297m...

Page 154: ...e Please pay attention to contents below when VOIP line is used If Fax is sent or received abnormally due to disturbance on telephone line try to improve Fax delivery rate with modes below 1 Switching to VOIP compatibility mode by setting control panel Please set according to the operation below 1 Press menu key 2 Press or to enter Fax setting option and then press OK 3 Press or to enter compatibi...

Page 155: ...144 ...

Reviews: