background image

Cod. 96849-99176 


Do not remove the impeller (A)for any reason. 

 
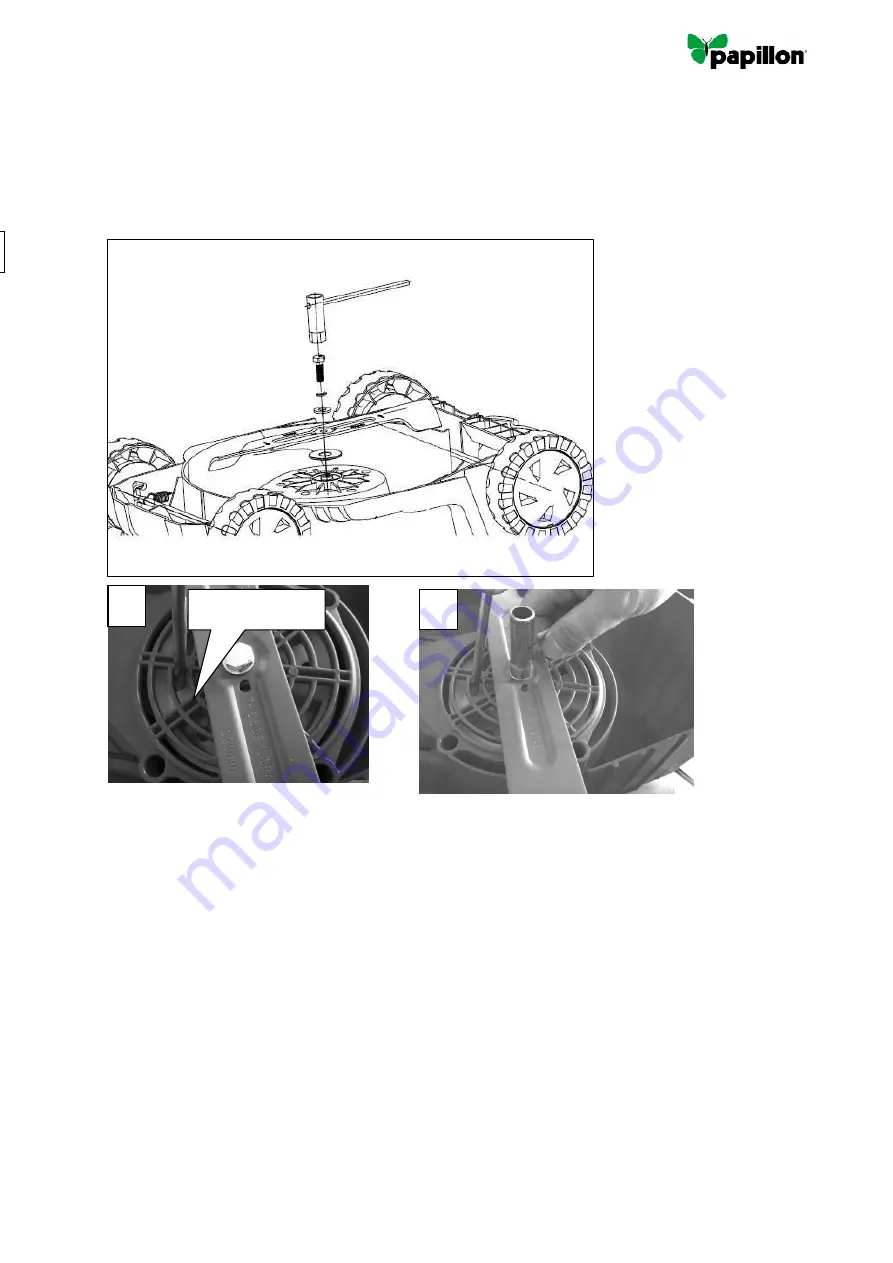
To replace the blade: 


Turn the mower onto its side. 


Place bushing into shaft of motor  


Place blade, flat pad and spring washer alignly 


Place blade screw into the holes 


Tighten blade screw with sleeve. 


MAINTANCE 

1.  Keep all nuts, bolts and screws tight to be sure the lawn mower is in a safe working condition. 
2.  Check the catcher frequently for wear or deterioration. 
3.  Replace worn or damaged parts for safety. 
4.  Only use the replacement blade, blade bolt and impeller specified for this product. 
5.  Be careful during adjustments of the lawn mower to prevent entrapment of the fingers between 

moving blade and fixed parts of the machine. 

6.  Oil the wheel pins. 
7.  Store the lawn mower in a dry place. 

VII-Guarantee 

1. This product has been manufactured to a high quality standard. It is guaranteed against defects in 
materials and workmanship for 12 months from purchase. Please retain your receipt as proof of purchase. 
2. If the product is found to be defective within the relevant time period, we will either replace all defective 
parts or at our discretion, replace the unit free of charge with the same item or one of a greater value 
and/or specification. 
3. This guarantee does not cover defects caused by or resulting from: 
   a)  Misuse, abuse or neglect 
   b)  Trade, professional or hire use; 
   c)  Damage caused by foreign objects, substances or accident. 
   d) material of normal wear and tear (blade, wheels, electric motor brushes, etc..) 

Location hole 

Summary of Contents for 96849

Page 1: ...Rasaerba codice 96849 e 99176 Manuale istruzioni ITALIANO Istrucciones ESPANOL User manual ENGLISH Distribuzione PADOVA ITALY...

Page 2: ...locit a vuoto 3450min 1 3500min 1 Altezza di taglio 25 40 55mm 25 40 60mm Larghezza di taglio max 320mm 360mm Livello potenza sonora 96db A 96db A L attrezzo presenta un doppio isolamento Sono previst...

Page 3: ...lettrica e Durante l impiego di un utensile elettrico all esterno utilizzare una prolunga adatta per uso all esterno L uso di un cavo adatto per uso esterno riduce il rischio di scossa elettrica 3 SIC...

Page 4: ...tuni o pericoli causati a terzi o ai loro beni Mentre si utilizza l apparecchio indossare sempre calzature adeguate e pantaloni lunghi Non utilizzare l apparecchio a pieni nudi n con sandali aperti Co...

Page 5: ...nsieme ai rifiuti domestici Si prega di riciclarli nelle apposite strutture Chiedere consiglio sulle modalit di riciclo alle Autorit Locali o al proprio rivenditore Indica rischio di lesioni personali...

Page 6: ...e l aletta e posizionare il contenitore di raccolta erba sulle guide Fig 1g 8 Premere per posizionare i copriruota Fig 1h REGOLAZIONE ALTEZZA DI TAGLIO Per ottenere l altezza di taglio desiderata gli...

Page 7: ...gare la spina all alimentazione protetta RCD Avvio Interruttore On Off fig 3 Avvertenza Non avviare il rasaerba se rimasto fermo sull erba lunga Premere il pulsante di sicurezza A del gruppo dell inte...

Page 8: ...one Rispettare le precauzioni che seguono scollegare il rasaerba dall alimentazione principale e attendere fino a quando la lama non ruota pi prima di procedere Fare attenzione a non tagliarsi Utilizz...

Page 9: ...rni della ruota 7 Conservare il rasaerba in un luogo asciutto VII Garanzia 1 Questo prodotto stato fabbricato secondo standard elevati sulla qualit garantito da difetti nei materiali e nella manifattu...

Page 10: ...in 1 3500min 1 Altura de corte 25 40 55mm 25 40 60mm Anchura m xima de corte 320mm 360mm Nivel de potencia ac stica 96db A 96db A Esta herramienta tiene doble aislamiento Tiene dos barreras independie...

Page 11: ...ra uso en exteriores El uso de un cable apropiado para exteriores reduce el riesgo de descarga el ctrica 3 SEGURIDAD PERSONAL a Mant ngase alerta F jese en lo que est haciendo y utilice el sentido com...

Page 12: ...e calzado grueso y pantalones largos No opere el aparato con los pies descalzos o con sandalias abiertas Inspeccione a fondo el rea donde el aparato debe ser usado y eliminar todas las piedras los pal...

Page 13: ...s residuos de productos el ctricos no se deben tirar con la basura dom stica Recicle donde existan los servicios para residuos el ctricos o dom sticos Verifique con su autoridad local o distribuidor a...

Page 14: ...g 8 Presione el cubre ruedas en su posici n Fig 1h AJUSTE LA ALTURA DE CORTE Para obtener la altura de corte deseada los ejes delantero y trasero se reposicionan en la parte interior del armaz n de la...

Page 15: ...ruptor ON OFF fig 3 PRECAUCI N No arranque la segadora si est colocada sobre la hierba alta Presione el bot n de seguridad A del conjunto interruptor y despu s tire la palanca del interruptor B contra...

Page 16: ...fig 6 y fig 7 Advertencia Observe las siguientes precauciones Desconecte la segadora de la red y espere hasta que la cuchilla haya dejado de girar antes de continuar Tenga cuidado de no cortarse Util...

Page 17: ...las ruedas 7 Guarde la segadora en un lugar seco VII Garant a 1 Este producto ha sido fabricado con un alto est ndar de calidad Est garantizado contra defectos de los materiales y la ejecuci n del tr...

Page 18: ...pper handle 12 Lower handle 13 Switch box 14 Grass collection box 15 Wheels 16 Motor cover 7 Cable hook III Technical data Code 96849 99176 Voltage 230 240V 50Hz 230 240V 50Hz Power 1000W 1500W No loa...

Page 19: ...ed cords increase the risk of electric shock e When operating a power tool outdoors use an extension cord suitable for outdoor use Use of a cord suitable for outdoor use reduces the risk of electric s...

Page 20: ...Operate the appliance only in daylight or in good artificial light Avoid operating the appliance in wet grass where feasible Always be sure of your footing on slopes Walk never run Always work across...

Page 21: ...harge chute This product is double insulated electrically Disconnect from mains power immediately if the power cord becomes damaged Beware of sharp blades Blades continue to rotate after the motor is...

Page 22: ...Pull the wheel axle towards the front of the mower 3 Locate the wheel axle into the desired cutting height adjustment position Note Make sure that both front right and left wheels are located in the s...

Page 23: ...the mains cable Place the bulk of the mains cable on the close to the starting point Switch the mower on as described above Proceed as shown in fig 4 Move from position 1 to position 2 Turn right and...

Page 24: ...een moving blade and fixed parts of the machine 6 Oil the wheel pins 7 Store the lawn mower in a dry place VII Guarantee 1 This product has been manufactured to a high quality standard It is guarantee...

Page 25: ...do en este manual esta de acuerdo con las Directivas Europeas 2006 42 EEC 2014 35 EEC 2014 30 EEC 2000 14 EEC Nivel de ruido garantizado LwA 96dB A K 3dB DISTRIBUIDOR PARA ESPA A A FORGED TOOL S A Avd...

Page 26: ...Cod 96849 99176 Exploded view 99176...

Page 27: ...Cod 96849 99176 Exploded view 96849...

Reviews: