background image

20

21

English

English

BATTERY REPLACEMENT PROCEDURE

PLEASE READ THE CAUTIONS AND WARNINGS BEFORE ATTEMPTING
TO REPLACE THE BATTERIES
Hot-swappable batteries mean that the batteries can be replaced without
powering down the whole UPS system.
NOTE:  If there is a power interruption while replacing the hot-swappable batte-

ries, with the UPS on, the load will not be backed up.  To hot-swap the
batteries start with step number 6.

1.  Turn off the equipment that is plugged into the output receptacles of the
     UPS.
2.  Press the OFF button to turn the UPS off.  NOTE:  The input circuit breaker
     MUST be turned to the off position for the 208V models.
3.  Unplug the UPS's AC power cord from the AC wall outlet.
4.  Unplug the equipment from the output receptacles of the UPS.
5.  Unplug the computer interface cable from the rear panel of the UPS.
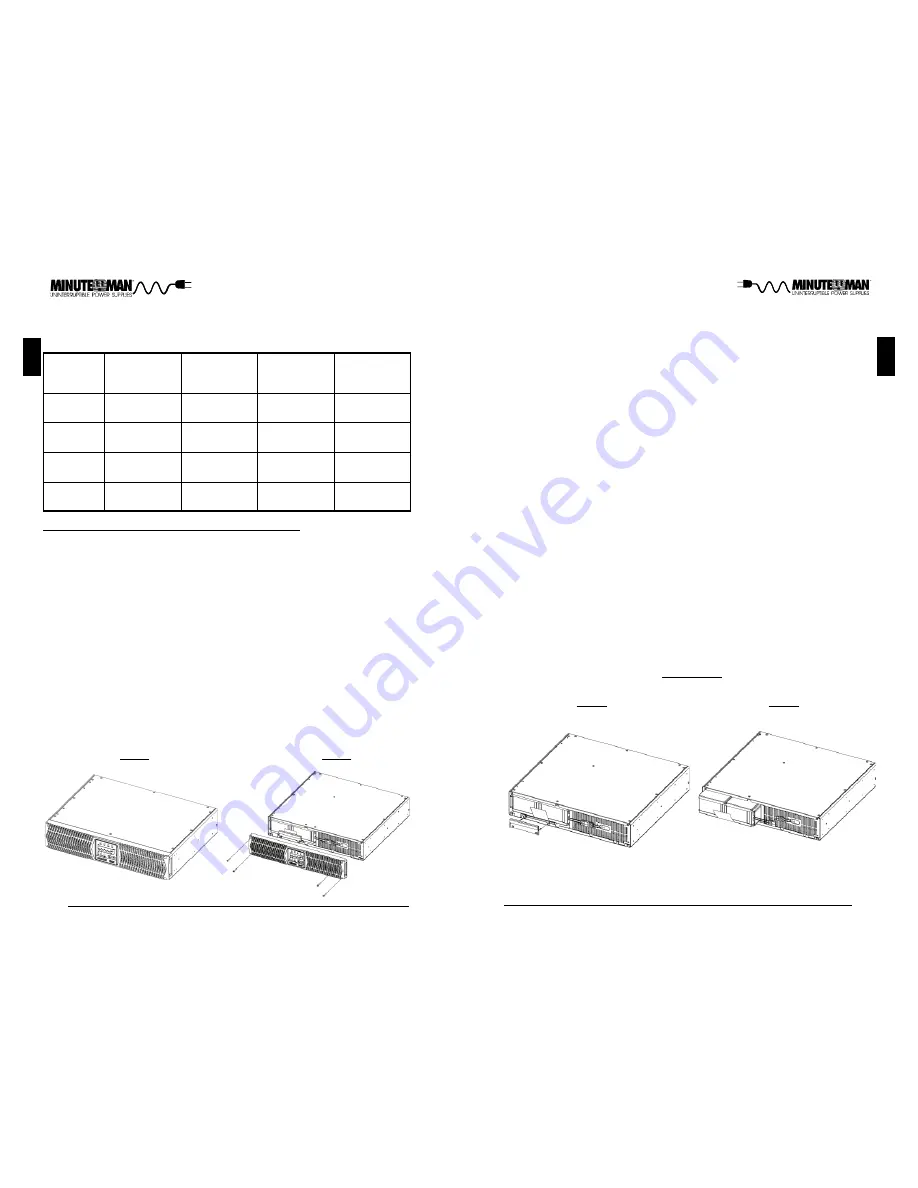
6.  Remove the front panel retaining screws. (FIG. 2)
7.  Lay the front panel on top of the UPS.

ED1000RM2U
ED1000RMT2U

ED1500RM2U
ED1500RMT2U

Battery
Qty/Rating

2-12V8.5Ah


4-12V7.2Ah

ED3000RM2U
ED3000RMT2U

6-12V8.5Ah

Model #

Replace batteries with the same number and type as originally
installed in the UPS.  These batteries have pressure operated vents.
These UPSs contain sealed non-spillable maintenance-free lead
acid batteries.

CAUTION:

Panasonic
Part #

Yuasa
Part #

REW45-12

CSB
Part #

NP-7.2-12

REW45-12

LC-R129

LC-R127.2

LC-R129

HR 1234W F2

GP 1272 F2

HR 1234W F2

FIG. 1

FIG. 2

ED2000RM2U
ED2000RMT2U

4


-12V8.5Ah

REW45-12

LC-R129

HR 1234W F2

8.  Remove the two retaining screws for the battery retaining bracket. (FIG. 3)
9.  Remove the battery retaining bracket. (FIG. 3)
10.  Disconnect the Battery connectors (red and black). (FIG. 4)
11.  Grasp the battery pull tab and gently pull the battery module out of the UPS
      and set on the floor. (FIG. 4)
NOTE:  Use Caution, the battery module is heavy.
12.  Disconnect the battery positive (red) wire.
13.  Disconnect the battery negative (black) wire.
14.  Remove the battery jumper wires.
15.  Remove the old batteries from the battery module.
16.  Install the new batteries into the battery module in the same position as the
      original batteries.
17.  Verify proper polarity.  Re-install the battery jumper wires on the new batt-
       eries.
18.  Verify proper polarity.  Reconnect the battery negative (black) wire.
19.  Verify proper polarity.  Reconnect the battery positive (red) wire.
20.  Slide the battery module into the UPS.
21.  Verify proper polarity.  Reconnect the battery connectors (red and black).
NOTE:  Some sparking might occur, this is normal.
22.  Re-install the battery retaining bracket.
23.  Re-install the two retaining screws for the battery retaining bracket.
24.  Re-install the front panel on the UPS.
25.  Re-install the front panel retaining screws.
26.  Properly dispose of the old batteries at an appropriate recycling facility or
       return them to the supplier in the packing material for the new batteries.
27.  The UPS is now ready for the normal operation.
NOTE:  If the UPS has a Weak/Bad Battery Alarm after replacing the batteries,
the user must initiate a self test to clear the Weak/Bad Battery Alarm.  To
initiate a self test see section 4 "SELF TEST".

FIG. 3

FIG. 4

Summary of Contents for ED1000RM2U

Page 1: ...User s Manual Endeavor Series Para Systems Inc 1455 Lemay Dr Carrollton TX 75007 Phone 1 972 446 7363 Fax 1 972 446 9011 Internet minutemanups com UPS Sizing sizemyups com PN 34000274 On Line UPS...

Page 2: ...d Indicators 6 3 Installation 9 4 Operation 15 5 Troubleshooting 18 6 Replacing the Battery 19 7 Obtaining Service 22 8 Specifications 23 9 Configurable Parameters Settings 25 10 Limited Product Warra...

Page 3: ...read this manual before installing your Endeavor On Line Series UPS models ED1000RM2U ED1000RMT2U ED1500RM2U ED1500RMT2U ED2000RM2U ED2000RMT2U ED3000RM2U ED3000RMT2U as it provides important informa...

Page 4: ...in are carefully designed to minimize any shipping damage In the unlikely case that the UPS needs to be returned to the manufacturer please use the original packing material Since the manufacturer is...

Page 5: ...ady state when the UPS reaches a low battery condition The BATT LOW LED is extinguished when the UPS is in the On Line mode and when the battery is not in a low battery condition The REPLACE BATT red...

Page 6: ...Receptacles ED1000RM2U NEMA 5 15P Model ED2000RM2U ED3000RM2U ED1500RM2U Input Power Plug All power cords are 10ft ED1000RMT2U ED1500RMT2U NEMA 5 15P NEMA 5 20P NEMA L5 30P NEMA 6 15P NEMA 6 15P 6 NEM...

Page 7: ...ARN ING Use two or more people when installing the UPS Use CAUTION the UPS is extremely heavy Do not move the rack after the units have been in stalled The rack maybe unstable due to the weight distri...

Page 8: ...lows the user to mount the UPS on the wall There is a wallmount bracket kit available for the UPS The kit includes two wall mounting brackets ten retaining screws and the wallmount template WARNING Us...

Page 9: ...Battery mode short pin4 to pin5 for approximately 0 5 seconds to shutdown the UPS The UPS must be turned off and then back on again to restart the UPS NOTE Connecting to the REPO port is optional The...

Page 10: ...will illuminate and the UPS will sound a constant alarm This alarm will remain on until the excess load is removed or the UPS s self protec tion circuit shuts the UPS down COMMUNICATIONS PORTS RS232 a...

Page 11: ...le Power Supply contains potentially hazardous voltages Do not attempt to disassemble the UPS beyond the battery replacement procedure This UPS contains no user serviceable parts Repairs and Battery r...

Page 12: ...12 LC R129 HR 1234W F2 8 Remove the two retaining screws for the battery retaining bracket FIG 3 9 Remove the battery retaining bracket FIG 3 10 Disconnect the Battery connectors red and black FIG 4...

Page 13: ...r a copy of your original sales receipt and a brief description of the problem 5 Mark the RMA on the outside of all packages The factory cannot accept any package without the RMA marked on the outside...

Page 14: ...e 15 to 45 C 5 to 113 F 24VDC 72VDC 2 12V8 5Ah 6 12V8 5Ah 15 5 13 4 60 dBA 24 0x17 3x3 5 610x440x89mm 39 4x23 6x9 0 1000x600x230mm 46 2 lbs 21 0 Kgs 55 0 lbs 24 7 Kgs 40 0 lbs 17 9 Kgs 29 0 lbs 13 2 K...

Page 15: ...r after delivery in regard to use or appli cation of Para Systems s equipment is furnished without charge and on the basis that it represents Para Systems s best judgment under the circumstances but i...

Page 16: ...ay Drive Carrollton Texas 75007 USA Type of Equipment Uninterruptible Power Supplies UPS Model No ED1000RM2U Y ED1500RM2U Y ED2000RM2U Y ED3000RM2U Y I hereby declare that the equipment specified abov...

Page 17: ...30 English Notes...

Reviews: