background image

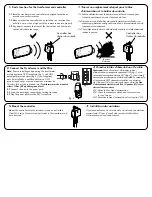
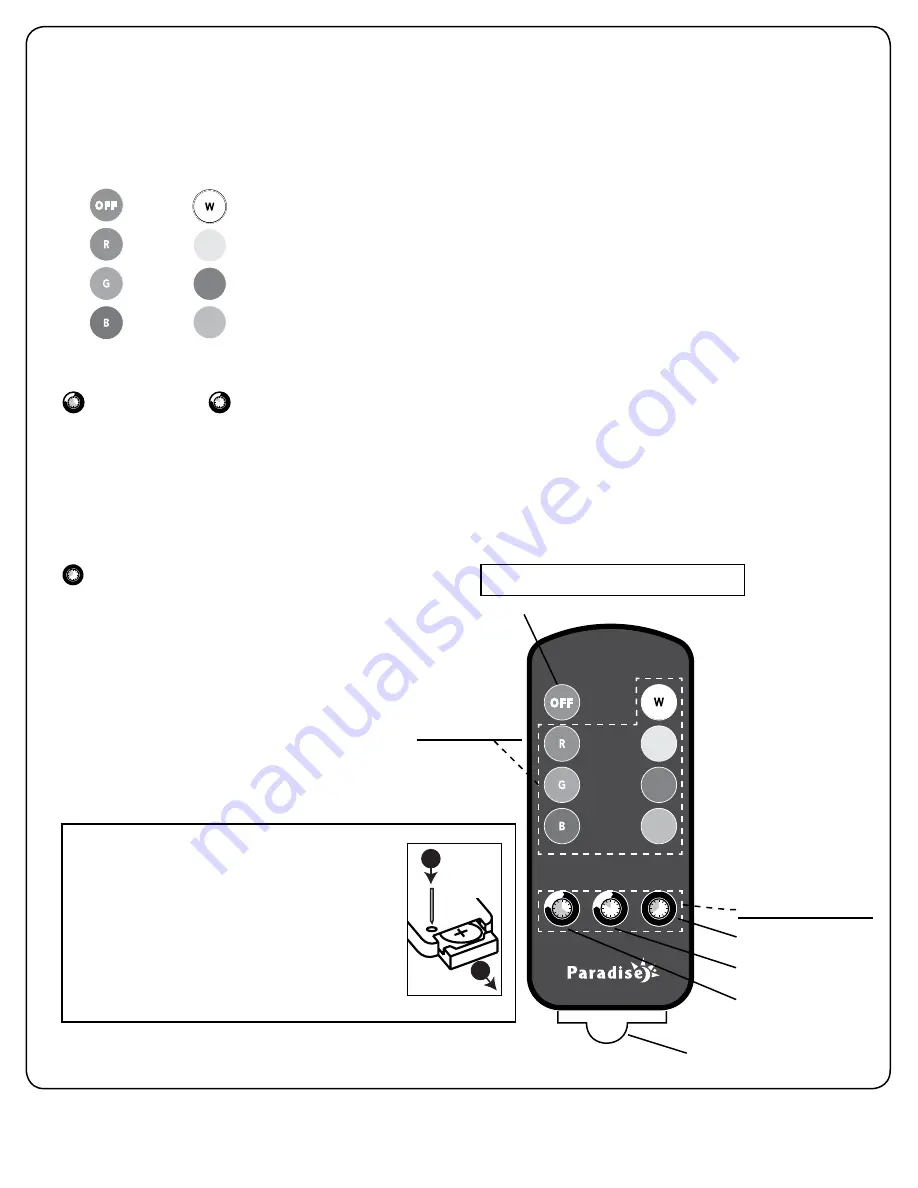
The unit must be operated with the provided remote control. If the remote is lost or broken, please call 1 888 867-6095 for a replacement.

Note: 

Remove the pull-tab to allow the remote control to function.

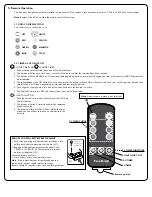
5.1 FIXED COLOR SELECTION

Sets the fixtures on the desired color.

5.2 TIMER & AUTO SHUT OFF

5 HOUR TIMER AND         10 HOUR TIMER 
1. With any fixed color selected, press one of the timer buttons.
2. The fixtures will blink once for 5 hours, twice for 10 hours to confirm the command has been received.
3. The fixtures will turn off after 5 or 10 hours depending on which button was pressed. Changing the color at this point will NOT deactivate the  

  timer fonction.
4. The following day, if the OFF button has not been pressed, the fixtures will turn ON at the same time that it was set the previous day and then  

  turn off after 5 or 10 hours depending on which button was initially pressed.
5. To change the starting time, press one of the timer buttons at the desired start time.
6. To disable the timer, press OFF and then back on in any of the fixed colors.

8H AUTO SHUT-OFF
1. With the desired color mode activated, press the 8H Auto  

  Shut-Off button.
2. The fixtures will blink 3 times to confirm the command    

  has been received.
3. The fixture will turn off after 8 hours. Unlike the timer 

  mode, the unit will not turn back on automatically the    

  next day.

5. 

Remote Operation

WHITE

YELLOW

RED

OFF

MAGENTA

GREEN

BLUE

CYAN

OFF

5.1 FIXED COLOR

Remove pull-tab

5.2 TIMER FUNCTIONS

8H AUTO SHUT-OFF

10H TIMER

5H TIMER

Push tab

down using

pin-like tool 

1

2

Pousser la

languette à

l’aide de l’outil

en forme

d’aiguille

1

2

REMOTE CONTROL BATTERY REPLACEMENT

1. Push tab down using pin-like tool (not included), while    

  pulling out battery compartment as shown. (ill.1)

2. Remove used battery and replace with either a new  


  CR2032 or a CR2025 3V Lithium battery in proper  


  polarity as indicated. (ill.1)

Clean the battery contacts.

3. Close battery door on the remote control.

Note:

 If the remote distance is significantly reduced, 

replacing the battery should improve the range.

Battery should be recycled as per state and local guidelines.

ill.1

Note:

 Do not expose remote to wet locations

Summary of Contents for U000-1294

Page 1: ...iencing problems contact a qualified electrician WARNING Risk of Electric Shock When used outdoors install only to a covered Class A GFCI protected receptacle that is weatherproof with the power unit connected to the receptacle If one is not provided contact a qualified electrician for proper installation Ensure that the power unit and cord do not interfere with completely closing the receptacle c...

Page 2: ...eront installés le bloc d alimentation et la prise de courant Bushes Buissons a r Controller box Boîtier de contrôle Controller box Boîtier de contrôle Front Devant Front Devant 2 Connect the Transformer and the Wire 2 Branchez le bloc d alimentation et le câble Note Prior to installing and powering the transformer a safety approved GFCI receptacle fig 1 and GFCI watertight protective cover fig 2 ...

Page 3: ...tance d une piscine d un spa ou d une fontaine d eau Garder le câble serré afin d éviter les accidents sur les chemins ou aux alentours de l installation L emplacement doit être sans danger pour les enfants et animaux Illustration des lumières à titre d exemple seulement IMPORTANT Lors du branchement veillez à aligner correctement les connecteurs mâles et femelles Voir la coche d alignement démont...

Page 4: ...isable the timer press OFF and then back on in any of the fixed colors 8H AUTO SHUT OFF 1 With the desired color mode activated press the 8H Auto Shut Off button 2 The fixtures will blink 3 times to confirm the command has been received 3 The fixture will turn off after 8 hours Unlike the timer mode the unit will not turn back on automatically the next day 5 Remote Operation WHITE YELLOW RED OFF M...

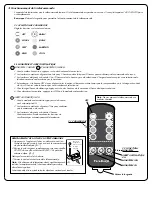
Page 5: ... OFF puis le mode de couleur désirée ARRÊT AUTOMATIQUE 8H 1 Avec le mode de couleur désiré appuyez sur le bouton arrêt automatique 8H 2 Les lumières se mettent à clignoter 3 fois pour confirmer que la commande a été reçue 3 Les lumières s éteignent au bout de 8 heures Contrairement au mode minuterie les lumières ne se rallument pas automatiquement le lendemain 5 Fonctionnement de la télécommande B...

Page 6: ...Check each fixture is well connected Le problème ici est avec une lumière Vérifiez que chaque lumière est bien branchée Only some lights work Seulement quelques lumières fonctionnent ICES 003 This Class B digital apparatus complies with Canadian ICES 003 Operation is subject to the following two conditions 1 this device may not cause harmful interference and 2 this device must accept any interfere...

Reviews: