46
•
Troubleshooting
GXL-45 Operator Manual
Figure 43 Flame Adjust Setscrew
12.
Replace burner flame tamers and cooking grates
13.
Repeat this process for all main burners
Rear Burner Conversion
The rear burner must also be changed to accommodate the new gas type. Complete the following steps
after changing the main burner orifices, and before turning on the gas to complete the leak check.
1.
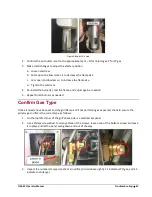
Remove the access plate as shown in the
2.
Use a 3/8” open end wrench to loosen and remove the orifice
Figure 44 Rear Burner Gas Conversion
3.
Insert and tighten the new orifice just until snug, then give another 1/8 turn
•
Natural gas orifice size – 1.1 mm
•
LP gas orifice size – 1.0 mm
4.
Complete orifice leak check after gas is supplied
5.
Close the access panel; install and tighten all 4 screws

