Digiplex/DigiplexNE LCD Keypad 9
n
keypad’s programming mode and enter section
[510]
.
3. When the keypad emits a confirmation beep, wait 5
seconds and remove the memory k ey after the second
confirmation beep.
3.6 Copy the Keypad Contents to the Memory Key
S
ECTION
[520]
1. Insert the memory key onto the k ey pad’s connector
labelled “
KE Y
” (refer to F igure 2.1 on page 5). Ensure that
the write protect jumper is ON (refer to Figure 3.1).
2. To c opy the contents to the memory key, enter the
keypad’s programming mode and enter section
[520]
.
3. After the c onfirmation beep, wait 5 s ec onds and remove
the memory key after the s ec ond confirmation beep. Set
the memory key’s jumper to OFF if you do not wish to
accidentally ov erwrite its contents (refer to Figure 3.1).
Figure 3.1: PMC-3 Jumper Settings
Summary of Contents for DigiplexNE DGP2-641
Page 1: ...LCD Keypad V1 1 DGP2 641 Reference and Installation Manual...
Page 2: ......
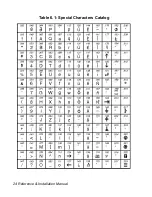
Page 26: ...24 Reference Installation Manual Table 6 1 Special Characters Catalog...
Page 28: ...26 Reference Installation Manual Notes...
Page 29: ......
Page 30: ......
Page 31: ......


