16
Full Installation and Setup
The Easy Install feature can also be used when one person installs and sets up the
FrameSaver unit from beginning to end.
Procedure
1.
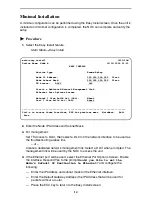
Follow Step 1 through Step 8 of
Minimal Installation
on page 14.
2.
If the unit will be enforcing CIR (Committed Information Rate) and EIR (Excess
Information Rate) on network frame relay links, enable Traffic Policing.
Main Menu
→
Configuration
→
Network
→
Frame Relay
You can change other Frame Relay and LMI default settings, if necessary.
3.
Configure each interface according to the local management interface (LMI) and
assigned line conditions supplied by the service provider.
Configuration
→
Network
→
Frame Relay
Configuration
→
T3 User Ports
→
Frame Relay
4.
Install the network cable (see
Connecting to the Network
on page 17). The
FrameSaver unit starts discovering DLCIs (see
Automatic Configuration
on
page 17).
5.
If SNMP traps are wanted, set up managers and select the desired traps (see
Configuring SNMP Trap Managers and Traps
on page 19).
6.
Verify the entire path from the FrameSaver unit to the NOC NMS is functioning (see
Verifying the End-to-End Path
on page 19.
7.
If the Ethernet port will be used for management, install the Ethernet cable (see
Connecting the LAN Cable
on page 20).
8.
Install the DTE cable (see
Connecting to the DTE
on page 20).
9.
Verify that data is being received (see
Checking that Data is Being Received
on
page 22).
10.
Verify that all PVCs, including Management PVCs, are configured (see
Checking
PVC Connections
on page 22).
The FrameSaver installation is complete.
See the
FrameSaver SLV Operations Guide (9000-A2-GB33)
for additional status and
troubleshooting information.


