6
5.
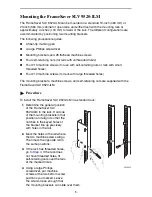
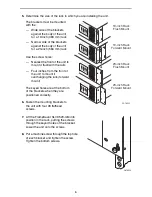
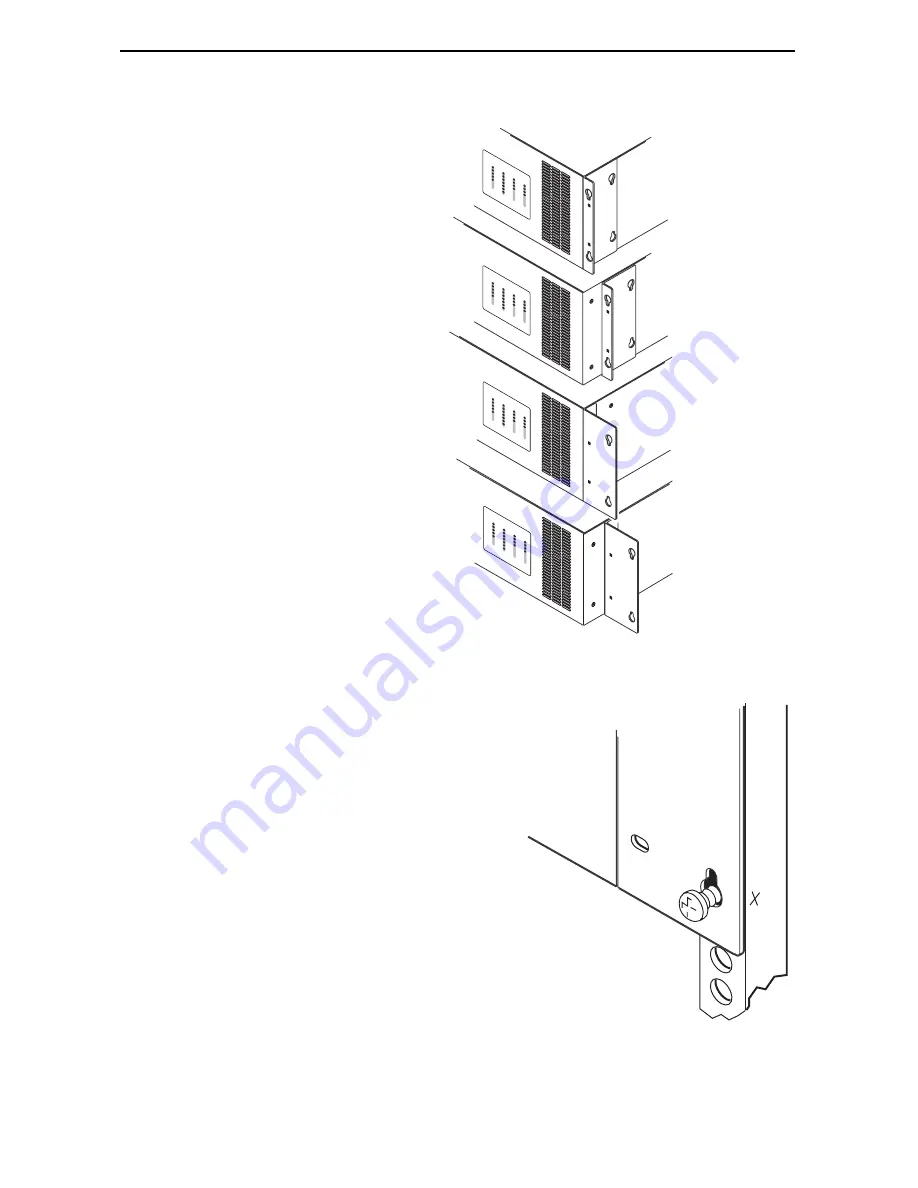
Determine the size of the rack in which you are installing the unit.
The brackets must be mounted
with the:
—
Wide side of the brackets
against the body of the unit
for a 19-inch (483 mm) rack
—
Narrow side of the brackets
against the body of the unit
for a 23-inch (584 mm) rack
Use the screw holes:
—
Nearest the front of the unit to
mount it flush with the rails
—
Four inches from the front of
the unit to mount it
overhanging the rails (forward
mount)
The keyed holes are at the bottom
of the brackets when they are
positioned correctly.
6.
Fasten the mounting brackets to
the unit with four #8 flathead
screws.
7.
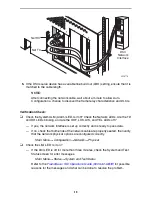
Lift the FrameSaver SLV 9520-ILM into
position in the rack, putting the screws
through the keyed holes of the bracket.
Lower the unit onto the screws.
8.
Put a machine screw through the top hole
of each bracket and tighten the screw.
Tighten the bottom screws.
Fra
m
eS
ave
r
TM
SLV
95
80
AIS
XMT
RCV
LCV
OOF
LOS
YEL
POR
T 1
TD
RD
DSR
DTR
POR
T 2
NETW
ORK
TD
RD
DSR
DTR
SYSTEM
OK
ALM
TST
PWR
FA
N
98-16022
19-inch Rack
Forward Mount
23-inch Rack
Flush Mount
23-inch Rack
Forward Mount
Fra
m
eS
av
er
TM
SLV
95
80
AIS
XMT
RCV
LCV
OOF
LO
S
YEL
POR
T 1
TD
RD
DSR
DTR
POR
T 2
NETW
ORK
TD
RD
DSR
DTR
SYSTEM
OK
ALM
TST
PWR
FA
N
Fra
m
eS
ave
r
TM
SLV
95
80
AIS
XMT
RCV
LCV
OOF
LO
S
YE
L
POR
T 1
TD
RD
DSR
DTR
POR
T 2
NETW
ORK
TD
RD
DSR
DTR
SYSTEM
OK
ALM
TST
PWR
FA
N
19-inch Rack
Flush Mount
Fra
m
eS
ave
r
TM
SLV
95
80
AIS
XMT
RCV
LCV
OOF
LOS
YE
L
POR
T 1
TD
RD
DSR
DTR
POR
T
2
NETW
ORK
TD
RD
DSR
DTR
SYSTEM
OK
ALM
TST
PWR
FA
N
98-16024


