background image

Worksheets

 A-2

7924-A2-GB20-30

October 1997

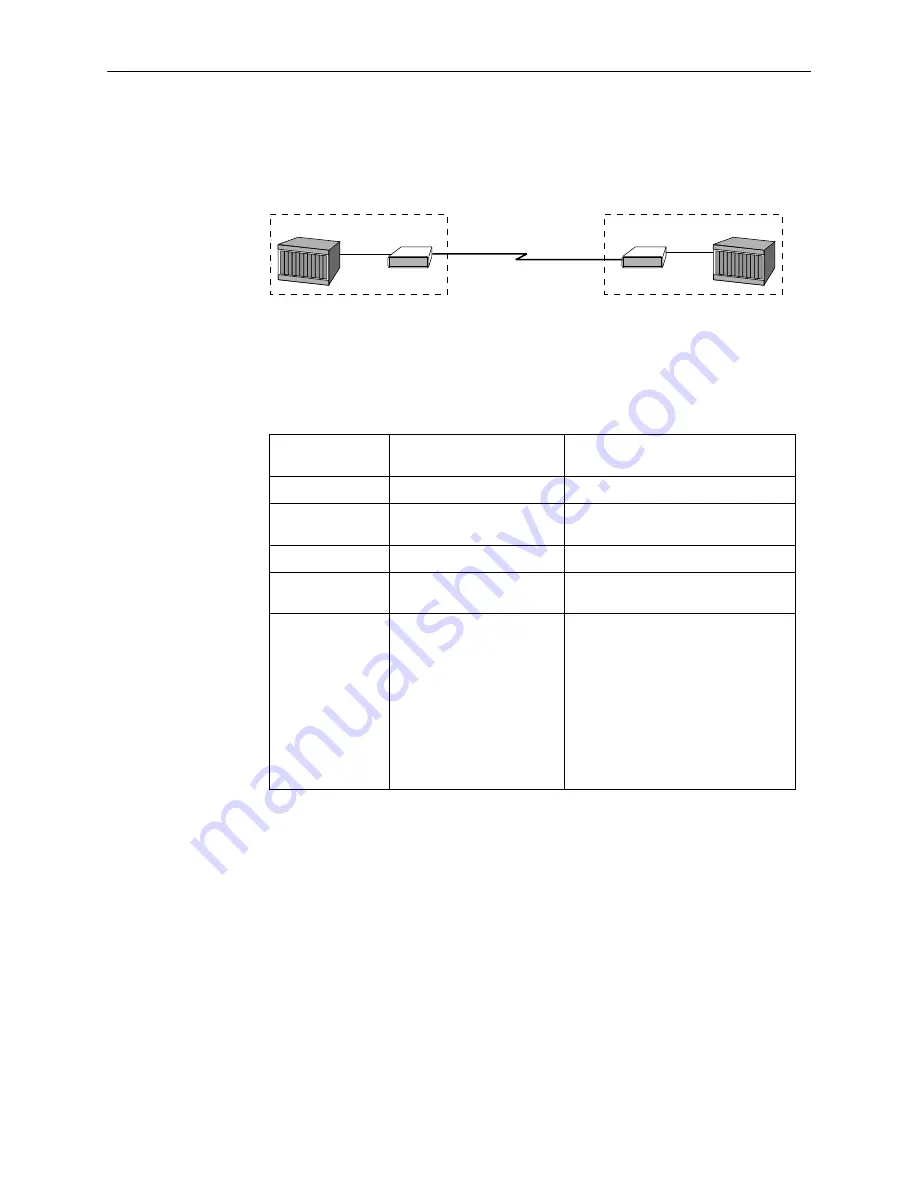
DSX-1-to-DSX-1 Configuration

Multiplexer

DSX-1 Unit

DSX-1

Multiplexer

DSX-1 Unit

DSX-1

Cross-campus

2- or 4-wire

facility

Customer Premises

Central Site

97-15296

To connect two DSX-1-compatible units, configure the units as follows. Terminal
mode factory defaults are in bold (for Switchpack mode defaults, see Appendix C,

Switchpacks and Jumpers

).

Configuration
Option

DSX-1-Compatible Unit
(Customer Premises)

DSX-1-Compatible Unit
(Central Site)

Card Type

CP (default)

CO

Loops Enabled

Dual (Loops A & B) or 
Single (Loop A)

Must be same as CP side

T1 Line Encode

B8ZS or AMI

Must be same as CP side

Framing

D4, Extended Superframe,
or Unframed

Must be same as CP side

Line Build-Out

Enter 5 at the Config
command prompt. Select
from the following options:

1) 0 to 133 ft

2) 133 to 266 ft

3) 266 to 399 ft

4) 399 to 533 ft

5) 533 to 655 ft

Enter 5 at the Config command
prompt. Select from the following
options:

1) 0 to 133 ft

2) 133 to 266 ft

3) 266 to 399 ft

4) 399 to 533 ft

5) 533 to 655 ft

Summary of Contents for HotWire 7924

Page 1: ...HOTWIRE MODEL 7924 STANDALONE T1 HDSL TERMINATION UNIT USER S GUIDE Document No 7924 A2 GB20 30 October 1997 ...

Page 2: ...es the right to revise this publication and to make changes from time to time in the contents hereof without obligation of Paradyne Corporation to notify any person of such revision or changes Changes and enhancements to the product and to the information herein will be documented and issued as a new release to this manual Trademarks All products and services mentioned herein are the trademarks se...

Page 3: ...tory agencies and inspection authorities to ensure compliance 6 A rare phenomenon can create a voltage potential between the earth grounds of two or more buildings If products installed in separate buildings are interconnected the voltage potential may cause a hazardous condition Consult a qualified electrical consultant to determine whether or not this phenomenon exists and if necessary implement...

Page 4: ...rmful interference to radio communications Operation of this equipment in a residential area is likely to cause harmful interference in which case the user will be required to correct the interference at his own expense The authority to operate this equipment is conditioned by the requirements that no modifications will be made to the equipment unless the changes or modifications are expressly app...

Page 5: ...ew 2 1 Package Checklist for HotWire Model 7924 A1 2 1 Connecting to the Network 2 2 Connecting Power to the Unit 2 2 3 Using Terminal and Switchpack Modes Choosing an Interface Mode 3 1 Connecting to a System Terminal 3 1 Switching Between Terminal and Switchpack Modes 3 2 4 Customizing DSX 1 Compatible Units Accessing Configuration Options 4 1 Making Changes from the Terminal Interface 4 2 Makin...

Page 6: ...s 6 3 Remote Unit Information 6 5 Front Panel LEDs 6 6 DSX 1 Compatible Unit 6 6 V 35 Compatible Unit 6 7 7 Testing Detecting a Problem 7 1 Understanding Loopback Tests 7 1 Local Loopbacks 7 2 Remote Loopbacks 7 3 Starting and Stopping Loopbacks 7 4 Resetting the Unit 7 5 A Worksheets Overview A 1 DSX 1 to DSX 1 Configuration A 2 DSX 1 to V 35 Configuration A 3 Unframed Operation A 4 Time Slot DS0...

Page 7: ...inal Connection Cable Pin Assignments B 1 HDSL Loop Connection Cable Pin Assignments B 2 T1 Network Connection Cable Pin Assignments B 3 V 35 Connection Cable Pin Assignments B 4 C Switchpacks and Jumpers DSX 1 Compatible Units C 1 V 35 Compatible Units C 3 Glossary Index ...

Page 8: ...odel 7924 A1 xxx Document Summary Section Description Chapter 1 About HotWire Model 7924 Termination Units Describes the features of each version of the Model 7924 and typical configurations Chapter 2 Installing the Unit Describes how to install the unit and make connections Chapter 3 Using Terminal and Switchpack Modes Provides instructions for connecting a VT100 compatible terminal user interfac...

Page 9: ...ludes board layout diagrams Glossary Defines acronyms and terms used in this document Index Lists key terms acronyms concepts and sections in alphabetical order Product Related Documents Document Number Document Title 7900 A2 GB20 HotWire Model 7900 Basic Maintenance Processor User s Guide 7900 A2 GB21 HotWire Model 7900 SNMP Maintenance Processor User s Guide 7900 A2 GN10 HotWire Model 7900 10 Sl...

Page 10: ...ed copper pairs Automatic detection and compensation for inverted pairs and swapped loops which simplifies installation Tolerance of bridged taps Local and remote alarm surveillance Local and remote T1 network and HDSL loop performance monitoring HotWire 7924 may be ordered either as a standalone unit 7924 A1 xxx or as a nest mounted card 7924 B1 xxx that fits in a HotWire 7900 nest This guide des...

Page 11: ...wer supply 7924 A1 202 1 544 Mb s V 35 compatible Connection to 120 Vac power supply 7924 A1 301 1 544 Mb s DSX 1 compatible Connection to 230 Vac power supply 7924 A1 302 1 544 Mb s V 35 compatible Connection to 230 Vac power supply 7924 A1 501 1 544 Mb s DSX 1 compatible Direct connection to 48 Vdc power supply For use in a HotWire 7900 10 Slot Standalone Shelf only 7924 A1 502 1 544 Mb s V 35 c...

Page 12: ... each pair one unit is configured as a central site or central office CO unit and the other is the remote or customer premises CP unit The HotWire Model 7924 standalone unit is configured at the factory to operate at the CP side of a T1 HDSL connection Conversely HotWire Model 7924 nest cards are configured for CO operation The central site unit must be reconfigured for CO operation in these confi...

Page 13: ...st containing HotWire Model 7924 nest cards The nest cards at the central site each terminate a single HDSL subscriber line Each line is then converted to a DSX 1 interface for connection to other central office equipment such as a digital cross connect system DCS PBX DSX 1 Unit Router DSX 1 DCS Mgmt Station 7900 Nest Nest Cards V 35 Unit V 35 Multiplexer DSX 1 Unit DSX 1 Telco 2 or 4 wire facilit...

Page 14: ...ellular network access application Switch Mgmt Station 7900 Nest Nest Cards Telco 2 or 4 wire facilities between Cell Sites and MTSO Customer Premises Central Site DSX 1 DSX 1 Unit DSX 1 DSX 1 Unit DSX 1 Cell Site Cell Site Mobile Telephone Switching Office MTSO 97 15297 Figure 1 3 Cellular Network Access User Interface Types There are three types of user interfaces to the standalone units VT100 c...

Page 15: ... method for housing up to ten standalone termination units and uses only a single power source HotWire Model 7924 A1 50x units which use 48 Vdc direct power must be installed in a HotWire 7900 10 Slot Standalone Shelf Installation instructions for these models are not provided in this User s Guide To obtain information on the Standalone Shelf refer to Product Related Documents on page vi Package C...

Page 16: ...ector on the rear panel Connect the other end to your V 35 or DSX 1 equipment HotWire 7924 V 35 compatible units are not designed to be used at both ends of an HDSL connection Connecting Power to the Unit HDSL DS1 48 VDC 97 15356 01 DSX 1 Compatible HotWire 7924 Rear Panel HDSL V 35 48 VDC 97 15264 V 35 Compatible HotWire 7924 Rear Panel Plug the power transformer into the appropriate 115 or 230 V...

Page 17: ... customer premises operation In Switchpack Mode You change configuration parameters by moving switchpacks and jumpers on the board The standalone unit is not preconfigured You must ensure that the switchpacks and jumpers are set as desired You can still display information about the unit from the terminal and run loopback tests Any changes you make in Terminal Mode are lost when you change to Swit...

Page 18: ...t to either Terminal Mode the default setting or Switchpack Mode Refer to Chapter 4 for DSX 1 compatible units or Chapter 5 for V 35 compatible units for information on changing configuration options using either of these modes Procedure Use electrostatic discharge protection when handling the circuit board To change the mode 1 Power down the unit and expose the circuit board by loosening the two ...

Page 19: ...he Board Configuration branch of the Main Menu while in Terminal Mode Changing switchpack and jumper settings on the circuit board while in Switchpack Mode The Main Menu for a DSX 1 compatible unit on the customer premises CP side appears as follows Command G123 ATTX CP T1 Rate LOOP AB T1 HDSL HTUR Main Menu 1 Board Status 2 Performance Monitor 3 Board Configuration 4 Board Reset 5 CP Local Loopba...

Page 20: ...itchpack Mode you can display configuration parameters using the terminal menus but any configuration changes must be made using the switchpacks and jumpers on the board hardware Refer to Making Changes in Switchpack Mode on page 4 5 To access the Board Configuration menu enter 3 at the Main Menu Command prompt Command 3 Board Configuration 1 HDSL Card Type CP HDSL Rate Type T1 2 Loops Enabled Dua...

Page 21: ...ed Single Only Loop A is enabled 3 T1 Line Encode Possible Settings B8ZS AMI Default Setting B8ZS Specifies the type of line encoding used to ensure ones density in the transmission signal To toggle the encoding method enter 3 at the Config prompt B8ZS Binary 8 Zero Substitution AMI Alternate Mark Inversion 4 Framing Possible Settings D4 Extended Superframe Unframed Default Setting D4 Specifies th...

Page 22: ...ns may be displayed on your terminal These other options for 7 5 15 and 22 5 dB are not for use with this product Use of these options will cause a weak signal and degrade performance Select from options 1 through 5 only You must reset the board for changes to the card type or loops enabled options 1 or 2 to take effect A system message is displayed on the terminal to remind you to reset the board...

Page 23: ...ion in Appendix C Switchpacks and Jumpers to locate switchpack S1 3 Place the switchpack in the correct position for each desired configuration option Definitions of switchpack positions are provided in Appendix C Switchpacks and Jumpers For example to change a unit s card type from CO to CP move switch 1 on switchpack S1 to the OFF position 4 Replace the cover and screws 5 Power up the board to r...

Page 24: ... Settings Position 4 Bit 0 OFF 0 ON 1 Position 5 Bit 1 OFF 0 ON 1 Position 6 Bit 2 OFF 0 ON 1 Switchpack Definitions Bit 2 Bit 1 Bit 0 Application 0 0 0 0 to 133 feet 0dB 0 0 1 133 to 266 feet 0 1 0 266 to 399 feet 0 1 1 399 to 533 feet 1 0 0 533 to 655 feet 1 0 1 7 5 dB 1 1 0 15 dB 1 1 1 22 5 dB Config For example to change the line build out to 399 to 533 feet while in Switchpack Mode set positi...

Page 25: ...ing switchpack and jumper settings on the circuit board while in Switchpack Mode The Main Menu for a V 35 compatible unit on the customer premises CP side appears as follows Command G123 ATTX CP T1 LOOP AB V 35 T1 HDSL HTUR Main Menu 1 Board Status 2 Performance Monitor 3 Board Configuration 4 Board Reset 5 CP Local Loopback 6 CP Remote Loopback 7 HTUC Menu Redisplays this Menu Command The G123 co...

Page 26: ...inal menus When operating in Switchpack Mode you can display configuration parameters using the terminal menus but any configuration changes must be made using the switchpacks and jumpers on the board hardware Refer to Making Changes in Switchpack Mode on page 5 4 To access the Board Configuration menu enter 3 at the Main Menu Command prompt Command 3 Board Configuration 1 HDSL Card Type CP HDSL I...

Page 27: ...r D ual Loops Dual Loops A and B are enabled Single Only Loop A is enabled 3 Payload Rate Possible Settings 1 through 9 for 64 through 1536 kbps Default Setting 9 1536 kbps Specifies the desired payload rate 1 1 x 64 64 kbps 6 8 x 64 512 kbps 2 2 x 64 128 kbps 7 12 x 64 768 kbps 3 3 x 64 192 kbps 8 16 x 64 1024 kbps 4 4 x 64 256 kbps 9 24 x 64 1536 kbps 5 6 x 64 384 kbps N No change to rate Option...

Page 28: ...anges while in Switchpack Mode 1 Power down the unit and remove the enclosure cover exposing the circuit board 2 Find the switchpack for the configuration options you wish to change Switchpack positions are defined in Appendix C Switchpacks and Jumpers 3 Place the switchpacks in the correct position for each desired configuration option The switchpacks are not preconfigured For example to change a...

Page 29: ... and Jumpers Config 4 Switch pack 1 definition 1 CO CP OFF CP ON CO 2 Dual Single Loop Mode OFF Dual ON Single 3 Not Used 4 5 00 11 Invalid 01 Invalid 10 Loop Timing 6 8 Not Used Switch pack 2 definition 1 64 Kbps 1x64 OFF 0 ON 1 2 128 Kbps 2x64 OFF 0 ON 1 3 192 Kbps 3x64 OFF 0 ON 1 4 256 Kbps 4x64 OFF 0 ON 1 5 384 Kbps 6x64 OFF 0 ON 1 6 512 Kbps 8x64 OFF 0 ON 1 7 768 Kbps 12x64 OFF 0 ON 1 8 1024 ...

Page 30: ...ormance statistics for the unit and its network connection You can monitor operations by viewing the Board Status option from the Main Menu Performance Monitor option from the Main Menu Board Status and Performance Monitor options from the HTUC or HTUR menu for displaying information about the unit on the other end of the connection Front Panel LEDs ...

Page 31: ...mand 1 DTR ACTIVE DSR ACTIVE LOOPBACK STATUS OFF HDSL STATUS LOOP A is UP LOOP B is UP S N RATIO Loop A 44 0 dB Loop B 43 5 dB Command Board Status for V 35 Compatible Unit T1 STATUS displays one of the following Network is Up Receive Carrier Loss Receive Remote Alarm Receive Unframed All 1 s DTR and DSR are either ACTIVE or INACTIVE DSR becomes active in response to DTR with HDSL loops up and dat...

Page 32: ...s are updated every second Enter 2 at the Main Menu Command prompt to display the Performance Monitor menu Command 2 Time Since Board Power Up or Reset 0000d 00h 00m 00s 1 1 minute stats 2 15 minute stats 3 1 hour stats 4 12 hour stats 5 24 hour stats 6 Running total 7 Clear Statistics Q Quit stats Select a time frame from the list to display statistics for a specified time period Accumulated perf...

Page 33: ...W LoopA 0 BPV 0 FAW LoopB 0 CRC 0 CRC LoopA 0 MOS 0 CRC LoopB 0 FEBE LoopA 0 FEBE LoopB 0 stats Performance Statistics for DSX 1 Compatible Unit stats 1 Current 1 minute HDSL Errors FAW LoopA 0 FAW LoopB 0 CRC LoopA 0 CRC LoopB 0 FEBE LoopA 0 FEBE LoopB 0 Previous 1 minute HDSL Errors FAW LoopA 0 FAW LoopB 0 CRC LoopA 0 CRC LoopB 0 FEBE LoopA 0 FEBE LoopB 0 stats Performance Statistics for V 35 Co...

Page 34: ...ation The same type of information provided for the locally attached unit can also be displayed but not changed for the unit on the other side of the connection You can display information about the CO unit by using the HTUC menu options from a terminal attached to the CP unit and you can display information about the CP unit by using the HTUR menu options from a terminal attached to the CO unit T...

Page 35: ...op Bk ON A loopback has been initiated for testing the equipment connected to this unit Refer to Chapter 7 Testing for more information PWR ON Power is applied to the unit FAIL ON The processor has halted and repairs are required Loop A ON HDSL Loop A has failed Blinking HDSL Loop A is synchronizing with the far end unit such as when the units are coming up after a reset If the LED blinks for more...

Page 36: ...ore information PWR ON Power is applied to the unit FAIL ON The processor has halted and repairs are required Loop A ON HDSL Loop A has failed Blinking HDSL Loop A is synchronizing with the far end unit such as when the units are coming up after a reset If the LED blinks for more than 60 seconds loss of signal has occurred Off Loop A is enabled and synchronized Loop B ON HDSL Loop B has been disab...

Page 37: ...les a technician to isolate equipment on the HDSL circuit to determine where on the circuit trouble may be occurring Loopback takes the system off line Data received from the DTE T1 or V 35 application equipment is looped back as depicted in Figures 7 1 through 7 4 Local and remote refer to the point at which the data is looped back In a local loopback the data is reflected back by the local unit ...

Page 38: ...an Alarm Indication Signal AIS is received at the CP end only if the CP end is G 703 compatible AIS is not received at V 35 compatible CP units Terminal 97 15514 01 CO CP E1 HDSL 7900 7900 E1 HDSL 7900 7900 Diagnostic Equipment Diagnostic Equipment Loop Bk LED lights AIS AIS Alarm Indication Signal Figure 7 1 Local Loopback Initiated at the CO Unit Terminal 97 15518 01 CO CP E1 HDSL 7900 7900 Diag...

Page 39: ...hick arrows in Figures 7 3 and 7 4 When the CO initiates a remote loopback an Alarm Indication Signal AIS is received at the CP end only if the CP end is G 703 compatible AIS is not received at V 35 compatible CP units Terminal 97 15515 01 CO CP E1 HDSL 7900 7900 Diagnostic Equipment E1 HDSL 7900 7900 Diagnostic Equipment Loop Bk LED lights AIS AIS Alarm Indication Signal Figure 7 3 Remote Loopbac...

Page 40: ...emote both units automatically reset themselves in order to return to normal operation A loopback may not be started on units that have just been reset After a reset the units require approximately one minute for the circuit HDSL connection to stabilize If you attempt to start a loopback during this time the following error message appears PLEASE WAIT Circuit is stabilizing Only one loopback may b...

Page 41: ... 4 at the Main Menu Command prompt This is equivalent to cycling the power Command 4 Reset will bring the loops down Are you sure y n Command If y is selected the Main Menu reappears the loops go down and the FAIL reset LED lights up Pressing any key other than y is interpreted as an n ...

Page 42: ...wo combinations of the two types of units DSX 1 compatible units on both ends V 35 compatible unit on the CP end DSX 1 compatible unit on the CO end NOTE HotWire 7924 V 35 compatible units are not designed for use at both ends of an HDSL connection If your application requires V 35 equipment at both ends of an HDSL connection consider using two Hotwire 7925 E1 HDSL termination units Contact your s...

Page 43: ...ion DSX 1 Compatible Unit Customer Premises DSX 1 Compatible Unit Central Site Card Type CP default CO Loops Enabled Dual Loops A B or Single Loop A Must be same as CP side T1 Line Encode B8ZS or AMI Must be same as CP side Framing D4 Extended Superframe or Unframed Must be same as CP side Line Build Out Enter 5 at the Config command prompt Select from the following options 1 0 to 133 ft 2 133 to ...

Page 44: ...nd Jumpers Configuration Option V 35 Compatible Unit Customer Premises DSX 1 Compatible Unit Central Site Card Type CP CO Loops Enabled Dual Loops A B or Single Loop A Must be same as CP side Payload Rate 1 9 64 1536 kbps Options 8 1024 kbps and 9 1536 kbps are only available if both Loops A B are enabled N A Framing N A Use D4 Extended Superframe or Unframed See Unframed Operation on page A 4 bef...

Page 45: ... Guide 2 The V 35 compatible unit must have an HDSL firmware revision number of three 03 or higher To display the HDSL FW firmware revision number select the Board Configuration option 3 from the Main Menu a system terminal is required 3 The V 35 compatible unit must have a hardware revision number of five 05 or higher To determine the hardware revision number look at the label on the bottom of th...

Page 46: ...o 133 feet 0 dB 2 133 to 266 feet 3 266 to 399 feet 4 399 to 533 feet 5 533 to 655 feet V 35 Compatible Units Configuration Worksheet Board Configuration Configuration Option Settings Default in Bold Card Type CP CO Loops Enabled Dual Single Payload Rate 1 1 x 64 64 kbps 2 2 x 64 128 kbps 3 3 x 64 192 kbps 4 4 x 64 256 kbps 5 6 x 64 384 kbps 6 8 x 64 512 kbps 7 12 x 64 768 kbps 8 16 x 64 1024 kbps...

Page 47: ...es the pin assignments for the terminal cable from the front panel modular jack to your PC s COM port If your PC s COM port requires a 9 pin D shell connector the cable must use the following pin assignments 97 15268 02 1 4 5 7 8 3 2 5 1 4 6 7 8 Modular Pin 9 Pin D Shell Pin RXD TXD GND TXD RXD GND DCD DTR DSR RTS CTS ...

Page 48: ... 3 7 6 8 20 4 5 Modular Pin 25 Pin D Shell Pin RXD TXD GND TXD RXD GND DSR DCD DTR RTS CTS HDSL Loop Connection Cable Pin Assignments The HDSL modular connector that plugs into the rear panel of the unit has the following pin assignments Pin Signal 1 Loop A Tip 2 Loop A Ring 3 Loop B Tip 4 Loop B Ring 5 8 open NOTE Pin 1 is on the left when viewing the jack from its inserted position ...

Page 49: ...n Cable Pin Assignments The modular connector that plugs into the rear panel of DSX 1 compatible units has the following pin assignments Pin Signal 1 Tx Ring 2 Tx Tip 3 open 4 Rx Ring 5 Rx Tip 6 8 open NOTE Pin 1 is on the left when viewing the jack from its inserted position ...

Page 50: ...l Loopback Local loopback 140 N RDL Loopback Maintenan ce Remote loopback 103 P TXD Transmit Data A Data generated by DTE 104 R D RXD Received Data A Data received by DTE 103 S TXD Transmitted Data B Data generated by DTE 104 R RXD Received Data B Data received by DTE 113 U EXT CLK Transmitter Signal Element Time A To help detect center of signaling element on BA 115 V RSET Receiver Signal Element...

Page 51: ...t you in locating the switchpacks and jumpers on the board The jumper and switchpack detailed in Figure C 1 are used to change configuration options All other jumpers listed below must remain as positioned at the factory Jumper Pins Factory Setting P1 2 3 P3 No Jumper P8 2 3 P9 2 3 P10 1 2 P11 1 2 P12 1 2 ...

Page 52: ...itchpack Mode Default in bold 1 2 3 1 2 3 1 2 1 2 3 1 2 3 1 2 3 3 2 1 P10 P1 6 7 8 ON 1 2 3 4 5 Figure C 1 DSX 1 Compatible Unit Switchpack and Jumper Locations Pin 1 on jumpers is labeled on the board The ON position is labeled on the switchpack Positions 4 5 and 6 on Switchpack S1 work as a group Set position 4 to the first digit position 5 to the second digit and position 6 to the last digit Fo...

Page 53: ... in locating the switchpacks and jumpers on the board The jumper and switchpacks detailed in Figure C 2 are used to change configuration options All other jumpers listed below must remain as positioned at the factory Jumper Pins Factory Setting P1 1 2 P2 1 2 P4 2 3 P5 No Jumper P8 1 2 P9 2 3 P10 2 3 P11 1 2 ...

Page 54: ... ON 192 kbps ON 256 kbps ON 384 kbps ON 512 kbps ON 768 kbps ON 1024 kbps All ON 64 kbps All OFF 1536 kbps Pins 1 2 2 3 Settings Terminal Mode Switchpack Mode Default in bold 1 2 3 1 2 3 3 2 1 1 2 1 2 3 1 2 3 1 2 3 3 2 1 6 7 8 ON 1 2 3 4 5 6 7 8 ON 1 2 3 4 5 Figure C 2 V 35 Compatible Unit Switchpack and Jumper Locations Pin 1 on the jumper is labeled on the board The ON position is labeled on the...

Page 55: ...lear to Send An EIA lead standard for V 24 circuit CT 106 an output signal DCE to DTE Code Violation This is equivalent to a BPV Used with HDB3 coding format Data Communications Equipment The equipment that provides the functions required to establish maintain and end a connection It also provides the signal conversion required for communication between the DTE and the network Data Set Ready An EI...

Page 56: ...e Termination Unit LTU Light Emitting Diode A status indicator that responds to the presence of a certain conditions Used to test various portions of a data link in order to isolate an equipment or data line problem A diagnostic procedure that sends a test message back to its origination point Multiframes Out of Sync A performance statistic that counts the number of multiframes received out of syn...

Page 57: ...compatible units 4 5 V 35 compatible units 5 4 COM port settings 3 2 configuration options changing in switchpack mode 4 5 5 4 changing in terminal mode 4 2 5 2 DSX 1 compatible units 4 3 V 35 compatible units 5 3 configuration worksheets DSX1 compatible unit A 5 V 35 compatible unit A 5 A 7 configurations campus network 1 3 cellular network 1 5 CO to customer premises 1 4 customer service A D D4 ...

Page 58: ...ments 3 2 performance statistics 6 3 pin assignments B 1 power cord installation 2 2 R rear panel diagram 2 2 related documents vi remote loopback test 7 3 remote unit accessing menu of 6 5 resetting the unit 4 4 5 3 7 5 S service information A statistics performance monitoring 6 3 switchpack mode changing to 3 2 described 3 1 DSX 1 compatible units 4 5 V 35 compatible units 5 4 switchpacks DSX 1 ...

Reviews: