background image

February 2003

3-17

1010-A2-GN21-00

3. Solaris Environment

Step 8

Click 

Next

 to accept the default path: 

/opt/jetstream

– Or –

Type the directory path in the 

Destination 

field or click 

Change

 to navigate to where JetVision Client will be installed. 

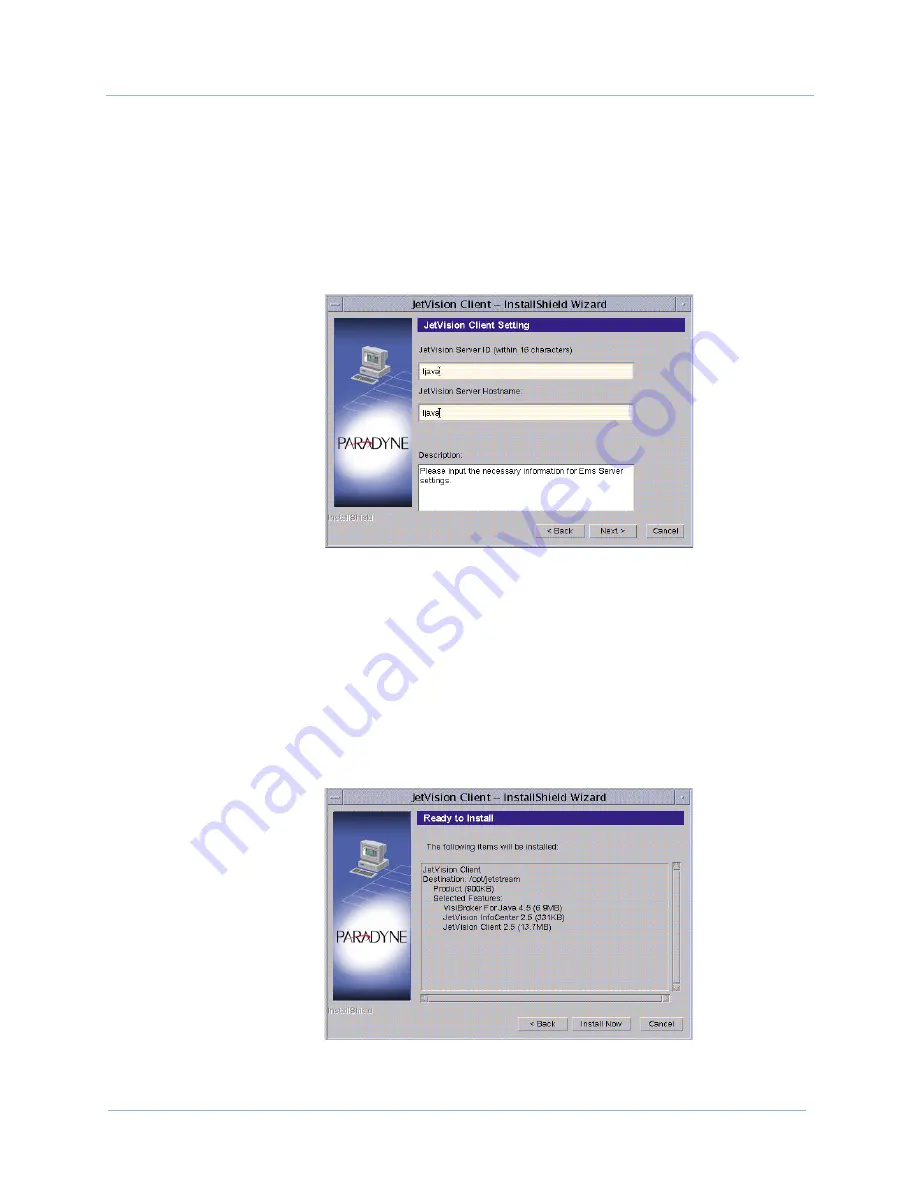
The JetVision Client Setting screen appears (

Figure 3–20

).

Figure 3–20.  JetVision Client Setting Screen

Step 9

Type the following information (up to 16 alphanumeric characters 
with no spaces or punctuation). 

JetVision Server ID

 field: this is the name you used 

when you installed JetVision Server.

JetVision Server Hostname

: this is the name of the 

computer where the JetVision Server was installed.

Click 

Next

. The Ready to Install screen appears (

Figure 3–21

).

Figure 3–21.  Ready to Install Screen

Summary of Contents for Jetstream CPX-1000

Page 1: ...Jetstream JetVision Installation Guide Release 2 5 Document No 1010 A2 GN21 00 February 2003...

Page 2: ...al Warranty Sales Service and Training Information Contact your local sales representative service representative or distributor directly for any help needed For additional information concerning warr...

Page 3: ...s thereof including all intellectual property rights By accepting this license Licensee does not become the owner of the Software but has the right to use the Software as outlined and limited in this...

Page 4: ...at any Software is held in such suit or proceeding to infringe or misappropriate such intellectual property right and the use of the Software or portion thereof is enjoined Paradyne shall at its sole...

Page 5: ...ion of this Agreement is found invalid or unenforceable pursuant to judicial decree or decision the remainder of this Agreement shall remain valid and enforceable according to its terms This Agreement...

Page 6: ...E February 2003 1010 A2 GN21 00...

Page 7: ...1 3 Installation Requirements for Solaris 1 4 Chapter 2 Windows Environment New Installation 2 1 Before Installation 2 2 Performing a Pre installation Check 2 2 Installing JetVision Server 2 3 Install...

Page 8: ...lling JetVision Client 3 13 Upgrading JetVision Server 3 19 NAT Firewall Connection 3 27 Customizing Gatekeeper in JetVision Server 3 28 Customizing JetVision Client to Access Gatekeeper 3 29 Network...

Page 9: ...m network management software and telecom terminology In particular the reader should be familiar with Paradyne Jetstream equipment and terminology Organization The JetVision Installation Guide is org...

Page 10: ...Services Platform Installation and Operation Describes features and characteristics of the CPX 1000 equipment provides procedures to install the equipment and provides instructions to troubleshoot and...

Page 11: ...on Server and JetVision Client are typically installed on separate machines when distributed graphical user interface GUI access is required But the server and client can also be installed on the same...

Page 12: ...ache Web Server Database EMS Oracle Visibroker Info Center IIOP HTTP IIOP IIOP Table 1 1 JetVision 2 5 Capabilities Capabilities Supported Number Number of JetVision Server sessions running at the sam...

Page 13: ...talled on computers running Windows 4 0 NT with Service Pack 5 0 or later Table 1 2 lists the minimum requirements for both the JetVision Server and JetVision Client Table 1 2 System Requirements for...

Page 14: ...guration up to 50 CPX 1000 systems Minimal Client Configuration Sun Ultra 10 system Sun Enterprise 250 system 2 x 400 MHz Sun Ultra 5 system 512 MB RAM 1 GB RAM 512 MB RAM 1 GB virtual memory 2 GB vir...

Page 15: ...2 24 Removing JetVision components page 2 29 Removing Oracle 8 1 6 page 2 32 Before you begin installing JetVision Server and JetVision Client ensure that your computer meets all hardware requirement...

Page 16: ...ng a Pre installation Check To perform a pre installation check Step 1 Insert the JetVision Server Windows installation CD ROM into the CD ROM drive to display the content Step 2 Double click startjet...

Page 17: ...ion Server on Windows follow these steps Step 1 Log on with administrator privileges to the computer where you want to install JetVision Server Step 2 Insert the JetVision Client installation CD ROM i...

Page 18: ...ection screen appears Figure 2 4 Figure 2 4 JetVision Application Selection Screen Step 4 Select Install JetVision Server then click Next A welcome screen similar to Figure 2 3 on page 2 3 appears Not...

Page 19: ...pears Figure 2 5 Figure 2 5 License Agreement Screen Step 6 Select the I accept the terms of the license agreement button then click Next The JetVision Server Setting screen appears Figure 2 6 Select...

Page 20: ...ion Server name up to 16 alphanumeric characters with no spaces and punctuation in the JetVision Server ID field Tip To find the name of the computer double click the Network icon in the Control Panel...

Page 21: ...and click Next to accept the default path C orant Or Type the directory path in the Oracle 8 1 6 Destination Directory field or click Browse to navigate to where Oracle will be installed Note The min...

Page 22: ...ribes the size of your network the PM DB size in MB field is automatically populated then click Next The Destination Folder for JetVision Server screen appears Figure 2 9 Figure 2 9 Destination Folder...

Page 23: ...lowed by the Oracle installation status Figure 2 11 Figure 2 11 Installing Oracle Status Screen The installation will take between 30 to 60 minutes depending on your computer Near the end of the Oracl...

Page 24: ...ontinue to install the JetVision Client and reboot later Installing JetVision Client If you intend to install JetVision Client on the same workstation as JetVision Server install the JetVision Server...

Page 25: ...nsert the JetVision Client installation CD ROM into the CD ROM drive The Welcome screen appears Figure 2 13 If your autorun feature is disabled go to Explore and click the CD ROM drive to display the...

Page 26: ...Selection Screen Step 4 Select Install JetVision Client then click Next A Welcome screen similar to Figure 2 13 on page 2 11 appears Step 5 Click Next The License Agreement screen appears Figure 2 15...

Page 27: ...ocation is displayed If a Web browser is not found a message appears in the Description pane telling you that a browser has not been found Click the Exit Setup and Install a Web Browser first button t...

Page 28: ...ollowing information up to 16 alphanumeric characters with no spaces or punctuation JetVision Server ID field this is the name you used when you installed JetVision Server JetVision Server Hostname th...

Page 29: ...re JetVision Client will be installed The Ready to Install for JetVision Client screen appears Figure 2 19 Figure 2 19 Ready to Install Screen Step 10 Click Install Now A screen appears showing the fi...

Page 30: ...5 can login to JetVision Server 2 5 The JetVision Client does not need upgrading however you need to install the current release of JetVision Client Refer to Installing JetVision Client on page 2 10 f...

Page 31: ...dows installation CD ROM into the CD ROM drive Go to Explore and click the CD ROM drive to display the contents Double click the setup bat file If the contents of the JetVision Server installation CD...

Page 32: ...ll JetVision Server then click Next A welcome screen similar to Figure 2 21 on page 2 17 appears Step 5 Click Next The License Agreement screen Figure 2 23 Figure 2 23 License Agreement Screen Note At...

Page 33: ...accept the default name this name is the same as that of your computer Or Type the JetVision Server name up to 16 alphanumeric characters with no spaces and punctuation in the JetVision Server ID fiel...

Page 34: ...Figure 2 25 Oracle 8 1 6 Setting Screen Note When Autostart JetVision Server is selected default setting JetVision Server will automatically start upon reboot Note If Oracle 8 1 6 is installed on your...

Page 35: ...appears Figure 2 26 Figure 2 26 Historical PM Database Size Screen Step 9 Click to select the button that describes the size of your network the PM DB size field is automatically populated then click...

Page 36: ...1 Click Next The Ready to Install screen Figure 2 28 appears listing other supporting components that will be installed and their file sizes Figure 2 28 Ready to Install Screen Step 12 Click install N...

Page 37: ...n the background showing the files binding process The Installation Summary screen appears Figure 2 30 listing the location of the JetVision Server Figure 2 30 Installation Summary Screen Step 15 Clic...

Page 38: ...es network requests on behalf of workstation users This section provides instructions on how to establish a JetVision Client connection through the NAT firewall via JetVision Server The required tasks...

Page 39: ...ay address In Figure 2 31 172 16 1 2 is used Step 3 Modify the following lines exterior_port This identifies the port number on which JetVision Server communicates to the outside In Figure 2 31 15000...

Page 40: ...Step 2 Add the following two flags to Visibroker in the startemsclient bat file Figure 2 32 DORBalwaysProxy DORBgatekeeperIOR http server name 2851 jetems server ip address ior gatekeeper ior Importa...

Page 41: ...2851 jetems 10 0 84 10 iors gatekeeper ior DSPLASHSCREEN JSROOTDIR icons ems_splash jpg com jetstream ems gui JsEmsApp JSROOTDIR com jetstream gui ems JsEmsProperty txt JSROOTDIR logs current log REM...

Page 42: ...ion Server a router and JetVision Client It also shows the proper login server name and the server IP The login address is the one that associates with the outside of the NAT network it is an unused a...

Page 43: ...w these steps Step 1 Click the Start button Settings Control Panel Step 2 Double click Add Remove Programs The Add Remove Programs Properties dialog box appears Figure 2 34 Figure 2 34 Add Remove Prog...

Page 44: ...2 30 February 2003 Step 4 Click Yes The Uninstallation Welcome screen appears Figure 2 35 Figure 2 35 Uninstallation Welcome Screen Step 5 Click Next The Feature Selection screen appears Figure 2 36...

Page 45: ...igure 2 37 Ready to Uninstall Screen Step 7 Click Uninstall Now The Uninstallation Summary screen appears Figure 2 38 after the JetVision component is completely uninstalled Figure 2 38 Uninstallation...

Page 46: ...Windows services any names that start with Oracle e g OracleServiceORCL and click Stop A dialog box appears asking if you want to stop the Oracle service Step 3 Click Yes When the service is stopped y...

Page 47: ...ent Step 5 Click Deinstall Products The Inventory dialog box appears Figure 2 41 Figure 2 41 Oracle Inventory Step 6 Click to expand the ORCL tree and select all files on the list as shown in Figure 2...

Page 48: ...gure 2 43 Figure 2 43 Confirmation Step 8 Click Yes A screen appears showing the removal status followed by an empty inventory dialog box Figure 2 44 Figure 2 44 Empty Inventory Screen Step 9 Click Cl...

Page 49: ...tor Step 13 Click to expand the HKEY_LOCAL_MACHINE tree then SOFTWARE and delete ORACLE Step 14 Click to expand SYSTEM still in HKEY_LOCAL_MACHINE then CurrentControlSet then Services Delete any regis...

Page 50: ...2 Windows Environment 1010 A2 GN21 00 2 36 February 2003...

Page 51: ...egin installing JetVision Server and JetVision Client ensure that your computer meets all hardware requirements for the Solaris operating system Chapter 1 Installation Requirements To ensure a success...

Page 52: ...meet the following minimum requirements 5 Add the following entries to the etc system file set shmsys shminfo_shmmax 4294967295 set shmsys shminfo_shmmin 1 set shmsys shminfo_shmmni 100 set shmsys sh...

Page 53: ...llowing executables are present in the usr ccs bin directory make ar ld nm 8 Run jetutil to verify if the target workstation meets the minimum installation i e hardware and software requirement Insert...

Page 54: ...Environment 1010 A2 GN21 00 3 4 February 2003 Figure 3 1 Jetutil Main Menu Type 6 to select Run System Requirement Checks then press Enter The menu selection appears Figure 3 2 Figure 3 2 Jetutil Menu...

Page 55: ...tep 1 Log on with administrator privileges to the computer where you want to install JetVision Server and open a console window Step 2 Insert the JetVision Server Solaris installation CD ROM into the...

Page 56: ...Welcome screen appears Figure 3 3 Figure 3 3 Welcome Screen Step 3 Click Next The JetVision Application Selection screen appears Figure 3 4 Figure 3 4 JetVision Application Selection Screen Note At an...

Page 57: ...lick Next The License Agreement screen Figure 3 5 appears Figure 3 5 License Agreement Screen Step 6 Select the I accept the terms of the license agreement checkbox then click Next The Destination Fol...

Page 58: ...Size in MB field then click Next to accept the default path opt jetstream ora_unix Or Type the directory path in the Oracle 8 1 6 Destination Directory field or click Browse to navigate to where Oracl...

Page 59: ...en appears Figure 3 8 Figure 3 8 Historical PM Database Screen Step 9 Click to select the button that describes the size of your network the PM DB size field is automatically populated then click Next...

Page 60: ...on Server ID field Then Click Next The Ready to Install screen Figure 3 10 appears listing other supporting components that will be installed and their file sizes Figure 3 10 Ready to Install Screen N...

Page 61: ...screen appears Figure 3 11 showing the JetVision Server installation status followed by the Installation Summary screen appears Figure 3 12 listing the components that have been installed Figure 3 11...

Page 62: ...ming the status of your installation Figure 3 13 Figure 3 13 Readme Information Screen Step 13 Click Exit The installation will take between 30 to 60 minutes depending on your computer Note If you pla...

Page 63: ...here you want to install JetVision Client and open a console window Step 2 Insert the JetVision Client installation CD ROM into the CD ROM drive Use the appropriate UNIX shell command to start the ins...

Page 64: ...Selection Screen Step 4 Select Install JetVision Client then click Next A Welcome screen similar to Figure 3 14 on page 3 13 appears Step 5 Click Next The License Agreement screen appears Figure 3 16...

Page 65: ...r Panel Screen If a Web browser is found its location is displayed If a Web browser is not found a message appears in the Description pane telling you that a browser has not been found and the Browse...

Page 66: ...Web browser location click the Web Browser Location button then click Browse to navigate to where the Web browser is stored and install a Web browser The Browse button is enabled when the Web Browser...

Page 67: ...etting screen appears Figure 3 20 Figure 3 20 JetVision Client Setting Screen Step 9 Type the following information up to 16 alphanumeric characters with no spaces or punctuation JetVision Server ID f...

Page 68: ...Figure 3 22 Installing Screen After the files are extracted the Installation Summary screen Figure 3 23 listing the installed applications and their locations Figure 3 23 Installation Summary Screen...

Page 69: ...Vision Client on page 3 13 Step 1 Log on with administrator privileges to the computer where you want to install JetVision Server and open a console window Step 2 Insert the JetVision Server Solaris i...

Page 70: ...elcome screen appears Figure 3 24 Figure 3 24 Welcome Screen Step 3 Click Next The JetVision Application Selection screen appears Figure 3 25 Figure 3 25 JetVision Application Selection Screen Note At...

Page 71: ...License Agreement screen Figure 3 26 Figure 3 26 License Agreement Screen Step 5 Select the I accept the terms of the license agreement checkbox then click Next The Readme Information screen appears...

Page 72: ...ion Folder screen appears Figure 3 28 Figure 3 28 Destination Folder Screen Step 7 Click Next to accept the default path opt jetstream Or Type the directory path in the destination directory field or...

Page 73: ...or click Browse to navigate to where Oracle 8 1 6 will be installed Click Next The Historical PM Database Size screen appears Figure 3 30 Notes The minimum buffer for historical alarm database is 150...

Page 74: ...bes the size of your network the PM DB size field is automatically populated then click Next The JetVision Server Setting screen appears Figure 3 31 Figure 3 31 JetVision Server Setting Screen Step 10...

Page 75: ...Install Screen Step 11 Click install Now A screen appears Figure 3 33 showing the JetVision Server installation status followed by the Installation Summary screen appears Figure 3 34 listing the comp...

Page 76: ...21 00 3 26 February 2003 Figure 3 33 JetVision Server Installation Status Screen Figure 3 34 Installation Summary Screen Step 12 Click Next The Readme Information screen appears informing the status o...

Page 77: ...determine whether to forward it toward its destination JetVision Client A firewall also works with a proxy server JetVision Server that makes network requests on behalf of workstation users This sect...

Page 78: ...ess In Figure 3 36 172 16 1 2 is used Step 3 Modify the following lines exterior_port This identifies the port number on which JetVision Server communicates to the outside In Figure 3 36 15000 default...

Page 79: ...mize JetVision Client follow theses steps Step 1 Go to the emsclient_2 5 bin directory For example opt Jetstream emsclient_v25 bin Step 2 Add the following two flags to Visibroker in the startemsclien...

Page 80: ...2851 jetems 10 0 84 10 iors gatekeeper ior DSPLASHSCREEN JSROOTDIR icons ems_splash jpg com jetstream ems gui JsEmsApp JSROOTDIR com jetstream gui ems JsEmsProperty txt JSROOTDIR logs current log REM...

Page 81: ...ion Server a router and JetVision Client It also shows the proper login server name and the server IP The login address is the one that associates with the outside of the NAT network it is an unused a...

Page 82: ...he Solaris cd for example pkgadd d SUNWarc SUNWbtool For every package being added the system warns that it is going to use its superuser privilege to add the files and prompts for confirmation Table...

Page 83: ...quired OS Patches Patch ID Description Solaris 7 106541 23 Kernel Update Patch 106300 17 Shared library patch for C 64 bit 106327 16 Shared library patch for C 32 bit 106950 19 Linker patch 106980 19...

Page 84: ...M and X Input Output Method patch 108827 30 usr lib libthread so 1 patch 108921 15 CDE 1 4 dtwm patch 108940 46 Motif 1 2 7 and 2 1 1 Runtime library patch for Solaris 8 108987 09 Patch for patchadd a...

Page 85: ...h id tar Z Step 2 Uncompress and extract each of the patch archives that you want to install For example uncompress patch id tar Z tar xvf patch id tar A directory name patch id is created for each pa...

Page 86: ...tches were extracted in Step 2 Step 7 Shut down and reboot your computer For example reboot Note In the top level directory of each patch Install info file provides general patch installation instruct...

Page 87: ...ion components follow these steps Step 1 Log on to the computer with administrator privileges and open a terminal window Step 2 Change directories to where the JetVision components are installed For e...

Page 88: ...tep 4 Click Yes The Feature Selection screen appears Figure 3 40 Figure 3 40 Feature Selection Screen Step 5 Select the components that you want to remove then click Next The Ready to Uninstall screen...

Page 89: ...ep 8 Repeat Step 2 through Step 7 to uninstall the next JetVision component Removing Oracle 8 1 6 To remove Oracle 8 1 6 on Solaris follow these steps Step 1 Log on to the computer with administrator...

Page 90: ...3 Solaris Environment 1010 A2 GN21 00 3 40 February 2003...

Page 91: ...estination folder Solaris 3 7 3 16 3 22 Windows 2 8 2 14 2 21 F file extraction Solaris 3 18 Windows 2 22 G gatekeeper customizing in JetVision server Solaris 3 28 Windows 2 25 customizing JetVision c...

Page 92: ...2 3 22 3 27 ready to install Solaris 3 10 3 25 Windows 2 9 2 15 2 22 related documents iv removing JetVision components uninstallation Solaris 3 37 Windows 2 29 removing Oracle Solaris 3 39 Windows 2...

Page 93: ...etVision Solaris 3 37 Windows 2 29 upgrade JetVision server Solaris 3 19 Windows 2 16 W web browser Solaris 3 15 Windows 2 13 Welcome screen Solaris 3 6 3 13 3 20 Windows 2 4 2 11 2 17 Windows install...

Reviews: