16
LT5674 (ISS 5)
*To minimise the risk of cracking due to heat expansion the use of a 3 – piece back panel is recommended*
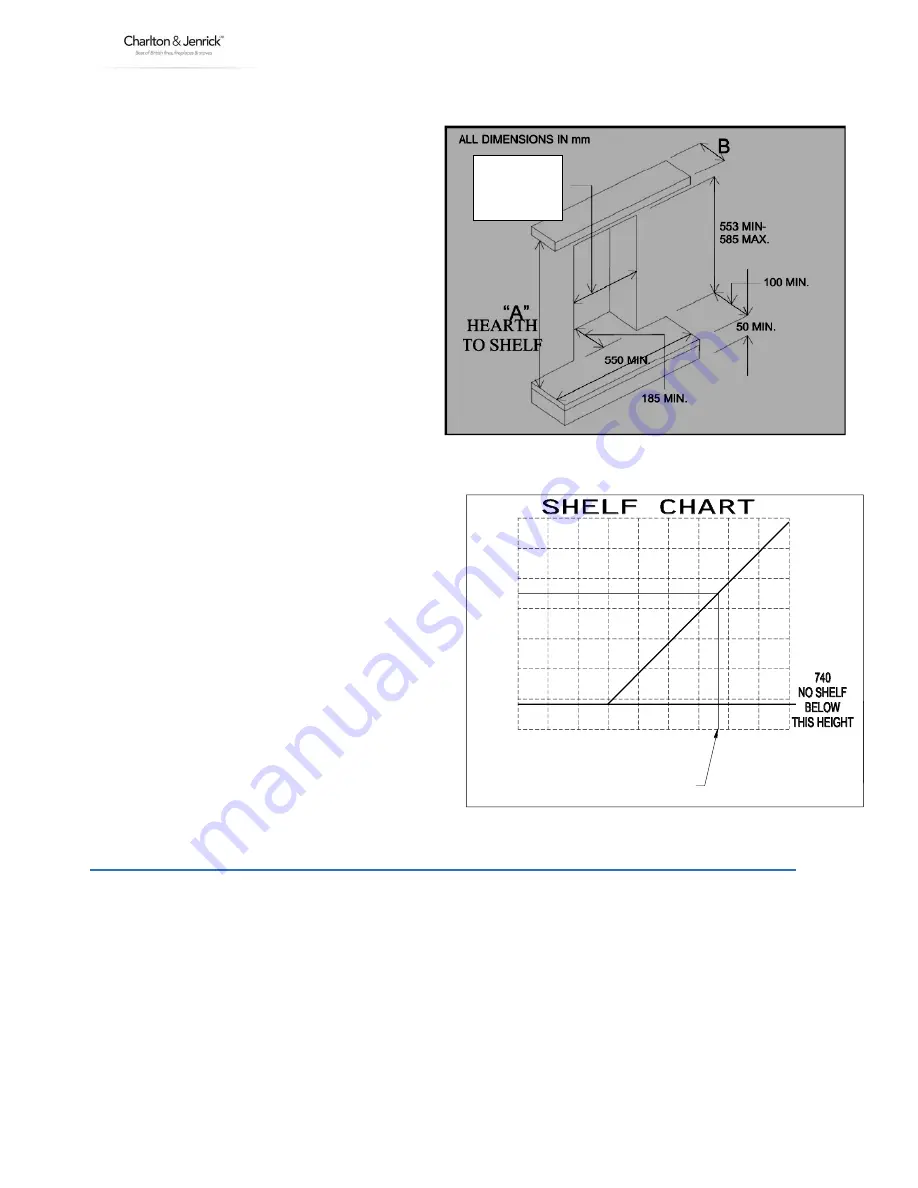
The back panel of the surround must have a
cut-out within the maximum and minimum
dimensions as shown.
Ensure that gas supply is suitably sited.
A non-combustible hearth must be provided
beneath the appliance if the appliance is fitted
at low level (less than 150mm from floor). The
hearth must have a minimum thickness of
12mm and the perimeter 50mm above floor
level. The hearth must extend the full width of
the appliance and must project forward a
minimum of 100mm in front of the appliance.
Alternatively the appliance may be fitted
without a hearth (Hole in the Wall type
installations), 50mm min. from the floor to the
base of appliance
The minimum clearance from the hearth (base of appliance) to the underside of a combustible shelf should
be determined using the shelf chart.
Minimum width between vertical sides of
combustible surround should not be less than 800
mm provided fire is central to the surround and
sides do not project more than 150 mm. When
vertical side forward projection is increased by
12.5 mm add 50 mm to inside width of surround.
Check with the supplier or manufacturer that the
surround meets 150
0
C minimum rating (attention
should especially be given to man made materials
such as resin).
When installing in a timber framed dwelling
reference must be made to the specific
installation requirements stated in Section 10
Installing The Appliance In Timber Framed
Dwelling.
SECTION NINE Preparing the Appliance for Installation (installation instructions)
Carefully unpack the appliance from the carton and check the contents.
Lift off the decorative trim, which is held by four magnets and put to one side.
Undo the two nuts securing the fascia grill unit, to combustion chamber and lift off.
Lay the appliance on its back ensuring suitable protection is provided for the carpet / floor.
Remove the two cross head nuts securing the fret apron and remove the apron
Remove the nuts from the top, bottom and sides of the glass frame and lift away carefully.
With extreme care lift away the glass panel frame and put to one side in a safe place note the printing and
ensure it is placed so that it is fitted correctly.
Remove the refractory components from the inside of the appliance.
The appliance is now ready for installation.
25
50
75
100 125 150 175 200 225
0
750
800
850
900
950
1000
1025
EXAMPLE: 925 SHELF HEIGHT=165 MAX. SHELF WIDTH
"B" SHELF WIDTH
"A
"S
H
E
L
F
H
E
IG
H
T
F
R
O
M
H
E
A
R
TH
all dimensions in mm's
Min 460
Max 500


