background image

LT5245 (2:02/09)


Paragon Symphony CF 

Users Instructions


SECTION ONE 

Introduction Continued 


• 

Care  must  be  taken  to  prevent  any  damage  being  caused  to  surrounding  soft  furnishing  or 
decoration; e.g. many embossed vinyl wall coverings may become discoloured if placed too close 
to  the  appliance.  Combustible  material  i.e.  wall  panelling  or  wallpaper  must  be  removed  from 
behind the fire and fire trim.  

• 

It  is  advised  that  this  appliance  is  serviced  annually;  as  it  is  more  likely  to  provide  trouble-free 
operation. 

• 

In  GB  (Great  Britain)  the  fire  does  not  normally  require  purpose  built  ventilation,  but  if  for  any 
special  reason  purpose  built  ventilation  is  provided  it  should  be  checked  periodically  to  ensure 
freedom from obstructions.  

• 

In IE (Ireland) permanent ventilation must comply with the current edition of IS813. 


SECTION TWO 

Operating the Appliance


Before attempting to operate the appliance check that nothing has been placed in front of the 
appliance that may interfere with the remote sensor operation. 
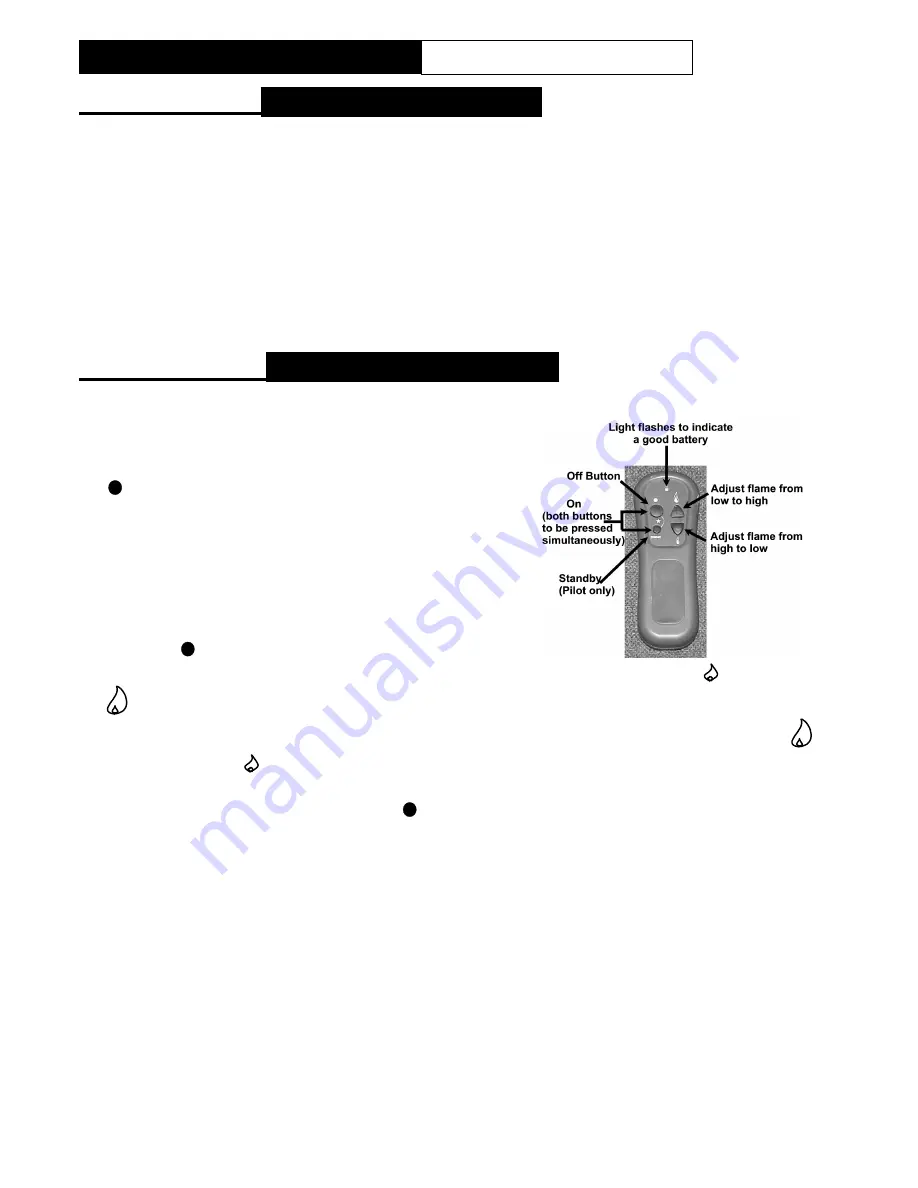
To light the appliance using the remote hand set:


a.  Point the remote control hand set in the direction of the 

appliance and simultaneously press the buttons marked 
‘ ’ and ‘standby’. Continue to hold in these two buttons 
until a ‘bleep’ is heard (approximately 2-3 sec.) and then 
release  these  buttons.  The  appliance  will  automatically 
go  through  the  ignition  sequence  and  the  pilot  should 
ignite.  Once  the  pilot  is  alight  the  appliance  will 
automatically  go  to  the  high  setting  (approximately  20-
25sec).  

b.  If  the  ignitor  stops  sparking  and  the  pilot  fails  to  light 

press the 

'

'

 button before repeating this procedure. 

c.  The appliance can be adjusted up or down by pressing the appropriate button 

'

'

 (low setting) or  

'

(high setting). These buttons have a duel function. If they are pressed until a ‘bleep’ is heard 

and  then  released  immediately  the  appliance  will  automatically  go  to  the  maximum 

'

'

  or 

minimum settings 

'

. On the other hand if the button is not released gradual adjustment is made 

until the button is released or until the maximum or minimum setting is reached.  

d.  To  switch  off  the  appliance  press  the 

'

'

  button.  If  the  appliance  is  to  be  switch  off  for  a  short 

period it is recommended that the ‘standby’ button be used, this switches the main burner off but 
leaves the pilot on and will extend battery life.  

e.  The appliance can be switch off with out using the hand set by removing the appliance batteries 

located  behind  the  ash  pan  cover.  When  the  batteries  are  removed  there  will  be  a  delay  (up 
3minutes) after which double bleeps may be heard and shortly after the appliance will extinguish. 
Ensure that the battery is reconnect once the fire as been extinguished. The appliance cannot be 
operated without the use of the handset. 


NOTE: If the fire is extinguished for any reason wait 3 minutes before relighting. 


LOW BATTERY INDICATION (HAND SET) 

If while pressing any of the buttons on the remote hand set the low battery indicator lamp either stops 
flashing or appreciably slows then the battery should be changed. 

Summary of Contents for SYMPHONY CF

Page 1: ...NSTRUCTIONS Please read these instructions carefully before you start installing or using this appliance Keep this booklet handy for future reference This appliance is for use in Great Britain or IRELAND only A QUALITY PRODUCT FROM PARAGON FIRES PARAGON FIRES TELFORD SHROPSHIRE TF7 4QJ ...

Page 2: ... Fuel Bed Layout 9 SECTION FIVE General Points 12 INSTALLATION INSTRUCTIONS SECTION SIX Appliance Data 12 SECTION SEVEN Regulations and Warnings 13 SECTION EIGHT Siting the Appliance Flue Class1 14 SECTION NINE To Install Appliance Checking the Flue and Fire Opening 14 Gas Supply Routing 15 Glass Removal 15 Connecting to the Gas Supply 15 SECTION TEN Checking Fire Operation Check Gas soundness 16 ...

Page 3: ...als or cleaning after servicing installation it is recommended that it be of the type fitted with a HEPA filter Disposal of refractory ceramic materials To keep dust to a minimum these materials should be securely wrapped in polythene and be clearly labelled RCF waste These materials are not classified as hazardous waste and should be disposed of at a site licensed for the disposal of industrial w...

Page 4: ...gets to low IMPORTANT INFORMATION The appliance is for use on Natural Gas G20 20mbar only The chimney or flue unless new or previously used with a gas appliance shall be swept before installation if it has been used for solid fuel The fire front fret or fascia supplied must be used with this appliance Failure to install appliance correctly could lead to prosecution In GB Great Britain the applianc...

Page 5: ...e pilot is alight the appliance will automatically go to the high setting approximately 20 25sec b If the ignitor stops sparking and the pilot fails to light press the button before repeating this procedure c The appliance can be adjusted up or down by pressing the appropriate button low setting or high setting These buttons have a duel function If they are pressed until a bleep is heard and then ...

Page 6: ...2200mAh A long life lithium battery is available as an optional extra call the number shown on the last page of these instructions for further information a Lift off fret and ash pan b The battery power pack or holder is located at the left hand side of the burner carefully slide the battery holder forward and replace the six high power alkaline AA batteries as a complete set or recharge as approp...

Page 7: ... this may cause more of a restriction and not rectify the problem Note Take care when cleaning in this area so as not to damage the pilot assembly GLASS CLEANING From time to time it will be necessary to clean the glass panel of your Symphony CF fire We recommend you use a Ceramic hob cleaner these are available for all leading super markets i e ASDA TESCO SAINSBURY S Etc Brands of hob cleaning we...

Page 8: ...ts provided and no additional parts must added Incorrect positioning of the fuel bed components could result in the staining of the glass panel Important Refer to the Health Safety Notice located on page 3 of this booklet before cleaning or replacing any refractory material The fuel bed components are delicate and they should be handled with great care The loose parts and moulded shapes may be rem...

Page 9: ... the front edge of the burner Lay a thin layer of vermiculite over the burner top taking special attention to prevent blocking the pilot head assembly Lay a cover of cerrowool over the burner by tease out the fibre until they form a very loose very light network Try to ensure that clumps of fibre are not formed A loose net will allow gas to pass through them and ensure the maximum glow is attained...

Page 10: ... 2 02 09 Paragon Symphony CF Users Instructions SECTION FOUR Fuel Bed Cleaning and Layout Continued Position log shapes 3 and 4 as shown Position log shapes 5 and 6 as shown Position log shapes 7 and 8 as shown ...

Page 11: ...ion inside the firebox will occur adding to the realism of the appliance This is normal It is important that The chimney or flue is checked annually to ensure clearance of combustion products The fire front or fascia must be positioned in front of the fire whilst it is burning Any debris from the chimney or flue should be removed The fire should be allowed to cool before it is removed The fire mus...

Page 12: ...line or 6 x 1 5 V Rechargeable nickel metal hydride with a minimum capacity of 2200mAh A special long life lithium battery 7 2 V is available as an optional extra Appliance Dimensions NOTE The efficiency of this appliance has been measured as specified in BS7977 1 2002 and the result is 80 The gross calorific value of the fuel has been used for this efficiency calculation GasTec have certified the...

Page 13: ...ccordance with the current edition of I S 813 Domestic Gas Installation the current building regulations and the current ETCI rules for electrical installation if appropriate Prior to the installation ensure that the local distribution conditions identification of type of gas and pressure and adjustment of the appliance are compatible G20 20mbar IMPORTANT NOTE The fire front fret or fascia supplie...

Page 14: ...duction of natural draught Ensure that the air entrering the appliance below the lower edge of the decorative trim is not restricted If the appliance is fitted above a forward projection hearth the base of the opening must be at least 50mm above the hearth Again this will ensure that the air entering the appliance below the lower edge of the decorative trim is not restricted CHECKING THE FLUE AND ...

Page 15: ... three fixing the carrier to burner plate Remove the rubber blind grommet from the supply pipe inlet hole at the rear of the outer box and slide the box over the supply pipe and fix to the surround using one of the methods described in the next section Refit the grommet over the pipe and seal around the inlet hole Refit the burner unit and make connection between the supply isolating valve and the...

Page 16: ... use fuel bed component provided for this appliance In the interest of safety and efficiency of your appliance when replacing the fuel bed it is essential that the existing fuel bed be removed and the new components are replaced correctly as a complete set Lay fuel bed as described under Users Section Warning It is important that the fuel bed components are positioned as shown in these instruction...

Page 17: ...ER THAT The glass front of this fire acts as a dress guard conforming to BS 1945 1997 and satisfies the heating appliance regulations 1991 however a fireguard conforming to BS6539 1997 must be used to protect young children the elderly or infirm The curing effect of heating the logs and other refractory components will cause an initial odour This is due to the starch used in the manufacturing proc...

Page 18: ... isolating cock Remove the trim fascia and glass panel Remove the loose fuel bed components Disconnect battery leads and remove appliance battery pack Detach remote control eye from the fixing bracket See Section Nine when repositioning Disconnect fire at inlet elbow and Undo the five burner tray fixing screws Pull carefully forward and remove For normal servicing the tray can be cleaned using a v...

Page 19: ... of the main control valve Remove the cross headed nut holding the pilot to the chassis Carefully remove the pilot shield oxy pilot Re assemble in reverse order REPLACEMENT OF CONTROL UNIT EDB Follow the burner tray removal sequence Disconnect leads from control unit and remove 4 bolts Re assemble in the reverse order Turn on the gas supply check for gas soundness and re commission appliance FLUE ...

Page 20: ... must be installed by a CORGI registered person 2 The appliance must be used in accordance with the users instructions 3 The appliance must be serviced annually by a CORGI registered person 4 The service log must be correctly filled out and the record of annual services must be up to date and supported by receipts in each case 5 This warranty is not transferable and relates to the original install...

Page 21: ...______________ ___________________________________________ Date of Purchase Service Log The following information must be complete and supported by receipts as part of the conditions of the extended three year parts warranty and the appliance must be registered by completing and returning the registration document last page of this booklet to Paragon Fires Date of First annual service Engineer Nam...

Page 22: ...DETAILS Name ________________________________ Address ________________________________ Post Code TELEPHO E o PRODUCT DETAILS Model PARAGON SYMPHONY CF Serial No Date of Purchase This information can be found on the label attached to the packaging and on the data badge which is located on the appliance flange top right behind trim WHERE DID YOU PURCHASE THIS PRODUCT Name ___________________________...

Page 23: ...23 LT5245 2 02 09 ...

Page 24: ...all 2 bags Grommet 1092 1 X Bag of Vermiculite 4216 Glass Panel Air Tray 5183 Silicone Sealing Strip 4818 Symphony CF Inner Fascia 5230 Symphony CF Trim 5232 Battery 9V PP3 Remote Control Hand Set Battery Holder Battery Insulation Blanket AA Battery 12 Magnet 4 X Segment 3048 Owners Book Data Badge NG Located behind trim Warning Label 1409 ID Label Packing Labels Serial Number Inspector ...

Reviews: