background image

 AFTER-SALES SERVICE 

1.

When requesting repairs

First check the items described in " 

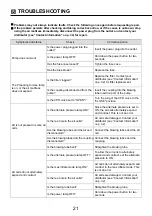
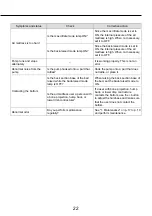
TROUBLESHOOTING" on p. 21 and p. 22 in the instruction

manual. If the problem persists, contact us (see "Contact Information" 

as shown below

).

„

Details necessary when requesting repair

z

Product name, product number, product ID (Pump 

back cover

. See p. 3.)

z

Date of purchase

z

Details of the fault or problem (please provide as much detail as possible)

z

Your name, organization, address, and phone number

2.

Minimum stock availability period

Paramount Bed keeps replacement parts (necessary to maintain stretcher performance) in stock for
at least 6 years after the discontinuation of production.

3.

Questions regarding after-sales service

Contact us (see "Contact Information" as shown below).

AIR MATTRESS DISPOSAL 

When the air mattress has reached the end of its usable life, discard it according to local 
standards. 

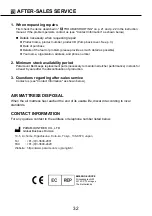
CONTACT INFORMATION 

For any queries, contact to the address or telephone number listed below. 

PARAMOUNT BED CO., LTD. 
Global Business Division 

EMERGO EUROPE 

Prinsessegracht 20 
2514 AP, The Hague 
The Netherlands


3

2


14-5, 2-chome, Higashisuna, Koto-ku, Tokyo, 136-8670, Japan
Tel         : +81-(0)3-3648-2961 

FAX       : +81-(0)3-3648-2420 

Website : https://www.paramount.co.jp/english/

Summary of Contents for 7F11336300A2

Page 1: ...information about any serious incident related to this air mattress that occurs within the EU to the manufacturer and the regulating authority of the member country of residence Serious incident mean...

Page 2: ...PRODUCTS 30 PRODUCT SYMBOL DEFINITIONS 31 AFTER SALES SERVICE 32 INTENDED USE J cococia F ka is an air mattress with an external pump which is designed to disperse body pressure when used for care in...

Page 3: ...at the product logo faces up and the blowing tube is at the foot end of the user Head end Foot end CPR valve CPR label Top Plug Product logo Warning label Snap button Product identification label Blow...

Page 4: ...on label Operation Panel Enlarged View Power button Status display Back raised mode button Max inflate mode button Hardness adjustment button Alternate pressure button Handle Blowing tube insertion po...

Page 5: ...ction manual store it in a place that can be easily accessed for later reference About the warning CPR and product ID labels zWarning and precautions requiring special attention are described on label...

Page 6: ...sk of unexpected gaps being created and part of the body getting caught resulting in injury J When getting in and out of the bed air mattress or taking a sitting position be careful not to fall or top...

Page 7: ...Take care when handling the pump zThe air mattress may malfunction causing injury failure or damage In addition there is a risk of electric shock or fire due to a short circuit x Do not step on press...

Page 8: ...stallation or improper connection or fixing may cause malfunction or result in an inability to supply air so the body pressure may not be dispersed effectively possibly causing bedsores zImproper fixi...

Page 9: ...cted service life of t o ears o maintain the condition of the pump have the pump serviced regularl according to the schedule recommended o not use unapproved accessories or attempt to modif disassembl...

Page 10: ...replace it with a new one For the replacement procedure contact your distributor see Contact Information on p 32 zIf the inside of the air mattress is stained or damaged contact your distributor see C...

Page 11: ...OFF When ON is set the mode is set to OFF automatically after 60 minutes elapse WARNING zAdjust the usage time according to the user s medical condition If the internal pressure of the air cells cont...

Page 12: ...p and the blowing tube is at the foot end of the user zCheck that the CPR valve plug points to CLOSE If it points to OPEN turn the plug to the CLOSE position WARNING zPlace the air mattress directly o...

Page 13: ...sides of the coupling inward from both sides and insert into the blowing tube insertion port of the pump zInsert until you hear a click Check that both hooks on the left and right and the insertion li...

Page 14: ...the pump Do not spill water on the pump or touch it with wet hands zWhen installing the pump do not bend the blowing tube Sufficient air may not be supplied possibly causing bedsores zTake care when...

Page 15: ...ible causing electric shock or fire 5 Connecting to the power supply WARNING z Do not plug the power cord into a multiple socket outlet Plugging the power cord into a multiple socket outlet or power s...

Page 16: ...ble of the pump to the outlet and hold down the power button for two seconds The pump starts working and the air cells expand Adjust the hardness of the air mattress according to the weight of the use...

Page 17: ...ing of each function J Hold the CPR valve at the head end of the air mattress see the figure in 2 How to lay the sheet and turn the plug from CLOSE to the OPEN position zWhen supplying air to the air...

Page 18: ...nants blood feces etc remove them Use soapy water commercially available soap such as neutral detergent diluted with water to wipe the surface of the cover on the air mattress to remove stains CAUTION...

Page 19: ...the cover and therefore do not need to be maintained frequently zWhen maintaining the air cells do not separate each air cell from the air mattress Remove the coupling from the pump and discharge air...

Page 20: ...handling method of each disinfectant z76 9 81 4 z70 z0 05 0 2 z0 05 0 2 z0 05 Ethanol for disinfection Isopropanol benzalkonium chloride benzethonium chloride chlorhexidine gluconate Replacing the fil...

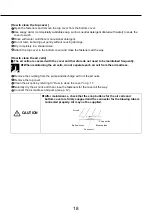
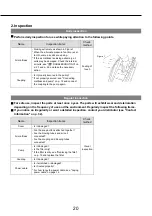
Page 21: ...ection J For safe use inspect the parts at least once a year The parts will exhibit wear and deterioration depending on the frequency of use and the environment Regularly inspect the following items J...

Page 22: ...e pump Is the CPR valve set to OPEN Turn the plug of the CPR valve to the CLOSE position Air is not present in some air cells Is the alternate pressure lamp ON Since the alternate pressure is set to O...

Page 23: ...the pump Is the pump hooked onto a part that rattles Hook the pump onto a part that does not rattle or place it Contacting the bottom Is the back section base of the bed raised while the back raised...

Page 24: ...ward from both sides and remove the coupling from the pump CAUTION zWhen removing the coupling from the pump press the levers on both sides of the coupling and pull the coupling out of the pump Do not...

Page 25: ...educe the odor zKeep the instruction manual in a safe place so that it does not become lost CAUTION zStore the product within the specified storage temperature humidity and air pressure ranges Failure...

Page 26: ...Size cm Width 25 Depth 11 Height 22 Material Case ABS resin flame resistant chemical resistant Power supply Plug 2P Length 4 6 m Product weight kg 2 2 Guaranteed conditions Operating temperature humid...

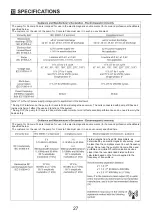
Page 27: ...her than those specified and sold by the manufacturers of Cococia Fuka are used as replacement parts for internal components it may result in an increase in emission or a decline in immunity of Cococi...

Page 28: ...trengths from fixed RF transmitters as determined by an electromagnetic site survey must be less than the compliance level in each frequency range Do not use the pump for Cococia F ka and portable and...

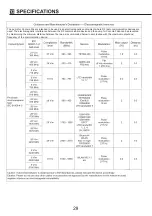
Page 29: ...itter in watts W according to the transmitter manufacturer NOTE1 At 80 MHz and 800 MHz the separation distance for the higher frequency range applies NOTE2 These guidelines may not apply in all situat...

Page 30: ...ommunication devices are used The electromagnetic interference between the RF communication device and the pump for Cococia F ka can be prevented by maintaining the minimum distance between the two as...

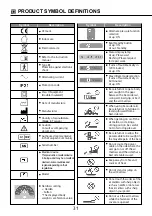
Page 31: ...ombination check the instruction manuals for beds bed side rails and swing arm bed grips side grips and Paramount Bed s catalogs and select suitable products that meet the following suitability standa...

Page 32: ...lease request for repair work Turns o automatically in 120 minutes Lit up ON Max in ate mode selection Turns o automatically in 60 minutes Lit up ON Be careful not to get a body part caught in the gap...

Page 33: ...unt Bed keeps replacement parts necessary to maintain stretcher performance in stock for at least 6 years after the discontinuation of production 3 Questions regarding after sales service Contact us s...

Page 34: ...MEMO 33...

Page 35: ...MEMO 34...

Page 36: ...Original Instruction Manual Made by TorindoCo Ltd 2020 11 AL300429 V1 01...

Reviews: