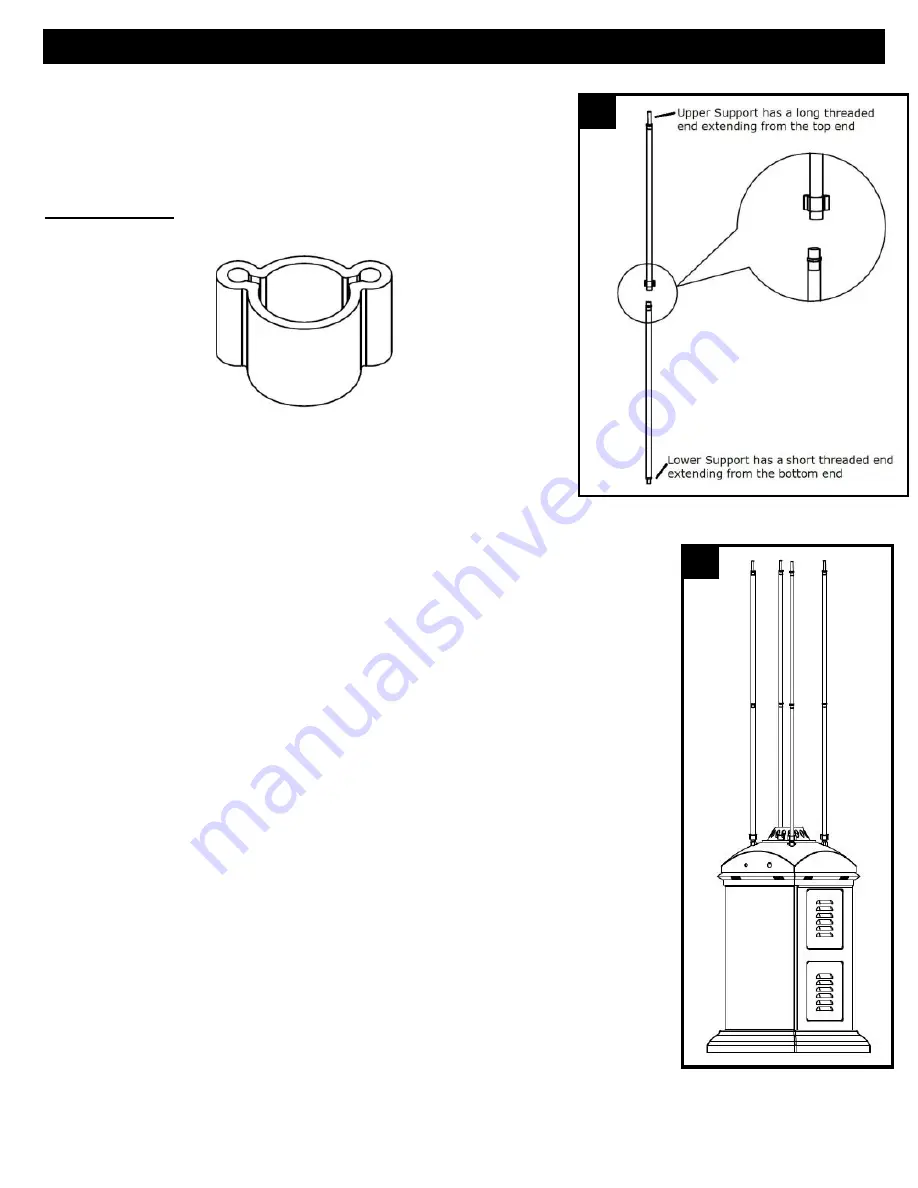
background image


1.

 Locate 4 pieces of Upper Supports and 4 pieces of Lower Supports. 

Slide 1 - Mesh Guard Connector over bottom end of Upper Support, 
then screw Upper Support onto Lower Support (Note: Mesh Guard   
Connector will remain loose and able to slide on the supports.) 
Repeat with remaining Upper and Lower Supports and Mesh Guard 
Connectors until you have 4 assembled Supports. 

Hardware Used

: 4 x D, Mesh Guard Connector 


2.

 Attach the assembled Supports to the Tank Housing/Base Assembly.   

Screw the assembled Supports into the holes located on the top of the 
Tank Housing/Base Assembly 

Note

: Make sure to use the short threaded end 

located on the bottom of the Lower Support for attaching the Supports to the 
Tank Housing/Base Assembly. The long threaded end on the Upper Support will be 
needed to allow for attachment of Emitter and Reflector. (Mesh Guard Connectors 
should rest on the top of Tank Housing after you attach the Supports to the Tank.

)   


ASSEMBLY 


Summary of Contents for LIP-09A-TGG

Page 1: ...ctions in this manual could result in bodily injury and or property damage PRECAUTIONS vapours and liquids in the vicinity of this or any other appliance Any LP cylinder not connected for use shall no...

Page 2: ...urned off and removed NOTE Use only 20lb LP Gas tank with size of 18 1in 46cm Height 12 5in 32cm Width Do not use if the environment temperature is below 40 degrees F 4 4 degrees C WARNING Improper in...

Page 3: ...o use check for damaged parts such as hoses regulators pilot or burner Turn off and disconnect LPG cylinder before moving the heater Do not attempt to alter this heater in any manner EXAMPLE Using the...

Page 4: ...r to operating the heater Installation and repair should be done by a qualified service person The heater should be inspected before use and cleaning may be required at least once a year or as necessa...

Page 5: ...Cap 1 A Reflector 1 B Emitter 1 C Upper Supports 4 D Lower Supports 4 E Mesh Guards 8 F Glass Tube Connector 1 G Glass Tube 2 pcs H Burner 1 I Tank Housing Base Assembly with wheels 1 J Regulator Hose...

Page 6: ...customer service for replacement parts ESTIMATE D ASSEMBLY TIME 60 minutes Tools Required for Assembly NOT included Phillips screwdriver w medium blade Leak Test Solution Adjustable wrench Note 14mm w...

Page 7: ...e Used 4 x D Mesh Guard Connector 2 Attach the assembled Supports to the Tank Housing Base Assembly Screw the assembled Supports into the holes located on the top of the Tank Housing Base Assembly Not...

Page 8: ...upports by lining up the holes in the corners of the Emitter with the Supports and sliding the Emitter down over the Supports 4 Secure the Emitter to the Supports using 4 pieces of B M8 Spacer Tighten...

Page 9: ...8 Nut 8 Assemble Glass Tube Locate Glass Tube Connector F and 7 Place Top Cap L into Reflector two pieces of Glass Tube G Carefully insert one end of Glass Tube Connector into open end of Glass Tube a...

Page 10: ...er piece pre assembled on the Emitter see Fig A 11 Before placing LP tank onto base of heater attach Cylinder Holder K to base using 3 pieces of M6x12 Bolts Hardware Used 3 x C M6x12 Bolt Connect the...

Page 11: ...g prevention device The cylinder must have a connection device compatible with the connection for the appliance The cylinder used must include a collar to protect the cylinder valve Never connect an u...

Page 12: ...e person at least annually If re lighting a hot heater always wait at least 5 minutes 2 Inspect the hose assembly for evidence of excessive abrasion cuts or wear Suspected areas should be leak tested...

Page 13: ...mph 6 Unit will operate at reduced efficiency below 40 degrees F 7 Heater is for use outdoors outside any enclosure 8 There is adequate fresh air ventilation 9 Heater is away from gasoline or other fl...

Page 14: ...ces This dangerous condition can damage heater and render it unsafe for use Clean burner holes by using a heavy duty pipe cleaner Compressed air may help clear away smaller particles Carbon deposits m...

Page 15: ...ressure low with valve open full Replace cylinder or regulator New cylinder or 1st ignition Purge air from lines Cylinder valve on no gas flow Replace hose regulator assembly AAA Battery behind ignite...

Page 16: ...service please call our toll free number 1 800 561 5550 Customer Service JR Home Products Unit 1 5628 Riverbend Drive Burnaby BC V3N 0C1 Toll Free 1 800 561 5550 E mail customercare jrhome com Warrant...

Reviews: