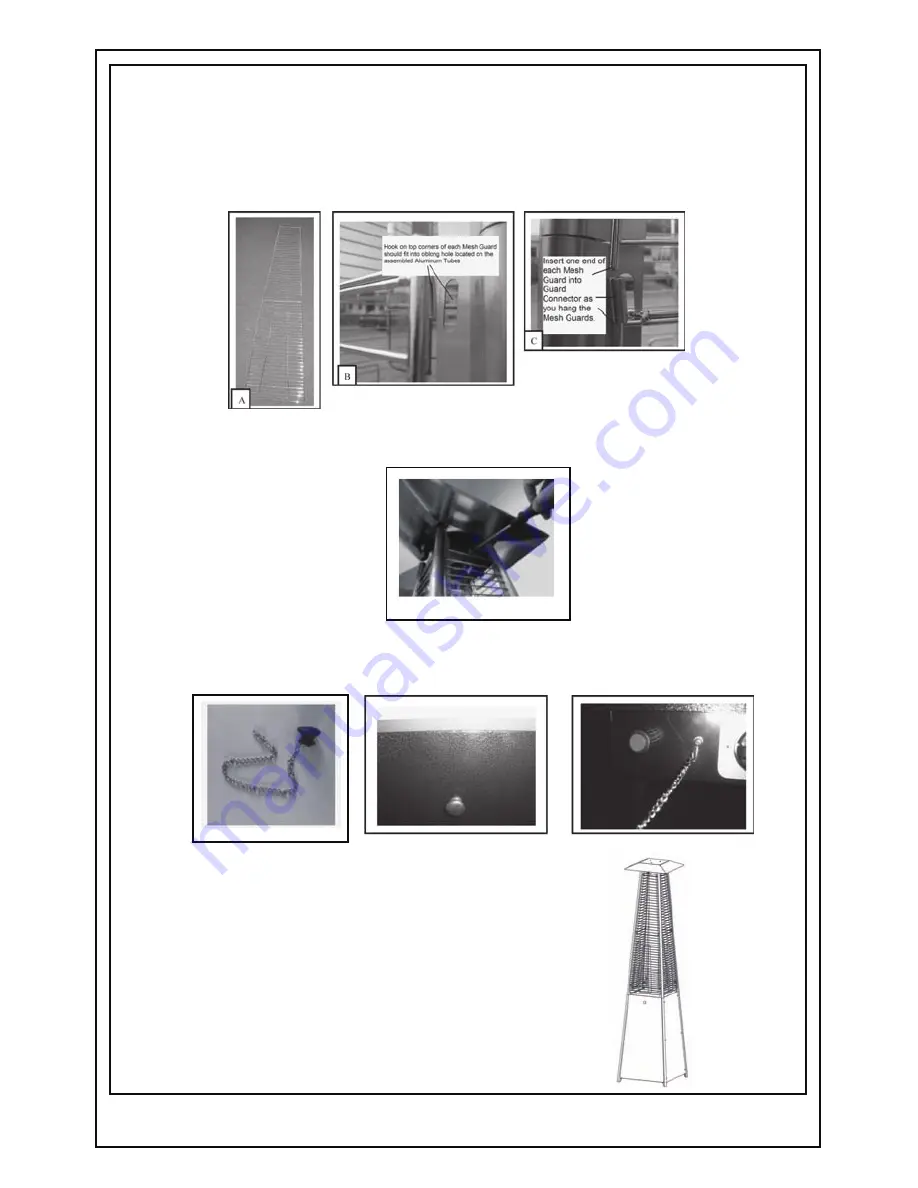
background image

STEP 10: 

Locate the Mesh Guards (10)--8 pieces/4 sets. There will be 4 pieces that 

are narrow and 4 pieces that are wider (Fig A). Begin with the wider pieces and hang 

them with the hook attached to the mesh guards onto the assembled Aluminum Tubes 

(there are oblong 4 holes in each tube—2 at the top and 2 at the bottom – Fig. B).The 

wider pieces will go at the bottom and the narrower pieces will go at the top. As you 

are hanging the mesh guards, use the Guard Connectors (11) to secure each edge 

of the wider guard to the edge of the narrower guard (Fig. C). 

STEP 11:

 Locate the Guard Fastening Pieces (12). Screw the Guard Fastening Pieces 

(12) on the top of the mounting plate to help keep the Mesh Guards firmly in place 

using 4 – M3/16 screws (14).

- 8 -


STEP 12: 

Locate the Knob with Chain (13) and screw the knob into the front panel of 

the Tank Housing Assembly and attach the chain to the control box. 

STEP 13:

 The heater is now assembled and ready for 

leak testing and use. 


Summary of Contents for PH08-S BK

Page 1: ...esult in bodily injury and or property damage PRECAUTIONS vapours and liquids in the vicinity of this or any other appliance Any LP cylinder not connected for use shall not be stored in the vicinity o...

Page 2: ...removed The unit should be secured or moved indoors if winds exceed 19 5mph Note Use the 20lb LPG tank but it is not supplied Use for CSA regulator with 0 6m gas house This regulator is set for an ou...

Page 3: ...se Do not use heater when it is raining and always be careful to not let any liquids splash onto the glass tube when the heater is working Keep children away from the heater and be careful not to knoc...

Page 4: ...ylinder is disconnected and removed from the appliance Do not store a spare LP gas cylinder under or near this heater Never fill the cylinder beyond 80 percent full The appliance is for outdoor use on...

Page 5: ...ntinues to leak 5 Never leak test while smoking INSTALLATION Important Safety Rules This appliance is for OUTDOOR USE ONLY 1 This appliance shall not be installed or used indoors in buildings garages...

Page 6: ...bolts nuts preassembled on wheels 8 pieces 4 sets 1 1 2 pcs 1 set 1 1 8 pcs 4 sets 8 4 1 M3 16 Screws 14 39 To be used to secure Mesh Guards to body of the appliance Screws used in assembly of the ap...

Page 7: ...the inside of the Tank Housing Assembly 1 and attach with 3 bolts and nuts provided in the bag with the Stability Ring STEP 3 Locate the Wheel Kit with Hardware 3 Loosen and remove the nuts and bolts...

Page 8: ...gether Repeat this with the other 3 sets 4 sets total 8 M3 16 screws total STEP 5 Once you have the assembled sets of the Aluminum Tubes slide the bottom of the assembled set note that the bottom will...

Page 9: ......

Page 10: ...r pieces will go at the top As you are hanging the mesh guards use the Guard Connectors 11 to secure each edge of the wider guard to the edge of the narrower guard Fig C STEP 11 Locate the Guard Faste...

Page 11: ...be will be extremely hot when it is working never try to touch it and keep children away from the heater objects or the ground Never use the heater if the glass tube has a crack or chip LIGHTING INSTR...

Page 12: ...etween Uses Turn the control knob to OFF position Turn the LP cylinder to the OFF position Store the heater upright in an area sheltered away from weather conditions such as rain sleet hail and snow I...

Page 13: ...will not light Turn the gas valve ON Purge air from lines Dirt or film on reflector and flame screen Clean reflector and flame screen Thick black smo ke Blockage in burner Turn off the heater and let...

Page 14: ...ervice please call our toll free number 1 800 561 5550 Customer Service JR Home Products Unit 1 5628 Riverbend Drive Burnaby BC V3N 0C1 Toll Free 1 800 561 5550 E mail customercare jrhome com Warranty...

Reviews: