DOC-0017-04-EN: AC20 Series - Hardware Installation Manual
22 (154)
DOC-0017-04-EN-A 22.03.2023
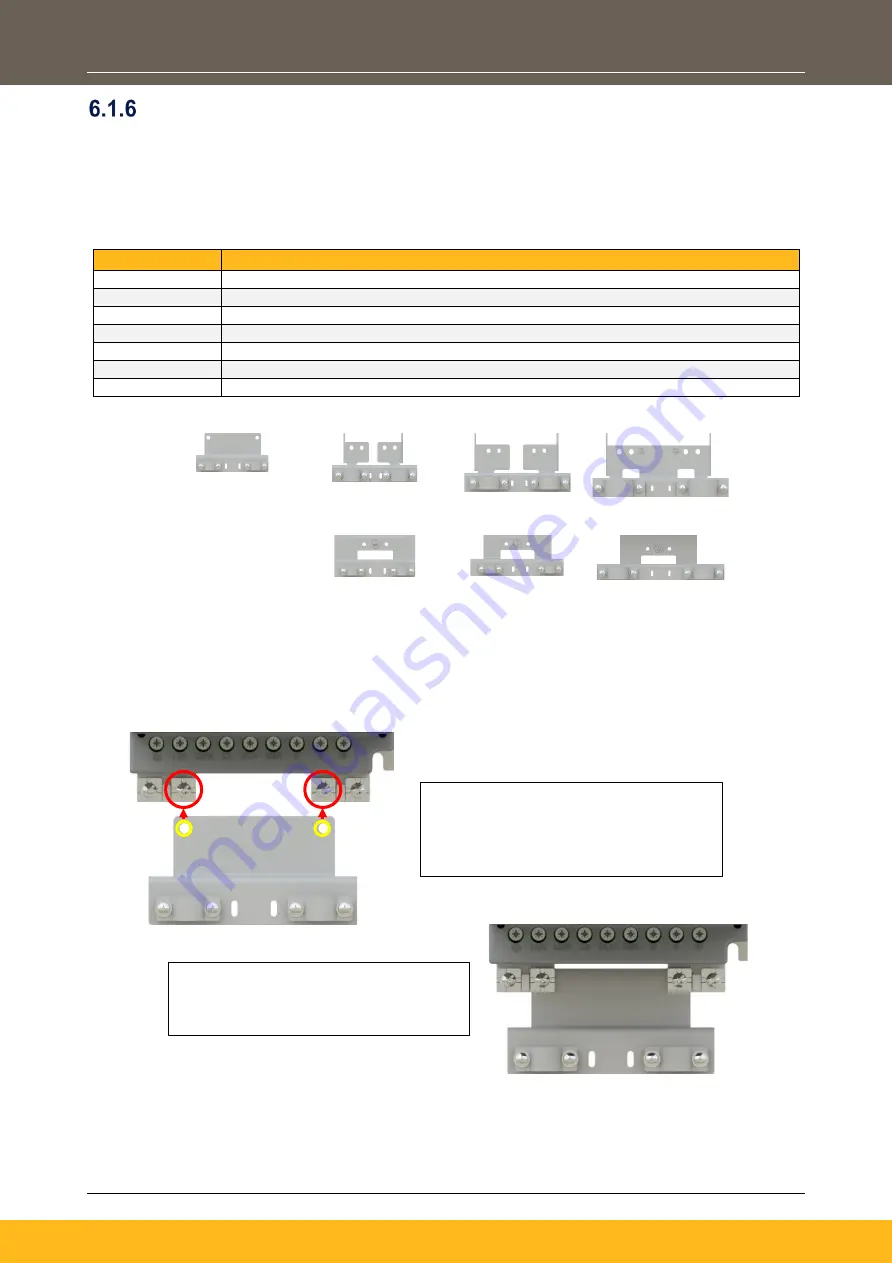
Wiring Bracket (Frames 2 – 5)
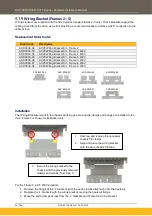
Wiring brackets are supplied with the AC20 product range (Frames 2-5 only). These brackets support the
cabling to and from the drive, as well as providing a convenient means to achieve a 360° connection to the
cable screen.
Replacement Order Codes
Order Code
Description
ASP-0039-02
AC20 Wiring Bracket Kit - Frame 2
ASP-0039-03
AC20 Wiring Bracket Kit - Frame 3, 400V
ASP-0039-04
AC20 Wiring Bracket Kit - Frame 4, 400V
ASP-0039-05
AC20 Wiring Bracket Kit - Frame 5, 400V
ASP-0039-06
AC20 Wiring Bracket Kit - Frame 3, 230V
ASP-0039-07
AC20 Wiring Bracket Kit - Frame 4, 230V
ASP-0039-08
AC20 Wiring Bracket Kit - Frame 5, 230V
ASP-0039-02
ASP-0039-03
ASP-0039-04
ASP-0039-05
ASP-0039-06
ASP-0039-07
ASP-0039-08
Installation
The Wiring Brackets mount to the chassis earthing points using the clamps and fixings pre-installed to the
drive. Frame 2 is shown for illustration only:
For the Frame 3, 4 & 5 230V products:
1. Remove the fixings of the ‘L’ brackets (with the earth clamps attached), from the heatsink.
2. Replace the ‘L’ brackets with the wiring bracket, reusing the heatsink fixings.
3. Move the earth clamps across from the ‘L’ brackets and fit onto the wiring bracket.
1. Unscrew and remove the necessary
chassis PE clamps.
2. Align and place the wiring bracket
onto the bare chassis PE tabs.
3. Secure the wiring bracket to the
chassis with the previously removed
clamps and screws (from step 1).


