background image

Publication PSS-UM001A-EN-P – June 2005

A-2     

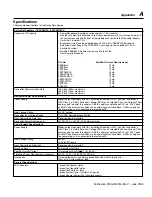
Specifications

General Specifications (continued)

Power Consumption, Maximum

8.1W @ 28.8VDC

Power Dissipation, Maximum

2.8W @ 28.8VDC

Thermal Dissipation, Maximum

9.5 BTU/hr. @ 28.8VDC

Isolation Voltage

50V rms

(continuous-voltage withstand rating)

Tested at 1250VAC rms for 60s

Field Power Bus

Nominal Voltage

24VDC

Supply Voltage

10-28.8VDC range

Supply Current

10A maximum

Dimensions

Inches (Millimeters)

4.41H x 2.83W x 2.56D (112H x 72W x 65D)

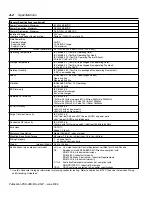
Operating Temperature

IEC 60068-2-1 (Test Ad, Operating Cold),
IEC 60068-2-2 (Test Bd, Operating Dry Heat),
IEC 60068-2-14 (Test Nb, Operating Thermal Shock):
20 to 60°C (68 to 140°F)

Storage Temperature

IEC 60068-2-1 (Test Ab, Un-packaged Non-operating Cold),
IEC 60068-2-2 (Test Bb, Un-packaged Non-operating Dry Heat),
-40 to 85°C (-40 to 185°F)

Relative Humidity

IEC 60068-2-30 (Test Db, Un-packaged Non-operating Damp Heat):
5-95% non-condensing

Shock

IEC60068-2-27 (Test Ea, Unpackaged Shock):
Operating 30g
Non-operating 50g

Vibration

IEC60068-2-6 (Test Fc, Operating):
5g @ 10-500Hz

ESD Immunity

IEC 61000-4-2:
6kV contact discharges
8kV air discharges

Radiated RF Immunity

IEC 61000-4-3:
10V/m with 1kHz sine-wave 80%AM from 30MHz to 2000MHz
10V/m with 200Hz 50% Pulse 100%AM at 900Mhz
10V/m with 200Hz 50% Pulse 100%AM at 1890Mhz

EFT/B Immunity

IEC 61000-4-4:
±4kV at 5kHz on power ports
±3kV at 5kHz on signal ports

Surge Transient Immunity

IEC 61000-4-5:
±1kV line-line(DM) and ±2kV line-earth(CM) on power ports
±2kV line-earth(CM) on shielded ports

Conducted RF Immunity

IEC 61000-4-6:
10Vrms with 1kHz sine-wave 80%AM from 150kHz to 80MHz

Emissions

CSPR 11:
Group 1, Class A

Enclosure Type Rating

Meets IP65/66/67 (when marked)

Mounting Base Screw Torque

#8 screw, 7.5 in. lbs. in Aluminum, 16 in. lbs. in Steel

Wiring Category

1

1 - on power ports
1 - on communications ports

Weight

Imperial (Metric)

0.80 lb. (0.36 kg)

Certifications: (when product is marked)

c-UL-us UL Listed Industrial Control Equipment, certified for US and Canada
CE

European Union 89/336/EEC EMC Directive, compliant with:
EN 61000-6-4; Industrial Emissions
EN 50082-2; Industrial Immunity
EN 61326; Meas./Control/Lab., Industrial Requirements
EN 61000-6-2; Industrial Immunity

C-Tick

Australian Radiocommunications Act, compliant with:
AS/NZS CISPR 11; Industrial Emissions

ODVA

ODVA conformance tested to DeviceNet specifications

1. Use this Conductor Category information for planning conductor routing.  Refer to Publication E115P, “Industrial Automation Wiring

and Grounding Guidelines”.

Summary of Contents for PSSCDM12A

Page 1: ...Pneumatic Isysnet DeviceNet Adapters PSSCDM12A PSSCDM18PA User Manual ...

Page 2: ... help you Identify a Hazard Avoid a Hazard Recognize the Consequence SHOCK HAZARD Labels may be located on or inside the equipment e g drive or motor to alert people that dangerous voltage may be present BURN HAZARD Labels may be located on or inside the equipment e g drive or motor to alert people that surfaces may be at dangerous temperatures Environment and Enclosure This equipment is intended ...

Page 3: ... rest of this manual except Chapter 4 we refer to the Isysnet I O DeviceNet adapters as the adapters In Chapter 4 we refer to the Isysnet I O DeviceNet adapter as the scanner because the chapter describes how to configure the adapter on the subnet Who Should Use This Manual You must be able to use RSNetWorx for DeviceNet software or a similar configuration software to configure your adapter In thi...

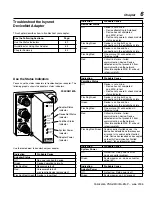
Page 4: ...wer is off Green System power on 24V present Indication Probable Cause DeviceNet Status Off Device is not on line Device attempting to Autobaud Device has not completed dup_MAC id test Device not powered check module status indicator Flashing Green Device is on line but has no connections in the established state Green Device is on line and has connections in the established state Flashing Red One...

Page 5: ...ivities Commissioning implies that the system has been validated and all configuration parameters are correct all modules are in good operating condition and the adapter scanlist is complete ControlFlash Utility software you can use to update the adapter s firmware with the most current boot and application code Term Definition Cyclic DeviceNet communications method in which the adapter sends data...

Page 6: ...l PSS UM003 Isysnet EtherNet IP Adapter Installation Instructions PSSCENA E104P Isysnet EtherNet IP Adapter User Manual PSS UM004 Isysnet I O 24VDC Expansion Power Supply Installation Instructions PSSSE24A E105P Isysnet 24VDC Input Modules Installation Instructions PSSN8 PSSP8 E106P Isysnet 24VDC Output Modules Installation Instructions PSST8 E107P Isysnet Relay Output Modules Installation Instruc...

Page 7: ...dules on the Backplane 2 2 Understand the DeviceNet Network and Subnet 2 3 DeviceNet Network 2 3 Backplane Subnet Network 2 3 Adapter Features 2 4 Communicate Through the Adapter 2 8 Map the Data 2 8 Overview of the Communication Process 2 8 Image Table Mapping 2 9 Communicate With I O Modules 2 10 Use Diagnostic Tables 2 11 Chapter Summary and What s Next 2 12 Chapter 3 Use Auto Start Mode Why Us...

Page 8: ...r s Parameters 5 2 Go On Line 5 4 Chapter Summary 5 4 Chapter 6 Troubleshoot the Isysnet Use the Status Indicators 6 1 DeviceNet Adapter Guidelines for Using Your Adapter 6 2 Chapter Summary 6 2 Appendix A Specifications Appendix B Default Data Maps PSSN8 Sink Input Module B 1 PSSP8 Source Input Module B 1 PSST8 Electronically Protected Output Module B 2 PSSTR4 Relay Sink Source Output Module B 2 ...

Page 9: ...er software configuration tool Setting the switches at any number from 64 through 99 lets the software have address control Each module is shipped with the switches set for node address 63 Remove the caps on the front of the module to access the switches refer to the X10 and X1 on the front of the module The two switches are X10 most significant digit left side of module X1 least significant digit...

Page 10: ...onnector view into connector Pin 1 Drain Pin 2 V Pin 3 V Pin 4 CAN_High Pin 5 CAN_Low Male In Connector DeviceNet Auxiliary Power view into connector Pin 1 User Power Pin 2 Adapter Power Pin 3 Adapter Power Pin 4 User Power Chapter Summary and What s Next In this chapter you learned how to install and wire your DeviceNet adapter Move to Chapter 2 to learn about the Isysnet DeviceNet adapters Make ...

Page 11: ... 1 3 4 6 5 7 4 5 6 7 MOD NET PSST8M12A 24V dc Out 0 1 2 3 0 2 1 3 4 6 5 7 4 5 6 7 MOD NET PSSN8M12A 24V dc In Mod PSSV32A Net Fault PSSCDM12A Adapter Status DeviceNet Status PointBus Status System Power Adapter Power DeviceNet Out DeviceNet In PWR x1 6 0 8 2 4 x10 6 0 8 2 4 Computer with PLC Programming Software ControlNet Network ControlLogix Chassis 1784 PCD PCMCIA Card PSSCDM12A Adapter DeviceN...

Page 12: ...g a module under power may cause the adjacent module to reset due to the addition of a large capacitive load on the power bus IMPORTANT If the module is removed while it is under power all the modules to the right of the removed module will disconnect from the PointBus and field power until the module is reinstalled If you must remove and reinsert modules we recommend the following Do not move I O...

Page 13: ...r You can connect up to 63 I O modules to each adapter and you can power the backplane I O modules from the adapter with a maximum of 10A of field power You may use the integrated isolated 24VDC expansion power unit PSSSE24A to power additional I O modules as shown below For more information on the PSSSE24A expansion power unit see the Isysnet I O 24VDC Expansion Power Supply Installation Instruct...

Page 14: ...baud 250Kbaud 500Kbaud Autobaud The adapter detects the primary DeviceNet network baudrate and automatically sets its own baudrate to match the network For the PSSCDM12A and PSSCDM18PA the PointBus can be configured to operate at 1Mbaud 1000Kbaud Auto Start Mode Auto Start Mode lets you easily get your adapter installed and operating In this mode the adapter s configurable features operate as they...

Page 15: ... Baudrate in RSNetWorx for DeviceNet IMPORTANT Changes to the Backplane Autobaud parameter only take effect if they are downloaded on an individual basis For example if you enable the Backplane Autobaud setting and download the change with additional changes to other features the Backplane Baudrate remains disabled This parameter should be set to Do Nothing when you download all parameters or when...

Page 16: ...ection on the primary DeviceNet Strobe Connection Produce Size The Strobe Produce Size shows the size number of data bytes produced by the Strobe I O connection on the primary DeviceNet Cycling I O Mapping Cycling I O Mapping is an EDS parameter accessible from the primary DeviceNet that shows you how data is mapped in the adapter s scanlist The data as shown below is listed in order of active mod...

Page 17: ... RSNetWorx for DeviceNet software Setting this parameter to a very low value increases the latency for non time critical scanner operations including the time required to respond to RSLinx software and configuration functions Setting this parameter to a very large value reduces the freshness of the I O data being collected by the scanner and is not advisable Foreground to Background Poll Ratio For...

Page 18: ...k and on PointBus it serves as a slave to the processor i e steps 1 and 4 and a master to the I O modules i e steps 2 and 3 The four data transfers are not necessarily sequential Transfers 2 and 3 typically occur more frequently than transfers 1 and 4 The computers and PCMCIA card shown in the diagram are required to configure the processor adapter and I O modules Although the PCMCIA card is used ...

Page 19: ...the data it receives to its internal memory before passing it to the appropriate device The I O map for a module is divided into read bytes input and status bytes write bytes output and configuration bytes The data is mapped by 3 buffers for input data each representing an I O connection on the primary DeviceNet and 1 buffer for output data representing data sent for Poll or COS connections on the...

Page 20: ...nfiguration of the system The adapter uses these messages to solicit data from or deliver data to each device Data received from the devices i e input data is organized by the adapter and retransmitted to the master Data received from the master i e output data is organized in the adapter and sent on to the I O modules Run The adapter maps output data to each module on PointBus Idle Output data wi...

Page 21: ...d electronic key vendor product code product type 74 Port Overrun Error Data overrun on port detected Modify your configuration and check for invalid data Check network communication traffic 75 Network Failure Communication has ceased on Inspect the I O modules and the backplane verify connections 76 No Msg for Scanner No direct network traffic for No action The scanner hears other scanner detecte...

Page 22: ...on and slave idle state while channel is in node status Run Mode 89 ADR Failed Failure occurred when downloading Reconfigure the ADR download data for ADR data to the I O module the I O module 91 Port Bus Off Bus off condition detected on Check DeviceNet connections and communications port physical media integrity Scanner is detecting communications Check system for failed slave devices or errors ...

Page 23: ...e 3 5 Use Custom Configuration 3 6 Chapter Summary and What s Next 3 6 This chapter assumes you already have an Isysnet system mounted There are five simple steps to the Auto Start Mode 1 Install the I O Module 2 Wire the DeviceNet Adapters 3 Install the I O Module 4 Use RSNetWorx for DeviceNet 5 Begin Auto Start Mode DeviceNet Out PSSCDM12A DeviceNet In X10 PWR X1 Adapter Status DeviceNet Status ...

Page 24: ...Mode In Auto Start Mode you can map I O data in the adapter s memory in one of the following ways Byte Boundaries Word Boundaries Double Word Boundaries Fixed Boundaries Byte Boundaries Each node s I O data is mapped in the adapter s memory at the next available byte This option works best in applications that use Allen Bradley PLCs and SLCs Word Boundaries Each node s I O data is mapped in the ad...

Page 25: ...s the latching mechanism You will hear a clicking sound when the module is properly engaged The locking mechanism will lock the module to the base Remove the Module From the Mounting Base To remove the module from the mounting base 1 Put a flat blade screwdriver into the slot of the orange latching mechanism 2 Push the screwdriver toward the I O module to disengage the latch The module will lift u...

Page 26: ...evice 5 Click Yes to upload configuration from the device Use RSNetWorx for DeviceNet You must use the RSNetWorx for DeviceNet software to configure your adapter Follow the steps below to use Auto Start Mode 1 Go online in the software IMPORTANT Auto Start Mode is only available when RSNetWorx for DeviceNet is online 2 Once you are online browse for the primary network e g You can use Single Pass ...

Page 27: ...x for DeviceNet and verifying that the device is found in the scanlist By repeatedly uploading the EDS parameter Cycling I O Mapping to verify that a mapping for the concerned module exists See page 2 6 for more information about this parameter If one of the following is observed it is likely that one of the Subnet modules has been addressed incorrectly or is configured to communicate at the wrong...

Page 28: ...n how to write custom configuration for your adapter on DeviceNet see Chapter 4 Configure the DeviceNet Scanner Subnet and Chapter 5 Add the Isysnet DeviceNet Adapter to the DeviceNet Scanner s Scanlist IMPORTANT The adapter s ADR configuration for the Subnet modules is reset when you run Auto Start Mode Chapter Summary and What s Next Auto Start Mode was discussed in this chapter Move on to Chapt...

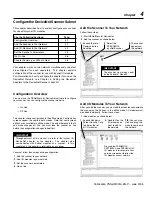
Page 29: ...mode Configuration screens appear the same in both modes Note that some screen options are unavailable in offline mode The only difference is that if you make changes off line you must take the scanner on line before the configuration changes take effect IMPORTANT Throughout most of this manual we refer to the Isysnet I O DeviceNet adapter as the adapter The adapter also communicates with Subnet m...

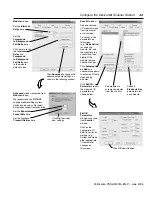
Page 30: ...scanner s name here The scanner s address must 0 Type a description here optional This window also shows the scanner s device identity These fields are read only Click OK to accept the Parameters General window IMPORTANT Configuration changes made in offline mode do not take effect until the scanner goes on line For more information on how the scanner goes on line see page 4 6 Use Clear Associatio...

Page 31: ...ccept new settings Set the number of Transmit Retries here Choose Electronic Key parameters for each module Add modules to or remove modules from the scanlist Scanlist window Add and remove I O modules to and from the scanlist on this screen To set any of the parameters on this screen e g Node Active for a specific module first add the module to the scanlist and then highlight the module to make s...

Page 32: ...nd leave screen open Click Close when finished Advanced Mapping window accessed from Input window Choose a Data Alignment and click OK Automap Options window accessed from Input window Use this pull down menu to choose a memory type This corresponds to I O on the primary DeviceNet Set the starting byte for I O mapping here The bytes mapped last will determine sizes on the primary DeviceNet Output ...

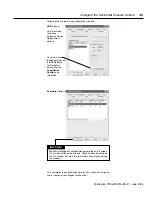
Page 33: ...es to take effect ADR window Use this screen to choose Automatic Device Replacement options You must have loaded each device into RSNetWorx for DeviceNet before you can Load Device Config using this button Summary window IMPORTANT You cannot change any configuration parameters on this screen It is for information purposes only These buttons do not apply for this window but are here to maintain con...

Page 34: ...nfiguration changes 2 Choose your scanner s network and apply the changes as shown below Chapter Summary and What s Next In this chapter you learned how to configure the scanner Move to Chapter 5 to learn how to add the Isysnet DeviceNet adapter to the DeviceNet scanner s scanlist 1 Click on Network 2 Click on Online Click Yes Select the DeviceNet network subnetwork This selection accesses the Poi...

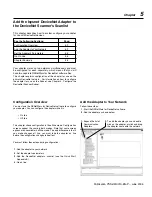
Page 35: ...anner Subnet Configuration Overview You must use the RSNetWorx for DeviceNet software to configure your adapter You can configure the adapter while it is On line Off line This chapter shows configuration in the offline mode Configuration screens appear the same in both modes Note that some screen options are unavailable in offline mode The only difference is that if you make changes off line you m...

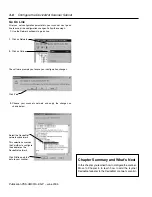
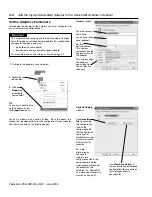
Page 36: ...lowing pages 1 Right click on the adapter TIP You can also double click on the adapter to view the Properties menus 2 Click on Properties to configure your adapter Type the scanner s name here Type a description here optional This screen shows the adapter s device identity These fields are read only Set the desired address This address corresponds to the address switch on the adapter General windo...

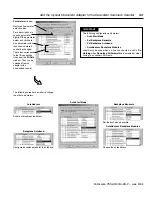
Page 37: ...ed from an adapter with a downloaded scanlist The following screens show how to change the other parameters Auto Start Mode Enable or disable autoaddress AutoAddress Configure backplane modules to autobaud Backplane Autobaud Choose the autoaddress AutoAddress Backplane Modules Backplane Baudrate Set the backplane baudrate IMPORTANT The following configuration parameters Auto Start Mode Set Backpla...

Page 38: ... Parameters window This completes the configuration options Your adapter must go on line for the configuration to take effect The window below shows an example EDS file Chapter Summary and What s Next In this chapter you learned how to configure the adapter Go On Line Follow these steps for the adapter to go on line 1 Use the Network pulldown The software prompts you to save your configuration cha...

Page 39: ...t from communicating on the network Possible duplicate MAC ID or baud rate mismatch Flashing Red Green Communication faulted device the device has detected a network access error and is in communication faulted state Device has received and accepted an Identity Communication Faulted Request long protocol message Indication Probable Cause System Power Off Not active Field power is off or dc dc conv...

Page 40: ...on on the mounting base Do not add new I O modules to the end of the Isysnet I O system while the system is under power Use labels with the I O modules Do not move I O modules to different locations on the mounting base after they have been installed and configured If adjacent modules i e 2 or more are removed replace all of them to operate the Isysnet I O system Input data will hold last state un...

Page 41: ... this adapter A SELV supply cannot exceed 30V rms 42 4V peak or 60VDC under normal conditions and under single fault conditions A PELV supply has the same rating and is connected to protected earth Input Voltage Rating 24VDC nominal DeviceNet Input Voltage Range 11 25VDC DeviceNet specification Input Overvoltage Protection Reverse polarity protected DeviceNet Power Requirements 24VDC 4 25VDC 30 mA...

Page 42: ...10V m with 1kHz sine wave 80 AM from 30MHz to 2000MHz 10V m with 200Hz 50 Pulse 100 AM at 900Mhz 10V m with 200Hz 50 Pulse 100 AM at 1890Mhz EFT B Immunity IEC 61000 4 4 4kV at 5kHz on power ports 3kV at 5kHz on signal ports Surge Transient Immunity IEC 61000 4 5 1kV line line DM and 2kV line earth CM on power ports 2kV line earth CM on shielded ports Conducted RF Immunity IEC 61000 4 6 10Vrms wit...

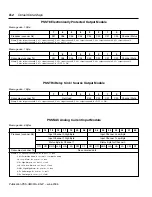
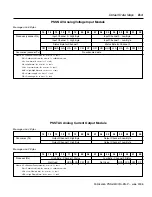
Page 43: ... Module B 3 PSSTAV Analog Voltage Output Module B 4 PSSS23A ASCII Module B 4 PSSV32A 32 Point Valve Driver Module B 4 PSSN8 Sink Input Module Message size 1 Byte 7 6 5 4 3 2 1 0 Produces scanner Rx Ch7 Ch6 Ch5 Ch4 Ch3 Ch2 Ch1 Ch0 Consumes scanner Tx No consumed data Where Ch0 input channel 0 Ch1 input channel 1 Ch2 input channel 2 Ch3 input channel 3 Ch4 input channel 4 Ch5 input channel 5 Ch6 inp...

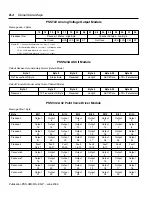
Page 44: ...Analog Current Input Module Message size 6 Bytes 15 14 13 12 11 10 09 08 07 06 05 04 03 02 01 00 Produces scanner Rx Input Channel 0 High Byte Input Channel 0 Low Byte Input Channel 1 High Byte Input Channel 1 Low Byte Status Byte for Channel 1 Status Byte for Channel 0 OR UR HHA LLA HA LA CM CF OR UR HHA LLA HA LA CM CF Consumes scanner Tx No consumed data Where CF Channel Fault status 0 no error...

Page 45: ...lt HA High Alarm 0 no error 1 fault LLA Low Low Alarm 0 no error 1 fault HHA High High Alarm 0 no error 1 fault UR Underrange 0 no error 1 fault OR Overrange 0 no error 1 fault PSSTAC Analog Current Output Module Message size 4 Bytes 15 14 13 12 11 10 09 08 07 06 05 04 03 02 01 00 Consumes Tx Output Channel 0 High Byte Output Channel 0 Low Byte Output Channel 1 High Byte Output Channel 1 Low Byte ...

Page 46: ...ion ID Byte Reserved Length ASCII Data CR Terminator PSSV32A 32 Point Valve Driver Module Message Size 1 Byte Byte Bit 7 Bit 6 Bit 5 Bit 4 Bit 3 Bit 2 Bit 1 Bit 0 Produce 0 Output Output Output Output Output Output Output Output 7 6 5 4 3 2 1 0 Produce 1 Output Output Output Output Output Output Output Output 15 14 13 12 11 10 9 8 Produce 2 Output Output Output Output Output Output Output Output 2...

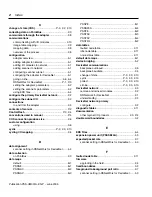
Page 47: ... 2 4 multiple connection types 2 4 physical list acquire status 2 5 physical ordering 2 7 poll COS connection consume size 2 6 self test 2 4 strobe connection produce size 2 6 transmit retries 2 7 adapters guidelines for use P 4 wiring 1 2 audience for manual P 1 auto catalog replace of adapter when power applied 2 4 auto start adapter 5 3 auto start mode beginning 3 5 byte boundaries 3 2 double w...

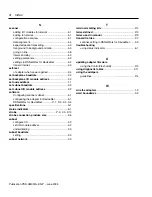
Page 48: ...cyclic P 3 2 3 2 10 cycling I O mapping 2 6 D data alignment scanner setting in RSNetWorx for DeviceNet 4 4 data collection on PointBus 2 3 data maps default B 1 PSSN8 B 1 PSSNAC B 2 PSSNAV B 3 PSSP8 B 1 PSSS23A B 4 PSST8 B 2 PSSTAC B 3 PSSTAV B 4 PSSTR4 B 2 data tables faulted node table 2 11 idle node table 2 11 node status table 2 11 default data maps B 1 device bridging 5 2 DeviceNet communica...

Page 49: ... cycling 2 6 node status table 2 11 O on line going 4 6 5 4 P parameters adapter 5 3 foreground to background poll ratio 4 3 I O data adapter 5 4 map from scanner 4 4 scanner 4 2 scanner data alignment 4 4 scanner expected packet rate setting 4 3 scanner interscan delay 4 3 scanner transmit retries 4 3 setting adapter 5 2 physical list acquire status 2 5 physical ordering 2 7 PointBus 2 1 data col...

Page 50: ...net I O module address 2 2 software Configuring scanner subnet 4 1 configuring the adapter for DeviceNet 5 1 RSNetWorx for DeviceNet P 1 P 3 2 4 3 4 specifications A 1 status indicators 6 1 strobe P 3 2 3 2 10 strobe connection produce size 2 6 subnet configure I O 2 2 set I O module address 2 2 understanding 2 3 subnet baudrate setting 2 2 subnet network 2 3 T terminal marking kits P 4 terms defi...

Page 51: ...Publication PSS UM001A EN P June 2005 Notes ...

Page 52: ...USA Tel 269 629 5000 Fax 269 629 5385 Customer Technical Service Tel 269 629 5575 Fax 269 629 5385 Web site www parker com pneu isysnet E mail PDNMKTG parker com Copyright 2005 Parker Hannifin Corporation All Rights Reserved Trademarks not belonging to Parker Hannifin Corporation are the property of their respective companies ...

Reviews: