background image

What is wrong and why?

We strongly recommend that you carry out the following checks on your
cooker before calling a Service Engineer.

Problem

The oven, grill or hotplate will not light.

Check

l

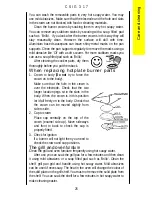
If only the hotplate burners will not light make sure that the burner
parts have been placed correctly. See instructions on page 25.

l

If you cannot hear any sparking or the sparking is slow when you
press the ignition button it may not be strong enough to light the
cooker. You will probably need to replace the battery. For
instructions on how to do this see page 31. You can light the burners
with a match until you have time to change the battery.

l

Check that there is not a problem with your gas supply. You can do
this by making sure that other gas appliances such as your central
heating or gas fire are working.

Problem

Food is cooking too quickly or too slowly.

Check

l

Check that you are using the recommended gas marks and shelf
positions. See pages 16 - 21. Be prepared to adjust the gas mark up
or down to get the results you want.

Problem

Having difficulty cleaning any part of the cooker.

Check

l

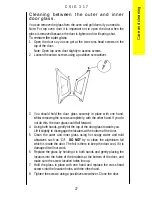
Check that the instructions for care and cleaning, beginning on page
24 are being followed.

33

C S I G  3 1 7  

What is wrong and why?

Summary of Contents for CSIG 317

Page 1: ...Owners handbook and Installation Instructions CSIG 317...

Page 2: ...o someone else We have included several drawings to show the right and wrong way of doing things The right way will have a smiling face by it A sad face shows something is wrong Do not remove the rati...

Page 3: ...low cooking 22 Care and cleaning 24 Installing the cooker 29 General information 31 What is wrong and why 33 Servicing 35 Installation instructions 37 Technical data 38 Safety requirements ventilation...

Page 4: ...31 Hotplate To light Push in the control knob and turn to the large flame symbol highest setting and press the ignition button immediately When the burner has lit release the button Warning If the ign...

Page 5: ...ressed immediately a build up of gas may cause the flame to spread Second oven To light 1 Open the oven door 2 Push in the control knob and turn it to the left to gas mark 1 Press the ignition button...

Page 6: ...trol knob to the gas mark you want 4 Wait until the burner is showing large flames 5 Close the oven door To turn off any burner 1 Push in the control knob and turn it to the off position This is shown...

Page 7: ...ow setting to cook thicker food such as chicken after you have browned it on the high setting Cooking positions There is only one position for the grill shelf Most food should be cooked on the grid in...

Page 8: ...n will get hot when you are using the main oven You can use the grill compartment to warm plates when you are using the main oven Preheating You don t usually need to preheat the grill You may wish to...

Page 9: ...re the handle is correctly located It is not necessary to remove the grill pan handle during grilling Place the grill pan on the shelf so that the pan is positioned centrally beneath the grill To remo...

Page 10: ...djust the heat by turning the control between the highest and lowest settings These are shown as a large and a small flame symbol Burner sizes The hotplate has three burner sizes to suit different typ...

Page 11: ...n with a lid Do not leave a pan unattended If the pan catches fire leave it where it is and turn off all controls Place a damp cloth or a fitting lid over the pan to smother the flames Never put water...

Page 12: ...overfill pans 3 Cover pans with a lid whenever possible The food will heat up more quickly and there will be less steam in the kitchen 4 Try cooking more than one vegetable in the same pan for example...

Page 13: ...food round during the cooking time Preheating You do not need to preheat the main or second oven for casseroling and so on Preheat the ovens for baking or when you are cooking sensitive food such as...

Page 14: ...aking tray which is 310mm 12 square If you use a tray or tin which is larger than this you may need to turn it around during cooking The size of tray which you should use in the second oven should not...

Page 15: ...minutes for each 1 2kg 1lb When cooking large items such as turkeys the use of foil may be required to prevent the breast becoming dry before the rest of the bird is fully cooked Condensation Condensa...

Page 16: ...dishes in the centre of the shelf You can change the gas marks and cooking times to suit your own tastes It is important to check that food is piping hot before serving If you are using both ovens at...

Page 17: ...oughly thaw frozen joints before cooking them The times given above are for open roasting in a preheated oven If you cover the food with foil or a lid allow an extra 10 15 minutes for each kg 1lb York...

Page 18: ...place on baking tray Puddings Milk pudding Baked sponge pudding Baked custard 2 4 3 3 3 3 2 hrs 45 60 mins 50 60 mins Yeast mixtures Bread 0 45kg 1lb loaves 0 90kg 2lb loaves Rolls and buns 8 8 8 3 3...

Page 19: ...ving If you are using both ovens at the same time you may need to adjust the cooking times Food Gas mark Shelf position Approximate cooking time Roasting meat Beef 5 Shelf on base Rare Medium Well Don...

Page 20: ...l or a lid allow an extra 10 15 minutes for each kg 1lb Yorkshire pudding individual 7 2 20 30 mins Cakes Christmas cake 8 Rich fruit 180mm 7 Madeira 180mm 7 Small cakes Scones Victoria sandwich 180mm...

Page 21: ...me Puddings Milk pudding Baked sponge pudding Baked custard 2 3 3 2 2 2 2 hrs approx 45 60 mins 50 60 mins Note You must soak dried beans then boil them in an open pan for 15 minutes before you add th...

Page 22: ...ng out You can uncover food for the last half hour if it is normally served golden brown Food preparation slow cooking Joints of meat and poultry l Do not cook meat joints over 2 7kg 6lb l Do not cook...

Page 23: ...make the pudding in the usual way l Cook for 30 minutes at gas mark 6 then reduce to the slow cook setting General points for slow cooking Frozen foods Thaw thoroughly before cooking Thickening Toss m...

Page 24: ...the handles It is strongly recommended that only hot soapy water is used for cleaning the door handles The hotplate Clean the hotplate top using a mild abrasive such as Cif Take care not to damage th...

Page 25: ...dy Make sure that the hole in the crown is over the electrode Check that the two longer location pegs sit in the slots in the body When the crown is in this position let it fall freely on to the body...

Page 26: ...t Council VEDC seal of approval Follow the instructions on the cleaning agent and protect the oven burner with aluminium foil to prevent it becoming blocked General Clean the base of the ovens the ove...

Page 27: ...do this the door glass could fall forward 4 Using both hands gently tilt the top of the door glass towards you Lift it slightly to disengage the locators at the bottom of the door 5 Clean the outer an...

Page 28: ...pads unsuitable for non stick saucepans Brillo Ajax pads or steel wool pads Chemical oven pads or aerosols Rust removers Bath Sink stain removers If the door glass panel becomes chipped or has deep sc...

Page 29: ...lity bracket is fitted For your safety The use of a gas cooking appliance results in the production of heat and moisture in the room in which it is installed Ensure that the kitchen is well ventilated...

Page 30: ...catch fire for example wood or curtains behind the cooker l Base units which are higher than the hotplate must be 100mm away l If a cooker hood is fitted read the cooker hood installation instructions...

Page 31: ...nition system doesn t work ypu probably need to replace the battery The battery is at the base of the cooker on the left hand side of the front When you need to replace the battery open the main oven...

Page 32: ...For your safety Do not try to disconnect the cooker from the gas supply if the supply pipe does not have a bayonet connection as described in the installation instructions If this is the case contact...

Page 33: ...For instructions on how to do this see page 31 You can light the burners with a match until you have time to change the battery l Check that there is not a problem with your gas supply You can do this...

Page 34: ...rays See page 14 l Check that you are using the recommended temperatures and shelf positions l If you are using a tin which is larger than the one we supplied be prepared to turn it round during cooki...

Page 35: ...n under the heading What is wrong and why When you report a problem try to describe the nature of the fault Always give your cooker s full name model and serial number Make a note of this information...

Page 36: ...training purposes The Gas Consumers Council The Gas Consumers Council GCC is an independent organisation which protects the interests of gas users If you need advice you will find the telephone numbe...

Page 37: ...p rear of panel For your safety Where applicable Natural Gas and L P Gas versions of this appliance are available Check that this model is suitable for the type of supply available In the interest of...

Page 38: ...pliance at hotplate level Rc B S P female Electric None IGNITION Spark generator APCO 7BG 6893 Battery 1 5 Volt AA size GRILL Natural Gas L P Gas Heat Input 3 3kW 11263 Btu h 3 0kW 215g h Injector Mar...

Page 39: ...ance with the current installation regulations Particular attention shall be given to the relevant requirements regarding ventilation The room containing the appliance should have an air supply in acc...

Page 40: ...ut less than 400mm above the hotplate then a minimum space of 100mm must be maintained between the sides of the unit and the appliance see Fig 1b Curtains must not be fitted immediately behind the app...

Page 41: ...ns should be read in conjunction with the leaflet packed with the stability bracket 1 Place the appliance in its intended position and level appliance 2 Mark off 250mm from the left hand side of the a...

Page 42: ...ry See Fig 5 4 Close the lid of the battery holder 6 PRESSURE TESTING 1 The oven injector is used as a pressure test point Remove the oven furniture Remove oven burner box retaining clips one spring c...

Page 43: ...eck that after about 10 minutes the flame size has reduced 6 Turn off the control and check that the oven flames go out 10 CHECKING THE SECOND OVEN 1 Turn the second oven thermostat control knob antic...

Page 44: ...44 N O T E S...

Page 45: ...45 N O T E S...

Page 46: ...46 CSIG 317 311590001 N O T E S...

Page 47: ...e No OFF DESCRIPTION 2 Oven shelves 1 P C Guarantee card 1 Hotplate operation card 1 Grill pan 311409401 1 Grill pan grid 311419801 1 Grill pan handle 311468100 1 Grill second oven shelf 4 Burner crow...

Page 48: ...ner Crown Rapid N G Burner Crown Rapid L P G Burner Crown Normal Burner Crown Simmer Pan Support 1 2 1 1 1 2 1 2 354000610 354000609 354000608 359039100 337000302 337000402 337000502 359033202 NOTE Fa...

Reviews: