background image

11

HINTS AND TIPS

·


In order to become acquainted with the
performance of the Dual Grill it is advisable to
check food regularly when grilling.

·


Food should be thoroughly dried before grilling
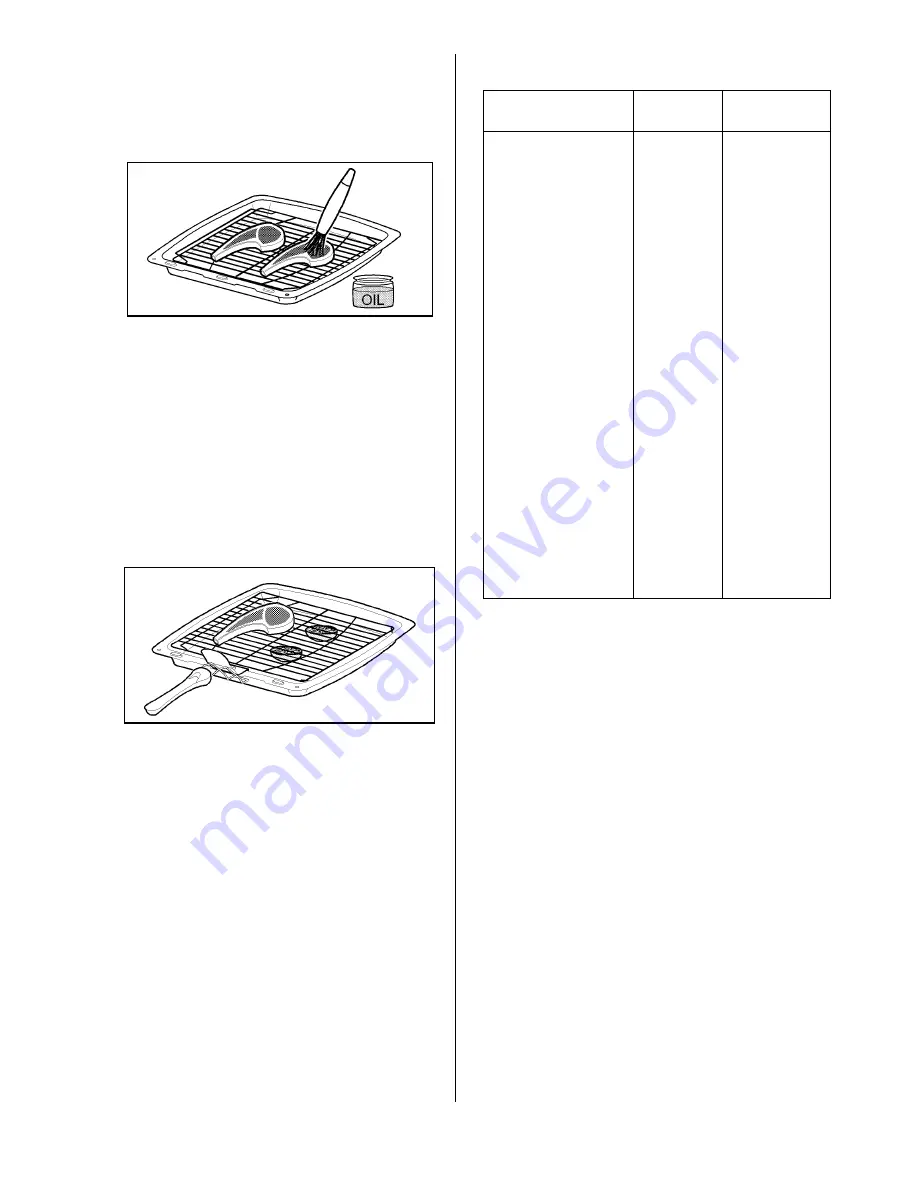
to minimise splashing.  Brush lean meats and
fish lightly with a little oil or melted butter to keep
them moist during cooking.

·


Adjust the height of the grilling grid and grill pan
runner position to allow for different thicknesses
of foods.

·


Accompaniments such as tomatoes and
mushrooms may be placed underneath the grid
when grilling meats.

·


When toasting bread use the shelf in position 1
with the grid in the high position.

·


Preheat the grill on a full setting for a few
minutes before cooking.  Adjust the heat setting
and the shelf as necessary during cooking.

·


The food should be turned over during cooking
as required.

·


When using the centre section of the dual grill,
ensure food is positioned centrally on the grill
pan grid in the grill pan.

NOTE:

If you require an additional handle for your grill pan,
this can be ordered from your local Service Force
Centre by quoting part number 311479800\6.

GRILLING CHART

 FOOD

SHELF

GRILL TIME

(mins in total)

Bacon Rashers

Adjust

5 - 6

Beefburgers

grill setting

10 - 15

Chicken Joints

shelf

30 - 40

Chops – Lamb

position

15 - 20

Pork

20 - 30

and

Fish – Whole
Trout/Mackerel

grill

15 - 25

Fillets – Plaice/Cod

pan

10 - 15

Kebabs

grid

20 - 30

Kidneys – Lamb/Pig

to

8 - 12

Liver – Lamb/Pig

suit

10 - 20

Sausages

different

20 - 30

Steaks – Rare

thicknesses

6 - 12

Medium

12 - 16

Well Done

of

14 - 20

Toasted Sandwiches

food

3 - 4

The times quoted above are given as a guide and
should be adjusted to suit personal taste.

Summary of Contents for CSM 559

Page 1: ...SLOT IN ELECTRIC COOKER WITH GAS HOB CSM 559 OPERATING AND INSTALLATION INSTRUCTIONS...
Page 2: ...wet hands Take great care when heating fats and oils as they will ignite if they become too hot When you are lighting any burner check that it is lit before you leave the appliance When turning off a...

Page 3: ...Defrost 18 Things to Note 18 Hints and Tips 18 Care and Cleaning 19 Cleaning Materials 19 Cleaning the Hob 19 When Replacing Hotplate Burner Parts 19 Cleaning the Outside of the Appliance 20 Cleaning...

Page 4: ...we ask that you PLEASE READ THESE INSTRUCTIONS CAREFULLY Particular attention should be made to cooking times and temperatures which may differ from your previous appliance It is most important that...

Page 5: ...ill condense and produce water droplets This is quite normal and is not caused by a fault on the appliance To prevent discolouration regularly wipe away condensation and also soilage from surfaces inc...

Page 6: ...grill pan handle 311468100 Note If you require an additional handle for your grill pan this can be ordered from your local Service Force Centre by quoting part number 311479800 6 1 grill pan grid 3114...

Page 7: ...FEATURES A Hotplate Controls B Top Oven Grill Temperature Control C Main Oven Temperature Control D Hotplate Controls E Ignition Switch F Grill Top Oven Indicator Neon G Main Oven Indicator Neon THE...

Page 8: ...n the burner has lit release the control and adjust the setting as required Warning If the ignition button is not pressed immediately a build up of gas may cause the flame to spread If you close the l...

Page 9: ...the pan supports Do not slide them across the hob Do not leave accidental spillage on the hob or removable parts The spillage should be wiped up and the parts washed and carefully dried as soon as th...

Page 10: ...URING GRILLING The cooling fan will operate For more details about the cooling fan see page 5 Some smoke from fat splashes may be evident as the grill cleans itself The top oven cannot be operated whe...

Page 11: ...tting and the shelf as necessary during cooking The food should be turned over during cooking as required When using the centre section of the dual grill ensure food is positioned centrally on the gri...

Page 12: ...GS TO NOTE 1 The grill cannot be operated if the top oven is in use Only the outer part of the top oven element in conjunction with the base element will operate when using the top oven 2 The indicato...

Page 13: ...en cooking cakes pastry scones bread etc place the tins or baking trays centrally on the shelf directly below the element DO NOT place dishes or baking trays directly onto the oven base as it becomes...

Page 14: ...he oven first COOKING TEMPERATURES Fan oven cooking generally requires lower temperatures than conventional cooking Follow the temperature recommended in the chart on page 16 As a guide reduce tempera...

Page 15: ...a sandwich cakes those of similar size will be cooked in the same time It is recommended that when baking larger quantities the shelf positions should be evenly spaced to suit the load being cooked A...

Page 16: ...n 180 190 1 180 190 1 1 h Convenience Foods Follow manufacturer s instructions Fish that oven 170 190 1 170 190 20 30 Fish Pie Potato Topped 190 200 1 190 200 20 25 Fruit Pies Crumbles 190 200 1 190 2...

Page 17: ...g 1lb up to 3 kg 7lb then 10 minutes per kg 1lb over 3 kg 7lb Duck 160 180 C 25 35 minutes per kg 1lb and 25 30 minutes over Pheasant 160 180 C 35 40 minutes per kg 1lb and 35 40 minutes over Rabbit 1...

Page 18: ...THOROUGHLY BEFORE COOKING ALWAYS COOK THOROUGHLY IMMEDIATELY AFTER THAWING Turn the main oven temperature control to the defrost setting When defrost is selected the oven indicator neon may come ON It...

Page 19: ...s on Clean the burner crowns by soaking them in very hot soapy water You can remove any stubborn stains by scouring with a soap filed pad such as Brillo If you look after the burner crowns in this way...

Page 20: ...e parts except the grill pan handle can be washed in the dishwasher The grill pan grill pan grid and oven shelves may be cleaned using a soap impregnated steel wool pad Soaking first in hot soapy wate...

Page 21: ...t 20 30 minutes will allow extra browning if required Some large joints and turkeys especially benefit by this method of cooking allowing the joint to cook through before the outside is over browned C...

Page 22: ...little washing up liquid has been added If the inner panel is heavily soiled Hob Brite may be used Do not use abrasive cleaning materials on the door glass Ensure that all parts are well rinsed and th...

Page 23: ...esults you want The ovens work but the grill does not Check that you have carefully followed the instructions for operation of the grill If the cooling fan fails the grill will not operate correctly P...

Page 24: ...de 2 Your telephone number 3 Clear and concise details of the fault 4 The model and serial number of the appliance found on the rating plate 5 The purchase date Please note that valid purchase receipt...

Page 25: ...s to put right an appliance which is improperly installed or calls to appliances outside the United Kingdom Appliances found to be in use within a commercial environment plus those which are subject t...

Page 26: ...ector marking 070 050 IGNITION H T Spark Spark Generator KIGASS BMS4 Spark Gap 3 4mm Physical Characteristics Height 900 mm nominal Width 600 mm nominal Depth 600 mm to front of door panel Weight 67 K...

Page 27: ...upply if the supply pipe does not have a bayonet connection as described in the installation instruction If this is the case contact the person who installed the appliance Warning This appliance must...

Page 28: ...the room has a door that opens directly to the outside no air vent is required For room volumes that exceed 11m 3 no air vent is required If there are other fuel burning appliances in the same room B...

Page 29: ...liance If the units are intended to be fitted adjacent to the appliance but less than 400mm above the hotplate then a minimum space of 100mm must be maintained between the sides of the unit and the ap...

Page 30: ...ted Earth wires are used ensure they are suitably sheathed to leave 10mm bare wire to fit into the terminal Clamp bare wires into the relevant terminal Fig 2 and check they are held by tugging each on...

Page 31: ...ITTED I E DO NOT USE P T F E SEALANT TAPE Carry out a gas tightness test after connecting to the gas supply The gas bayonet connector must be fitted in the shaded area indicated in Fg 3 Take into acco...

Page 32: ...he centre line of the fixing bracket 3 Draw a line from the front edge of the feet see Fig 4a and remove appliance from its position Mark off dimension B see Fig 4a back from this line on the centre l...

Page 33: ...e button can be released CHECKING LID SHUT OFF DEVICE 1 Lift the lid 2 Turn one hotplate tap to its full on position and push the ignition button 3 Close lid There should now be no gas supply to the h...

Page 34: ...NOTES 34...

Page 35: ...NOTES 35...

Page 36: ...o alter models and specifications without prior notice This instruction booklet is accurate at the date of printing but will be superseded if specifications or appearance are changed PARKINSONCOWAN 55...

Reviews: