background image

This handbook was correct on the date it was printed.  But this handbook will be
replaced if the specification or appearance change as the cooker is improved.
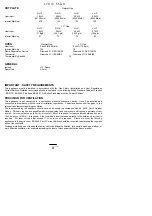
Description

No.

Off

Maker's Part

Number

Burner Cap - Rapid
Burner Cap - Normal
Burner Cap - Simmer
Burner Crown - Rapid - N.G.
Burner Crown - Rapid - L.P.G.
Burner Crown - Normal
Burner Crown - Simmer
Pan Support

1
2
1
1
1
2
1
2

354000610
354000609
354000608
359039100
337000302
337000402
337000502
359033302

NOTE : 

Failure to use manufacturers original spares could negate normal BSI approval of the product

Parkinson Cowan

Customer Care

P.O. Box 47, Newbury, Berkshire RG14 5XL

Telephone: 01635 525542

Fax: 01635 42970

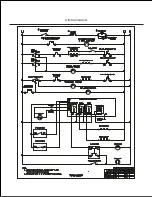
Drawing No. 311369708

Summary of Contents for Lyric LYR55GRL

Page 1: ...Owners handbook and Installation instructions GR...

Page 2: ...someone else We have included several drawings to show the right and wrong way of doing things The right way will have a smiling face by it A sad face shows something is wrong Important Make sure you...

Page 3: ...t 13 Slow cooking 16 Care and cleaning 19 Installing the cooker 23 General information 25 What is wrong and why 27 Servicing 29 Installation instructions 30 Technical Data 31 Safety requirements venti...

Page 4: ...on is not pressed immediately a build up of gas may cause the flame to spread Oven To light 1 Open the oven door 2 Push in the control knob and turn it to gas mark 9 and press the ignition button imme...

Page 5: ...off position This is shown by a large dot L Y R I C 5 5 G R 5 Lighting the cooker For your safety When you are lighting any burner check that it has lit before you leave the cooker When you are turni...

Page 6: ...on the high setting Grill pan The pan is designed so that you can pull it forward but it will stay supported To remove the pan push it back as far as possible and lift it off Replace it in reverse or...

Page 7: ...rowning food Positioning food on the grid Place food such as toast teacakes and muffins towards the centre of the grid Place food which needs a more gentle heat such as tomatoes and mushrooms towards...

Page 8: ...e symbol Burner sizes The hotplate has three burner sizes to suit different types of cooking Largest burner Rapid use a large pan for food such as chips Medium burners Normal use for everyday cooking...

Page 9: ...not leave a pan unattended If the pan catches fire leave it where it is and turn off all controls Place a damp cloth or a fitting lid over the pan to smother the flames Never put water on the fire Le...

Page 10: ...l pans 3 Cover pans with a lid whenever possible The food will heat up more quickly and there will be less steam in the kitchen 4 Try cooking more than one vegetable in the same pan for example potato...

Page 11: ...her shelf to finish cooking Preheating You do not need to preheat the oven when casseroling and so on Preheat the oven for baking or when you are cooking sensitive food such as Yorkshire puddings souf...

Page 12: ...irculation of heat and will lead to extended cooktimes If you are using a roasting bag or cover chicken breast with foil be prepared to allow an extra 10 15 minutes for each 1 2kg 1lb When cooking lar...

Page 13: ...itions give the best results Put the dishes in the centre of the shelf You can change the gas marks and cooking times to suit your own tastes It is important to check that food is piping hot before se...

Page 14: ...w frozen joints before cooking them The times given above are for when you are open roasting If you cover the food with foil or a lid you should allow an extra 10 15 minutes cooking time for each kg 1...

Page 15: ...on baking tray to cook Puddings Milk puddings Baked sponge pudding Baked custards 2 4 3 3 4 4 2 hrs 45 60 mins 50 60 mins Yeast Mixtures Bread 0 45kg 1lb loaves 0 90kg 2lb loaves Rolls and buns 8 8 8...

Page 16: ...ood for the last half hour if it is normally served golden brown Food preparation slow cooking Joints of meat and poultry l Do not cook meat joints over 2 7kg 6lb l Do not cook poultry over 2kg 4lb 8o...

Page 17: ...e it to stand for 30 minutes l Drain and make the pudding in the usual way l Cook for 30 minutes at gas mark 6 then reduce to the slow cook setting General points for slow cooking Frozen foods Thaw th...

Page 18: ...ool left over food quickly and then put it in the fridge Do not reheat food using the slow cook setting Reheat food in the usual way or in a microwave Only reheat food once L Y R I C 5 5 G R 18 S lo w...

Page 19: ...recommended that only hot soapy water is used for cleaning the handles ANY OTHER CLEANING MATERIALS WILL DULL THE BRASS PLATED FINISH The hotplate Clean the hotplate top using a mild abrasive such as...

Page 20: ...oughly before you put them back When replacing hotplate burner parts 1 Crown to body Do not try to force the crown on to the body Make sure that the hole in the crown is centrally over the electrode C...

Page 21: ...es too high in the oven If you do they may stick to the oven roof 3 Cover your roasting tins with foil This will prevent fat splashing 4 Use a roasting tin which is just large enough for the meat and...

Page 22: ...rk 5 for at least 30 minutes 3 Turn the temperature up to mark 7 for 2 hours or until the oven is presentably clean Do not use any cleaning agents or scrapers on the inside of the oven Do not wash the...

Page 23: ...sive use of the appliance may call for additional ventilation for example opening of a window or more effective ventilation for example increasing the level of mechanical ventilation where present For...

Page 24: ...mple wood or curtains behind the cooker l Base units which are higher than the hotplate must be 100mm away l If a cooker hood is fitted refer to the cooker hood installation instructions l We recommen...

Page 25: ...attery for the ignition will usually last for many months If the ignition system doesn t work you probably need to replace the battery The battery is located at the front left hand side of the bottom...

Page 26: ...ng trays cake tins and so on Do not store anything in this compartment which may catch fire Reversing the oven door You can turn the oven door around so that it opens on the other side Your supplier c...

Page 27: ...are working l If only the hotplate burners will not light make sure that the burner parts have been replaced properly See instructions on page 20 Problem Food is cooking too quickly or too slowly Che...

Page 28: ...Problem Having difficulty cleaning any part of the cooker Check l Check that you are following the instructions for care and cleaning see page 19 L Y R I C 5 5 G R 28 W h a t is w ro n g a n d w h y...

Page 29: ...ibe the nature of the fault Always give your cookers full name and serial number which you can see on the oven front frame when you open the oven door Make a note of this information in this space Nam...

Page 30: ...nel L Y R I C 5 5 G R For your safety Check that this model is suitable for the type of supply available In the interest of safety this appliance must be installed and or serviced by a competent perso...

Page 31: ...clearance Nominal Space for fixing above hotplate level 100mm each side of appliance Minimum space above grill 500mm Minimum distance from rear wall 20mm Weight of appliance 59 3kg CONNECTIONS Gas Re...

Page 32: ...appliance is not connected to a combustion products evacuation device It shall be installed and connected in accordance with the current installation regulations Particular attention shall be given to...

Page 33: ...ns must be a minimum of 100mm away from the hotplate L P G cookers MUST NOT be installed below ground level i e in a basement INSTALLATION 1 PARTS REQUIRED The loose hotplate parts are packed in the p...

Page 34: ...obtained by rotating clockwise or anticlockwise the hexagonal feet wheels at the front and rear of the appliance NOTE The rear wheels must only be rotated through half or whole turns 3 A spirit level...

Page 35: ...the centre line of the fixing bracket 3 Draw a line 100mm from the front edge of the levelling feet see Fig 2a and remove appliance from its position Mark off dimension B see Fig 2a back from this lin...

Page 36: ...d as the pressure test point Remove the oven furniture Remove oven burner box retaining clips one spring clip from each side and remove box front cover Replace one clip back into the right hand side o...

Page 37: ...ght the button can be released 2 There should now be a low gas rate to the burner which is the F S D by pass rate 3 When the F S D phial has heated up it opens the F S D valve which allows the main ga...

Page 38: ...r Cap Simmer Burner Crown Rapid N G Burner Crown Rapid L P G Burner Crown Normal Burner Crown Simmer Pan Support 1 2 1 1 1 2 1 2 354000610 354000609 354000608 359039100 337000302 337000402 337000502 3...

Page 39: ...oard monitors software tv dvd and othes Manual users user manuals user guide manual owners manual instruction manual manual owner manual owner s manual guide manual operation operating manual user s m...

Reviews: