background image

PRESSURE TESTING

1

The rapid injector is used as a pressure test point.

2.

Connect the pressure gauge to the Rapid injector.

3.

Check the supply pressure by turning the Rapid burner on and one other hotplate burner full on and light the
appropriate burner. The pressure should be either:-
(i)   For Natural Gas 20mbar
(ii)  For LP.Gas.  The pressure must be set to 28 mbar for use on butane or 37 mbar for use on propane.

4.

Turn off the taps, disconnect the pressure gauge.

5.

Check operation of each hotplate burner.

CHECKING THE GRILL

Place the grill pan containing the grid and with the handle attached into the grill compartment. Open the grill door
and turn the grill control to full on.  Visually check that both elements are heating up. 

CHECKING THE HOTPLATE


Lift the lid.  Fit the burner crowns and caps ensuring that they are correctly seated. Fit the pan supports.  Check
each of the hotplate burners in turn by turning the hotplate tap to its full on position and pushing the ignition button.
As soon as the burners are lit the button can be released. 

CHECKING LID SHUT-OFF DEVICE

1.   Lift the lid.
2.

Turn one hotplate burner tap to its full on position and push the ignition button.

3.

Close lid. There should now be no gas supply to the hotplate and the burner will go out.

4.   Turn off the hotplate tap and lift the lid. The gas supply should now be restored to the hotplate, when the tap is

turned on.

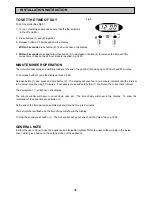
CHECKING THE MAIN OVEN

1.   Turn on the main oven thermostat to the highest setting.
2.   Ensure the oven is heating up by checking first that the oven neon illuminates.
3.   After a short period the heat from the oven element may be felt with the oven door open.
4.   Check that the oven lights and the oven fan are functioning.

CHECKING THE SECOND OVEN

1.   Ensure that the oven door is closed.
2.   Turn on the second oven thermostat to the highest setting.
3.   Ensure that the oven is heating up by checking firstly that the oven neon illuminates.
4.   After a short period the heat from the oven element may be felt with the oven door open.
5.   Check that the oven light is functioning.

35

INSTALLATION INSTRUCTION

Summary of Contents for SIM 514

Page 1: ...SLOT IN ELECTRIC COOKER WITH GAS HOB SIM 514 35 OPERATING AND INSTALLATION INSTRUCTIONS...

Page 2: ...ventilation of the oven cavity Never line any part of the appliance with foil Do not allow heatproof cooking material e g roasting bags to come into contact with oven elements because they may catch f...

Page 3: ...t Feature 20 Selecting Defrost 20 Things To Note 20 Hints and Tips 20 Care and Cleaning 21 Cleaning Materials 21 Cleaning The Hob 21 When Replacing Hotplate Burner Parts 21 Cleaning the Outside of the...

Page 4: ...sk that you PLEASE READ THESE INSTRUCTIONS CAREFULLY Particular attention should be made to cooking times and temperatures which may differ from your previous appliance It is most important that this...

Page 5: ...ts This is quite normal and is not caused by a fault on the appliance To prevent discolouration regularly wipe away condensation and also soilage from surfaces including the vent at the rear of the ho...

Page 6: ...ill pan handle 311468100 Note If you require an additional handle for your grill pan this can be ordered from your local Service Force Centre by quoting part number 311479800 6 1 grill pan grid 311419...

Page 7: ...Ignition Switch B Hotplate Controls C Top Oven Grill Temperature Control D Main Oven Temperature Control E Hotplate Controls F Timer G Top Oven Indicator Neon H Main Oven Indicator Neon 7 GETTING TO...

Page 8: ...all or there is a loss of power the clock will stop and you will not be able to use the oven 1 To set the time of day When the electricity supply is supply is first switched ON the display will flash...

Page 9: ...he time of day will show in the display To show the remainder of the cook time press button 1 At the end of the time period an audible signal will sound for up to 2 minutes The bell symbol will flash...

Page 10: ...as required Warning if the ignition button is not pressed immediately a build up of gas may cause the flame to spread TO TURN OFF ANY BURNER 1 Turn the control knob to the off position This is shown b...

Page 11: ...hob pan supports and burner parts are cool enough to touch See page 21 for full cleaning instructions Cover pans with a lid whenever possible Food will heat up more quickly and there will be less stea...

Page 12: ...at splashes may be evident as the grill cleans itself The top oven cannot be operated when the grill is in use The inner grill element may appear to glow slightly brighter than the outer element This...

Page 13: ...rid in the high position l Preheat the grill on a full setting for a few minutes before sealing steaks or toasting Adjust the heat setting and the shelf as necessary during cooking l The food should b...

Page 14: ...e oven shelf to warm Never place dishes directly on the top oven base as it becomes very hot and damage may occur TO FIT THE TOP OVEN SHELF The shelf should be fitted with the straight rods uppermost...

Page 15: ...ing cakes pastry scones bread etc place the tins or baking trays centrally on the shelf directly below the element l DO NOT place dishes or baking trays directly onto the oven base as it becomes very...

Page 16: ...ement heats the air which circulates in the oven via the vents in the back panel The advantages of fan oven cooking are PREHEATING The fan oven quickly reaches its temperature so it is not usually nec...

Page 17: ...ch cakes those of similar size will be cooked in the same time l It is recommended that when baking larger quantities the shelf positions should be evenly spaced to suit the load being cooked A slight...

Page 18: ...when more than one is used 180 190 200 220 200 220 160 170 160 170 160 170 140 150 130 140 130 140 140 150 80 100 170 180 130 140 140 160 180 190 170 190 190 200 190 200 130 140 190 200 190 200 170 18...

Page 19: ...kg 7lb then 10 min per kg 1lb over 3 kg 7lb Duck 160 180 C 25 35 min per kg 1lb and 25 30 min over Pheasant 160 180 C 35 40 min per kg 1lb and 35 40 min over Rabbit 160 180 C 20 min per kg 1lb and 20...

Page 20: ...hygiene to prevent bacterial and microbial growth and cross contamination when defrosting preparing cooking cooling and freezing foods Small or thin fish fillets frozen peeled prawns cubed or minced m...

Page 21: ...an the burner crowns by soaking them in very hot soapy water You can remove any stubborn stains by scouring with a soap filled pad such as Brillo If you look after the burner crowns in this way they w...

Page 22: ...a soap impregnated steel wool pad Soaking first in hot soapy water will make cleaning easier COMPARTMENTS The sides and back of the Main oven compartment are coated with Stayclean enamel The Stayclean...

Page 23: ...minutes will allow extra browning if required Some large joints and turkeys especially benefit by this method of cooking allowing the joint to cook through before the outside is over browned CLEANING...

Page 24: ...VEN LIGHT BULB The type of bulb required is a 300 C 25 watt small Edison Screw Part number 572 491 5431 00 1 Available through your local Service Force Centre CAUTION DISCONNECT THE APPLIANCE FROM THE...

Page 25: ...to adjust the temperature up or down by 10 C to achieve the results you want The ovens work but the grill does not Check that you have carefully followed the instructions for operation of the grill If...

Page 26: ...re you will need to give the following details 1 Your name address and post code 2 Your telephone number 3 Clear and concise details of the fault 4 The model and serial number of the appliance found o...

Page 27: ...incurred for calls to put right an appliance which is improperly installed or calls to appliances outside the United Kingdom l Appliances found to be in use within a commercial environment plus those...

Page 28: ...1 0 Kw 3412 Btu h 1 0 Kw 71 85 g h injector marking 079 051 IGNITION H T Spark Spark Generator KIGASS BMS4 Spark Gap 3 4mm Physical Characteristics Height 900 mm nominal Width 600 mm nominal Depth 60...

Page 29: ...bed in the installation instruction If this is the case contact the person who installed the appliance CHOICE OF ELECTRICAL CONNECTION The appliance should be operated using at least 6mm twin core and...

Page 30: ...is required For room volumes that exceed 11m no air vent is required If there are other fuel burning appliances in the same room BS 5440 Part 2 Current Edition should be consulted to determine the req...

Page 31: ...ce If the units are intended to be fitted adjacent to the appliance but less than 400mm above the hotplate then a minimum space of 100mm must be maintained between the sides of the unit and the applia...

Page 32: ...fit into the terminal Clamp bare wires into the relevant terminal fig 2 and check they are held by tugging each one in turn Clamp the mains cable securely ensuring 5mm of the outer insulation is insid...

Page 33: ...F E SEALANT TAPE Check for gas soundness after connecting to the gas supply The gas bayonet connector must be fitted in the shaded area indicated in Fig 3 Take into account that it must be possible to...

Page 34: ...entre line of the fixing bracket 3 Draw a line across the front edge of the feet see Fig 4a and remove appliance from its position Mark off dimension B see Fig 4a back from this line on the centre lin...

Page 35: ...on position and pushing the ignition button As soon as the burners are lit the button can be released CHECKING LID SHUT OFF DEVICE 1 Lift the lid 2 Turn one hotplate burner tap to its full on position...

Page 36: ...and hold button 2 The display will count up in one minute intervals until the interval to be timed is reached eg 30 minutes If necessary press and hold button 1 to achieve the correct time interval Th...

Page 37: ...37 N O T E S...

Page 38: ...SIM514 311603104 38 N O T E S...

Page 39: ...39 N O T E S...

Page 40: ...and specifications without prior notice This instruction booklet is accurate at the date of printing but will be superseded if specifications or appearance are changed PARKINSON COWAN 55 77 HIGH STREE...

Reviews: