background image

04

Important! 
Please read these operating instructions carefully to familiarise yourself 
with the product.  Keep these instructions for future reference. In case the 
user changes, the operating instructions must also be passed on to the new 
user.

Table of contents

Symbols used

 ..........................................................................................................................................................................................

05

1. Introduction

 .........................................................................................................................................

05

2. Safety instructions

 ..........................................................................................................................

05

Safety instructions

 ...............................................................................................................................................................................

05

Scope of use

 ............................................................................................................................................................................................

07

3. Technical specifications

 ................................................................................................................

08

Contents

 .......................................................................................................................................................................................................

08

Features

 ........................................................................................................................................................................................................

08

Technical specifications for mod. No. PT 360

 ..........................................................................................................

09

4. Before using the tool

 .....................................................................................................................

09

Fill the gas tank (Figure A)

 ..........................................................................................................................................................

09

5. Operation / use

 ................................................................................................................................

10

Assembly of attachments(Figure B)

......................................................................................................................................

10

Use as soldering gun (Figure C)

 ............................................................................................................................................

10

Use as hot air gun

 ................................................................................................................................................................................

11

Use as blowing torch(Figure F)

 ................................................................................................................................................

11

Igniting and extinguishing the flame

 ...................................................................................................................................

12

Shutting down the device safely (Figure G)

 ................................................................................................................

13

Protective cap (Figure H)

 ..............................................................................................................................................................

13

Storage conditions

 .............................................................................................................................................................................

13

Cleaning

 ......................................................................................................................................................................................................

13

6. Disposal

 ..................................................................................................................................................

14

Instructions for disposal of the gas cartridge

 ..............................................................................................................

14

7. Warranty

 ...............................................................................................................................................

14

Summary of Contents for 102885

Page 1: ...IAN 102885 GAS SOLDERING IRON SET PT360 GAS SOLDERING IRON SET Operation and Safety Notes GASL TKOLBEN SET Bedienungs und Sicherheitshinweise...

Page 2: ...GB CY Operation and Safety Notes Page 5 GB CY 18 DE AT CH Bedienungs und Sicherheitshinweise Seite 32...

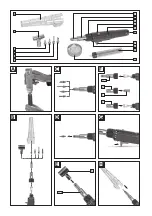
Page 3: ...A G H D 1 2 2 1 2 F E B 4 1 15 5 2 3 1 2 15 16 13 14 12 1 1 6 7 8 9 C 10...

Page 4: ...Scope of use 07 3 Technical specifications 08 Contents 08 Features 08 Technical specifications for mod No PT 360 09 4 Before using the tool 09 Fill the gas tank Figure A 09 5 Operation use 10 Assembl...

Page 5: ...roduct They contain important instructions for safety use and disposal of the product Please familiarise yourself with all operating and safety instructions before using the product Use the product on...

Page 6: ...take the system outdoors immediately to a well ventilated location away from sources of ignition where the leak can be safely detected and repaired Carry out the leak test in the open only Do not try...

Page 7: ...be used for only in accordance with its intended purpose Any other use is forbidden The manufacturer cannot be held responsible for damage or injury caused by use the machine for other than its intend...

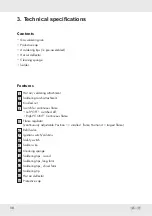
Page 8: ...uously adjustable Position 1 smallest flame Position 4 largest flame Refill valve Ignition switch columns Safety switch Solder wire Cleaning sponge Soldering tips round Soldering tips long form Solder...

Page 9: ...opane butane mix Rofill Super 100 is available in any well stocked hardware store Switch off the gas soldering iron and ensure that the flame is off Refill the gas tank only after the soldering iron h...

Page 10: ...four soldering tips 11 14 and one hot air deflector are included in the contents To fit the various attachments proceed as described on the following pages 5 Operation use CAUTION Danger of burns Allo...

Page 11: ...the device The device can now be used as a blow torch CAUTION Danger of burns Never touch the heated hot air deflector Allow the gas soldering iron to cool completely before changing the attachments...

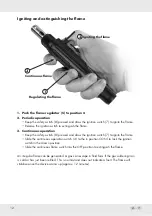
Page 12: ...nd draw the ignition switch 7 to ignite the flame Slide the continuous operation switch 4 to the in position CONT to lock the ignition switch in the drawn position Slide the continuous flame switch in...

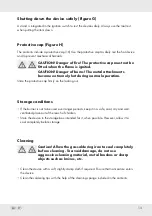
Page 13: ...ition switch to rest the device safely Always use the tool rest when putting the item down If the burner is not to be used over longer periods keep it in a safe cool dry and well ventilated place out...

Page 14: ...ects in the product you may be entitled to legal claims against the seller of the product These legal claims are not restricted by the following warranty Conditions of warranty The warranty period beg...

Page 15: ...or proper use of the product The purpose of use and actions which are advised or warned against must necessarily be avoided The product is intended solely for private use and not for professional use...

Page 16: ...N 102885 ROTHENBERGER Hellas S A E Mail ro he otenet gr Tel 30 210 94 02 049 IAN 102885 Supplier Please note that the following address is not a service centre address Please contact the above mention...

Page 17: ...17 18 1 18 2 18 18 20 3 21 21 21 360 22 4 22 22 5 23 23 C 23 D 24 F 24 25 G 26 26 26 26 6 27 27 7 27...

Page 18: ...18 1 2...

Page 19: ...19 50 C 120 F 0 5 1...

Page 20: ...20...

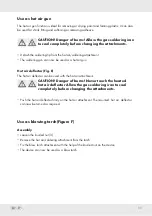
Page 21: ...21 3 OFF CONT 1 4 3 1 4 2 5 6 7 8 9 14 15 16 12 13 11 10 4 1x...

Page 22: ...22 Rofill Super 100 75 25 1 300 C 600 C 450 C 360 Rofill Super 100 Rofill Super 100 4...

Page 23: ...23 6 1 2 11 14 15 5 C 4...

Page 24: ...24 F 3 D...

Page 25: ...25 2 1 3 1 5 4 2 8 7 3 4 CONT OFF 1 2...

Page 26: ...26 16 G...

Page 27: ...27 6 Walter Werkzeuge Salzburg GmbH 3 7...

Page 28: ...28 IAN 12345 E Mail www lidl service com...

Page 29: ...29 E Mail ro he otenet gr 30 210 94 02 049 IAN 102885 Walter Werkzeuge Salzburg GmbH Gewerbeparkstra e 9 5081 Anif...

Page 30: ...30...
Page 31: ...32 Bestimmungsgem e Verwendung 34 3 Technische Informationen 35 Lieferumfang 35 Teilebezeichnung 35 Technische Daten f r Mod Nr PT 360 36 4 Vor der Inbetriebnahme 36 Bef llen des Gastanks Abb A 36 5...

Page 32: ...Bestandteil dieses Produkts Sie enth lt wichtige Hinweise f r Sicherheit Gebrauch und Entsorgung Machen Sie sich vor der Benutzung des Produkts mit allen Bedien und Sicherheitshinweisen vertraut Benut...

Page 33: ...rau en an einen Ort mit guter Luftzirkulation und ohne Z ndquelle wo das Leck gesucht und behoben werden kann berpr fen Sie die Dichtheit Ihres Gasl tkolbens nur im Freien Suchen Sie nie ein Leck mit...

Page 34: ...ebstoffen geeignet Der Gasl tkolben darf nur wie angegeben bestimmungsgem verwendet werden Jede weitere dar ber hinausgehende Verwendung ist verboten F r aus nicht bestimmungsgem er Verwendung hervorg...

Page 35: ...ler Stufenlos regelbar Position 1 kleinste Flamme Position 4 gr te Flamme Nachf llventil Z ndschalter St nder Sicherungsschalter Lot Reinigungsschwamm L tspitze Rundform L tspitze Langform L tspitze M...

Page 36: ...t in jedem gut sortierten Baumarkt erh ltlich Schalten Sie der Gasl tkolben ab und vergewissern Sie sich dass die Flamme aus ist Bef llen Sie den Gastank erst wenn der Gasl tkolben vollkommen ausgek h...

Page 37: ...tbrenneraufsatz 2 vier L tspitzen 11 14 und ein Hei luftdeflektor 15 enthalten Um die verschiedenen Aufs tze zu montieren verfahren Sie bitte wie auf den folgenden Seiten beschrieben 5 Inbetriebnahme...

Page 38: ...endet werden ACHTUNG Verbrennungsgefahr Ber hren Sie niemals den hei en Hei luftdeflektor Lassen sie den Gasl tkolben vollst ndig ausk hlen bevor Sie das Zubeh r tauschen ACHTUNG Verbrennungsgefahr La...

Page 39: ...Sie den Z ndschalter um die Flamme zu z nden Schieben Sie den Dauerlaufschalter 4 in die Position CONT um den Z ndschalter in gezogener Position zu verriegeln Schieben Sie den Dauerlaufschalter in die...

Page 40: ...riert Legen Sie das Ger t ausschlie lich auf dem St nder ab Beim Nichtgebrauch lagern Sie das Ger t an einem sicheren k hlen trockenen und gut bel fteten Ort au erhalb der Reichweite von Kindern Bewah...

Page 41: ...e von M ngeln dieses Produkts stehen Ihnen gegen den Verk ufer des Produkts gesetzliche Rechte zu Diese gesetzlichen Rechte werden durch unsere im Folgenden dargestellte Garantie nicht eingeschr nkt G...

Page 42: ...itung abgeraten oder vor denen gewarnt wird sind unbedingt zu vermeiden Das Produkt ist lediglich f r den privaten und nicht f r den gewerblichen Gebrauch bestimmt Bei missbr uchlicher und unsachgem e...

Page 43: ...r werkzeuge com Tel 43 6246 72091 60 IAN 102885 Walter Werkzeuge Service Center E Mail info zeitlos vertrieb de Tel 00800 09 34 85 67 IAN 102885 Lieferant Bitte beachten Sie dass die folgende Anschrif...

Page 44: ...IAN 102885 Walter Werkzeuge Salzburg GmbH Gewerbeparkstrasse 9 5081 Anif Austria V 1 0 Last Information Update Stand der Informationen 11 2014...

Reviews: