9
PHKSA 18-Li B2
GB
CY
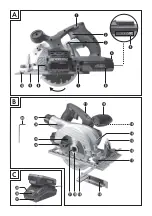
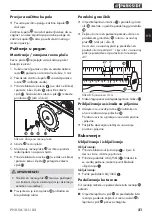
Fig. B: Cutting width 3 cm
♦
Retighten the wing screw .
Connecting the sawdust extraction
device
♦
Attach the dust extraction adapter to the chip
ejector .
Optional depending on the diameter of the dust
and sawdust extractor.
♦
Connect an approved dust and chip extraction
device.
Operation
Switching on and off
Switching on:
♦
Push the safety lock-out to the left or right
and keep it pressed.
♦
Press the ON/OFF switch . Once the saw is
running, you can release the safety lock-out .
Switching off:
♦
Release the ON/OFF switch .
Setting the cutting angle
You can select the cutting angle using the cutting
angle scale .
■
Release the wing screw on the cutting angle
preselector, set the desired cutting angle on the
cutting angle scale and then retighten the
wing screw .
Setting the cutting depth
NOTE
►
Select a cutting depth of approx. 3 mm more
than the thickness of the material. This ensures
that you achieve a clean cut.
♦
Release the locking screw , set the desired
cutting depth on the cutting depth scale and
then retighten the locking screw .
Working with the circular saw
1. Switch on the appliance – as described in
“Switching on and off” – and then place it with
the front edge of the base plate on the
material.
2. Align the machine using the guide fence or
by using a marked line.
3. Hold the machine in both hands using the handles
and saw by exerting an even pressure.
Switching the laser on and off
Switching on:
♦
Press the laser ON/OFF/RESET switch
.
Switching off:
♦
Press the laser ON/OFF/RESET switch
.
NOTE
►
OVERLOAD AND RESET!
The appliance
switches off in case of overload operation.
♦
Switch OFF the laser. Press the laser ON/
OFF/RESET switch
.
►
An automatic reset is only possible once the
laser is turned off.
Tips and tricks
■
Avoid damaging the cutting edge of sensitive
materials, e.g. coated chip boards or doors,
by sticking masking tape along the cutting line.
Another benefit of this is that it is easier to mark
a line on the tape than on a shiny surface. An
even more effective method of protecting the
cutting edges is to clamp a thin piece of wood
along the cutting line (this wood is also sawn).
Summary of Contents for 270420
Page 3: ...A B C...
Page 29: ...26 PHKSA 18 Li A1...
Page 33: ...30 PHKSA 18 Li B2 BG 2 3 a 4 a...
Page 34: ...31 PHKSA 18 Li B2 BG 5 a 6 a...
Page 35: ...32 PHKSA 18 Li B2 BG a...
Page 36: ...33 PHKSA 18 Li B2 BG 8...
Page 37: ...34 PHKSA 18 Li B2 BG...
Page 38: ...35 PHKSA 18 Li B2 BG 2 C 10 C 40 C C 15...
Page 39: ...36 PHKSA 18 Li B2 BG 1 0 mm 2 3 A A 4 5 6 B 0 45 B 3 cm...
Page 40: ...37 PHKSA 18 Li B2 BG 3 mm 1 2 3 50 80...
Page 41: ...38 PHKSA 18 Li B2 BG 2012 19 EU 2006 66 3...
Page 43: ...40 PHKSA 18 Li B2 BG www kompernass com 20 www kompernass com 00800 111 4920 IAN 270420...
Page 57: ...54 PHKSA 18 Li B2...


