


PDWS 125 A1
BG
│
37
■
Тогава шлифовъчният диск се задвижва в
посока към или обратно на оператора, в за-
висимост от посоката на въртене на диска в
мястото на блокиране. При това е възможно
и строшаване на шлифовъчните дискове.
■
Откатът е следствие от грешна или непра-
вилна употреба на пневматичния инстру-
мент. Той може да се предотврати с подхо-
дящи предпазни мерки, каквито са описани
по-долу.
а) Дръжте здраво пневматичния инструмент
и поставете тялото и ръцете си в положение,
в което можете да овладеете силите на откат.
Винаги използвайте допълнителната ръкох-
ватка, ако има такава налице, за да упраж-
нявате максимален контрол над откатните
сили или обратните моменти при работа на
високи обороти. Чрез подходящи предпазни
мерки операторът може да владее откатните
и реактивните сили.
б) Никога не поставяйте ръка в близост до
въртящи се работни инструменти. При откат
работният инструмент може да се задвижи
по ръката ви.
в) Избягвайте да поставяте тялото си в зоната,
в която пневматичният инструмент се задвиж-
ва при откат. Откатът задвижва пневматичния
инструмент в посока, обратна на движението
на шлифовъчния диск в мястото на блокира-
не.
г) Особено внимателно работете в зоната
на ъгли, остри ръбове и т.н. Не допускайте
отскачане на работните инструменти от
детайла и заклинване. Ротиращият работен
инструмент е склонен да се заклинва при
ъгли, остри ръбове или когато отскача. Това
причинява изгубване на контрол или откат.
д) Не използвайте верижен или зъбчат ре-
жещ диск. Такива работни инструменти често
причиняват откат или изгубване на контрол
над пневматичния инструмент.
Пускане в експлоатация
УКАЗАНИЕ
►
Преди първата употреба завинтете на-
крайника за бърза връзка .
Поставяне на допълнителната
ръкохватка
ВНИМАНИЕ!
►
Работете само с поставена допълнителна
ръкохватка !
♦
Завинтете здраво допълнителната ръкох-
ватка от лявата или дясната страна на
машината.
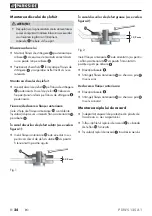
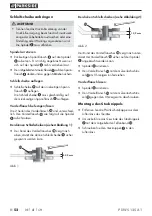
Поставяне на защитния капак
ВНИМАНИЕ!
►
С оглед на безопасността винаги използ-
вайте защитния капак !
■
В състоянието при доставката защитният
капак е закрепен с 2 винта към уреда.
♦
За завъртане на защитния капак предва-
рително отстранете всички винтове с шес-
тостенния ключ .
♦
Поставете защитния капак , изместен с
максимум един отвор, на новата позиция.
Затворената страна на защитния капак
трябва винаги да сочи към оператора.
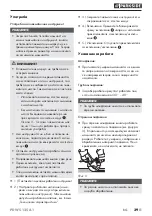
✓
✗
♦
Закрепете защитния капак с 3 винта към
уреда. Завинтете останалия винт отново в
отвора с резба.
♦
Проверете стабилното затягане: Защитният
капак трябва да е поставен стабилно.
Използвайте само ра-
ботни инструменти, над
които защитният капак
се издава минимум
2 mm.
Summary of Contents for 276009
Page 3: ......
Page 17: ... 14 GB CY PDWS 125 A1 ...
Page 31: ... 28 RO PDWS 125 A1 ...
Page 45: ...PDWS 125 A1 42 BG ...
Page 59: ... 56 DE AT CH PDWS 125 A1 ...


