11
CY
NI
IE
GB
cut protection trousers, a hard hat or ear
protection reduces the risk of injuries.
•
Prevent unintentional starting.
Ensure the switch is in the off-
position before connecting to
power source and/or battery
pack, picking up or carrying
the tool.
Carrying power tools with
your inger on the switch or energising
power tools that have the switch on
invites accidents.
•
Remove any adjusting key or
wrench before turning the pow-
er tool on.
A wrench or a key left at-
tached to a rotating part of the power
tool may result in personal injury.
•
Do not overreach. Keep proper
footing and balance at all times.
This enables better control of the pow-
er tool in unexpected situations.
•
Keep your hair, clothing and
gloves away from moving
parts.
Jewellery or long hair can be
caught in moving parts.
•
Warning!
During operation, this
electric tool generates an electromag-
netic ield which, under certain circum
-
stances, may impair the functionality of
active or passive medical implants. To
reduce the risk of serious or lethal inju-
ries, we recommend that persons with
medical implants consult their doctor
and the manufacturer of their medical
implant before operating the machine.
Power tool use and care
•
Do not force the power tool. Use
the correct power tool for your
application.
The correct power tool
will do the job better and safer at the
rate for which it was designed.
•
Do not use the power tool if the
switch does not turn it on and
off.
Any power tool that cannot be
controlled with the switch is dangerous
and must be repaired.
•
Disconnect the plug from the
power source and/or the bat-
tery pack from the power tool
before making any adjust-
ments, changing accessories, or
storing power tools.
Such preven-
tive safety measures reduce the risk of
starting the power tool accidentaIly.
•
Store idle power tools out of the
reach of children and do not al-
low persons unfamiliar with the
power tool or these instructions
to operate the power tool.
Power
tools are dangerous in the hands of
untrained users.
•
Maintain power tools. Check
for misalignment or binding
of moving parts, breakage of
parts and any other condition
that may affect the power tool’s
operation. If damaged, have
the power tool repaired before
use.
Many accidents are caused by
poorly maintained power tools.
•
Keep cutting tools sharp and
clean.
Properly maintained cutting
tools with sharp cutting edges are less
Iikely to bind and are easier to control.
•
Use the power tool, accessories
and tool bits etc. in accordance
with these instructions, taking
into account the working condi-
tions and the work to be per-
formed.
Use of the power tool for op-
erations different from those intended
could result in a hazardous situation.
• For sawing work on a slope, always
stand above the tree trunk. To keep
control at the moment of “sawing
through”, reduce the contact pressure
at the end of the cut without loosening
Summary of Contents for 307044
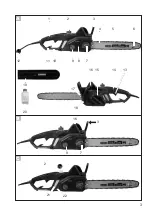
Page 3: ...3 C 1 2 3 5 6 17 A 14 13 15 16 7 9 7 9 11 12 19 B 2 4 10 8 3 16 20 21 22 18...
Page 4: ...4 R N S Q P O M L K 1 2 1 2 3...
Page 30: ...30 GR CY 16 180 ml A 1 2 3 4 5 6 O 17 16 15 13 14 18 9 7 8 10 12 19 20...
Page 32: ...32 GR CY 7 1 Lwa dB II...
Page 33: ...33 CY GR 460 mm...
Page 34: ...34 GR CY A...
Page 35: ...35 CY GR 30 mA H05RN F 75 2 5 mm2...
Page 36: ...36 GR CY N...
Page 37: ...37 CY GR...
Page 38: ...38 GR CY 1 E 1 B...
Page 39: ...39 CY GR 1 A A O B...
Page 40: ...40 GR CY FI 30 mA A 1 10 3 5 17 15 13...
Page 41: ...41 CY GR 11 18 1 2 7 8 3 5 4 5 4 45 5 24 5 4 5 23 23 5 6 5 9 7 8 25 8 7...
Page 42: ...42 GR CY 10 9 N 1 kg 2 10 min B 1 16 2 7 3 9 9 4 7 5...
Page 43: ...43 CY GR A 4 C 21 C 22 250 ml Parkside Grizzly 6 8 C 1 2 2...
Page 44: ...44 GR CY D 1 2 3 3 16 4 1 16 5 14 13 14 6 13 E 1 2 3 3 16 4 1 16 5 6 3 3 16 7...
Page 45: ...45 CY GR 26 F 1 2 3 7 9 8 4 4 5 4 45 5 24 5...
Page 46: ...46 GR CY 2 15 18 cm...
Page 47: ...47 CY GR 1 2 1 45 2 3 A 1 3 45 4 B 5 cm 1 10...
Page 48: ...48 GR CY 5 6 7...
Page 49: ...49 CY GR 1 2 3 2 1 3 3 1 3 4 1 2 3...
Page 50: ...50 GR CY A 8 A 4 26 10 24 A 5 A 5 A 4 A 4...
Page 51: ...51 CY GR G 30 85 0 65 mm H 1 2 3 4 0 mm 4 5 6 4 mm 7 8...
Page 52: ...52 GR CY 0 65 mm 5 10 F 1 12 2 8 5 4 3 A 4 4 26 5 4 5 8 F 4 10 1 A 12 2 8 5 4...
Page 53: ...53 CY GR 3 5 8...
Page 55: ...55 CY GR A 13 ser vice ser vice ser vice A 5 A 5 A 5 service...
Page 56: ...56 GR CY 3 307044...
Page 90: ...3 G F E D 11 14 13 24 9 23 1 11 3 3 16 16 1 16 4 5 25 8 24 7 4 5 0 45 I H 26...
Page 91: ......


