background image

PWS 125 F5

GB

MT

 59


Operation

Mounting/adjusting the blade guard


WARNING! RISK OF INJURY!


Always remove the plug from the power 
socket before working on the appliance.


RISK OF INJURY!


Always use the angle grinder with the blade 
guard 

. The blade guard should be in-

stalled securely. Set it so that the highest 
 possible degree of safety is achieved, i.e. the 
smallest possible part of the grinding disc is 
exposed to the operator. The blade guard 


is designed to protect the operator from frag-
ments and accidental contact with the 
grinding tool.

 RISK OF INJURY!


Make sure that the blade guard 

 is fitted  

at least at the same angle as the additional 
handle


 (see fig. A). Otherwise, you could 

cut injure yourself on the roughing disc or 
cutting disc.


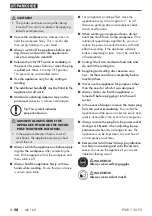
Turn the blade guard 

 to the required position 

(working position). Make sure that the blade 
guard 

 is positioned in such a way that the 

blade guard fixture 

 is lying over one of the 

5 bulges 

1

 on the blade guard 

 (see fig. E, 

fold-out page).


Ensure that the blade guard fixture 

 is firmly 

seated in the respective bulge 

1

.

Fitting the additional handle


CAUTION!


For safety reasons, this appliance may only 
be used with the additional handle


Failure to do so can lead to serious injury. 
The additional handle


 can be screwed 

onto the left, the right or the top, depending 
on the job at hand.

NOTE


You can leave the tool holder 

6a

 inserted  

into the additional handle


 or remove it as 

desired.

Fitting/changing the roughing/
cutting disc


Always wear protective gloves when changing 
cutting/roughing discs. 

Roughing and cutting discs 

become very hot. Allow them to cool down com-
pletely before touching them.
Pay attention to the dimensions of the roughing/
cutting disc. The diameter of the hole must fit the 
mounting flange without any play. Do not use a 
reducer or adapter.


Check the roughing/cutting disc. It should not 
be damaged or damp and have no cracks.

Otherwise, it could break during use and cause 
injuries.

NOTE


Use only discs which are free of dirt.


Use only grinding discs whose permissible 
speed rating is at least as high as that on the 
type plate on the power tool.


RISK OF INJURY!

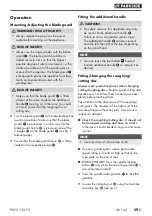
 Press the spindle locking 

button 

-

 only when the mounting spindle 

.

 is 

at a complete standstill.


Press the spindle locking button 

-

 to lock the 

gearbox.


Loosen the clamping nut 

!

 using the two-hole 

assembly key 

6

 (see fig. C).

IB_314188_PWS125F5_LB5.indb   59

20.05.20   13:37

Summary of Contents for 314188-2001

Page 1: ...lbetriebsanleitung IAN 314188_2001 AMOLADORA ANGULAR Traducci n del manual de instrucciones original ANGLE GRINDER Translation of the original instructions REBARBADORA Tradu o do manual de instru es o...

Page 2: ...seguida familiar cese con todas las funciones del dispositivo Prima di leggere aprire la pagina con le immagini e prendere con denza con le diverse funzioni dell apparecchio Antes de come ar a ler ab...

Page 3: ...A B 6a...

Page 4: ...C D I 0 E...

Page 5: ...dad 7 Indicaciones de seguridad especiales para la amoladura y el tronzado 8 Otras indicaciones de seguridad especiales para las muelas de tronzar 8 Accesorios autorizados 9 Almacenamiento y manipulac...

Page 6: ...industrial Explicaci n de los s mbolos Lea las instrucciones de uso origina les y las indicaciones de seguridad antes de poner el aparato en funcio namiento El uso de muelas de tronzar o de desbaste...

Page 7: ...rueba estandarizado y pueden utilizarse para comparar varias herramientas el ctricas Los valores totales de emisi n de vibraciones y de ruidos especi cados tambi n pueden utilizarse para realizar una...

Page 8: ...No utilice el cable para otros usos p ej para transportar y colgar la herramienta el ctrica o para desconectar el enchufe de la toma el c trica Mantenga el cable apartado del calor del aceite de los b...

Page 9: ...seguridad evitan que la herramienta el ctrica se encienda de forma accidental d Guarde las herramientas el ctricas que no vaya a utilizar fuera del alcance de los ni os No permita el uso del aparato...

Page 10: ...raciones muy fuertes y podr n causar una p rdida de control g No utilice herramientas intercambiables da adas Antes de cada uso inspeccione las herramientas intercambiables como las mue las abrasivas...

Page 11: ...celeraci n incontrolada de la herramienta el ctrica en el senti do contrario al del giro de la herramienta intercam biable en el punto de bloqueo Si p ej la muela abrasiva se engancha en la pieza de t...

Page 12: ...n previstas para las velocidades m s elevadas de las herramientas el ctricas m s peque as y pueden romperse Otras indicaciones de seguridad es peciales para las muelas de tronzar a Evite el bloqueo d...

Page 13: ...iciones clim ticas p ej humedad Indicaciones de trabajo INDICACI N Las muelas abrasivas solo pueden utilizarse para las aplicaciones recomendadas De lo contrario podr an destrozarse y da arse as como...

Page 14: ...espla ce el aparato de forma uniforme y de un lado a otro por la pieza de trabajo en un ngulo de 15 a 30 entre la muela abrasiva y la pieza de trabajo Para el procesamiento de super cies sesga das el...

Page 15: ...liente 1 que corresponda Montaje del mango adicional CUIDADO Por motivos de seguridad este aparato solo debe utilizarse con el mango adicional De lo contrario podr an producirse lesiones El mango adic...

Page 16: ...cambiarse inmediatamente Por razones de seguridad tras cambiar la muela d jela en marcha durante 60 segundos a la velocidad m xima Est atento a cualquier ruido an malo y a la generaci n de chispas Com...

Page 17: ...deben mantenerse siempre libres Retire el polvo que quede adherido con un pincel INDICACI N Los recambios no especi cados p ej escobillas de carb n o interruptores pueden solicitarse a trav s de nues...

Page 18: ...uidas y reparadas Si despu s de la compra del aparato se detecta la existencia de da os o de defectos al desembalarlo deben noti carse de inmediato Cualquier reparaci n que se realice una vez nalizado...

Page 19: ...las que se haya producido de forma gratuita a la direcci n de correo proporcionada En www lidl service com podr de scargar este manual de usuario y muchos otros m s as como v deos sobre los productos...

Page 20: ...sta declaraci n de conformidad recaer sobre el fabricante El objeto descrito de la declaraci n cumple con las disposiciones de la Directiva 2011 65 EU del Parlamento Europeo y del Consejo del 8 de jun...

Page 21: ...ni di sicurezza particolari per la levigatura e la troncatura 24 Altre indicazioni relative alla sicurezza per lavori di troncatura 24 Accessori consentiti 25 Conservazione e manipolazione degli attre...

Page 22: ...rme L appa recchio non destinato all uso commerciale Spiegazione dei simboli Prima della messa in funzione leggere le istruzioni per l uso originali e le avvertenze di sicurezza L uso di dischi per la...

Page 23: ...ndo un procedimento di prova standardizzato e possono essere usati per il confronto tra due elettroutensili Il valore complessivo delle vibrazioni e il valore di emissione acustica indicati possono an...

Page 24: ...scopi non conformi come ad es per trasportare l elettro utensile per appenderlo o per scollegare la spina dalla presa Tenere il cavo lontano dal calore dall olio da bordi vivi o da parti dell apparec...

Page 25: ...iporre l apparecchio Questa misura precauzionale impedisce l avvio involon tario dell elettroutensile d Conservare gli elettroutensili non utilizzati fuori dalla portata dei bambini Non consentire l u...

Page 26: ...tilizzare mai utensili danneggiati Prima di ogni utilizzo controllare gli utensili ed ac certarsi che sulle mole abrasive non vi siano scheggiature o crepature che il platorello non sia soggetto a inc...

Page 27: ...ella rotazione dell at trezzo Se ad es una mola resta agganciata o bloccata nel pezzo da lavorare il bordo della mola che si abbassa nel pezzo da lavorare potrebbe rimanere impigliato provocando in qu...

Page 28: ...piccoli e possono rompersi Altre indicazioni relative alla sicurezza per lavori di troncatura a Evitare il blocco della mola di troncatura o l impiego di una pressione eccessiva Non ese guire tagli e...

Page 29: ...operative NOTA I corpi abrasivi devono essere utilizzati esclu sivamente per le applicazioni consigliate In caso contrario potrebbero rompersi danneg giarsi e causare lesioni Lavori di sgrossatura No...

Page 30: ...gliatura muovere uniformemente l apparecchio con un angolo compreso tra 15 e 30 tra la mola abrasiva e il pezzo di lavoro sul pezzo Nella lavorazione di super ci inclinate non esercitare molta forza c...

Page 31: ...curva tura 1 Montaggio dell impugnatura supplementare CAUTELA Per motivi di sicurezza questo apparecchio pu essere usato solo con l impugnatura supplementare In caso contrario si potrebbero riportare...

Page 32: ...di mola fare funzionare l apparecchio per 60 secondi alla massima velocit Prestare attenzione a rumori insoliti e allo sviluppo di scintille Veri care che tutte le parti di ssaggio siano applicate co...

Page 33: ...di ricambio non indicati come ad es spazzole di carbone interruttori possono es sere ordinati tramite la nostra linea diretta di assistenza Smaltimento L imballaggio consiste di materiali eco compatib...

Page 34: ...esenti al momento dell acquisto devono venire segnalati immediatamente dopo che l apparecchio stato disimballato Le riparazioni eseguite dopo la scadenza del periodo di garanzia sono a pa gamento Ambi...

Page 35: ...no di cassa una descrizione del vizio e l indicazione della data in cui si presentato all indirizzo del servizio di assisten za clienti che Le stato comunicato Sul sito www lidl service com possi bile...

Page 36: ...della dichiara zione sopra descritto soddisfa le prescrizioni della Direttiva 2011 65 EU del Parlamento Europeo e del Consiglio Europeo dell 8 giugno 2011 sulla restrizione dell uso di determinate sos...

Page 37: ...petivas instru es de seguran a 39 Instru es de seguran a espec cas para lixar e cortar 40 Outras instru es de seguran a espec cas para cortar 40 Acess rios autorizados 41 Armazenamento e manuseamento...

Page 38: ...destina ao uso comercial Explica o dos s mbolos Antes da coloca o em funciona mento leia o manual de instru es original e as instru es de seguran a A utiliza o de discos de corte ou de desbaste dani...

Page 39: ...podem ser utilizados para compara o com outra ferramenta el trica Os valores totais de vibra o e os valores de emiss es sonoras indicados tamb m podem ser utilizados para uma avalia o preliminar da p...

Page 40: ...portar pendurar a ferramenta el trica ou puxar a cha da tomada Mantenha o cabo afastado de calor leo arestas a adas ou pe as m veis do aparelho Cabos dani cados ou enrolados aumentam o risco de choque...

Page 41: ...a evita o arranque involunt rio da ferramenta el trica d Guarde as ferramentas el tricas que n o est o a ser utilizadas fora do alcance das crian as N o autorize a utiliza o do apare lho por pessoas q...

Page 42: ...ar perda de controlo g N o utilize ferramentas de aplica o dani cadas Antes de cada utiliza o controle as ferramentas de aplica o por exemplo veri que se os discos abrasivos apresentam ssuras e lascam...

Page 43: ...a da acelerada no ponto de bloqueio no sentido oposto ao da rota o da ferramenta de aplica o Se p ex um disco abrasivo encravar ou bloquear na pe a a trabalhar a aresta do disco abrasivo que imerge na...

Page 44: ...s para ferramentas el tricas maiores n o s o adequados para as elevadas rota es de ferramentas el tricas mais pequenas e podem partir se Outras instru es de seguran a espec cas para cortar a Evite um...

Page 45: ...os ou in u ncias ambientais p ex humidade Instru es de trabalho NOTA Os corpos abrasivos s podem ser utilizados para as aplica es recomendadas Caso contr rio podem partir se ser dani cados e causar le...

Page 46: ...ue o aparelho uniformemente para a frente e para tr s na pe a a trabalhar num ngulo entre 15 e 30 entre o disco abrasivo e a pe a a trabalhar Ao trabalhar superf cies inclinadas o apare lho n o pode s...

Page 47: ...ntar o punho adicional CUIDADO Por motivos de seguran a este aparelho s pode ser utilizado com o punho adicional Caso contr rio podem ocorrer ferimentos O punho adicional pode ser aparafusado esquerda...

Page 48: ...uran a deixe o aparelho funcionar velo cidade m xima durante 60 segundos Tenha aten o a ru dos anormais e ao desenvolvi mento de fa scas Veri que se todas as pe as de xa o est o corretamente colocadas...

Page 49: ...el NOTA Pe as sobresselentes n o especi cadas como p ex escovas de carv o interrup tores podem ser encomendadas atrav s da nossa linha direta de Assist ncia T cnica Elimina o A embalagem composta por...

Page 50: ...evem ser imediatamente comunica dos ap s retirar o aparelho da embalagem Expi rado o per odo da garantia quaisquer repara es necess rias est o sujeitas a pagamento mbito da garantia O aparelho foi fab...

Page 51: ...pra e indique o defeito e quando este ocorreu para a morada do Servi o de Assist ncia T cnica que lhe foi indicada Em www lidl service com poder descarregar este manual de instru es e muitos outros ma...

Page 52: ...o acima descrito cumpre os regulamentos da Diretiva 2011 65 EU do Parlamento Europeu e do Conselho de 8 de junho de 2011 relativa restri o do uso de determinadas subst ncias perigosas em equipamentos...

Page 53: ...l safety instructions for grinding and abrasive cutting 56 Additional special safety instructions for abrasive cutting 56 Permissible accessories 57 Storage and handling of the recommended accessory t...

Page 54: ...ccidents The manufac turer accepts no responsibility for damage resulting from improper use The appliance is not intended for commercial use Explanation of the symbols used Before using the appliance...

Page 55: ...d can be used for comparison of the power tool with another tool The speci ed total vibration values and noise emission values can also be used to make a provisional load estimate WARNING Depending on...

Page 56: ...e use a residual current device RCD protected supply Use of an RCD reduc es the risk of electric shock 3 Personal safety a Stay alert watch what you are doing and use common sense when operating a pow...

Page 57: ...tools Check for misalign ment or binding of moving parts breakage of parts and any other condition that may a ect the power tool s operation If damaged have the power tool repaired before use Many ac...

Page 58: ...he hole on the attachment tool must correspond to the width of the tting on the ange Accessory tools that cannot be rmly tted to the power tool rotate unevenly vibrate severely and can lead to a loss...

Page 59: ...his happens an uncontrolled pow er tool turns rapidly against the direction of rotation of the accessory tool caught in the blockage If for example a grinding disc catches or jams the edge of the grin...

Page 60: ...s are not designed for the higher rotational speeds of smaller power tools and can break Additional special safety instructions for abrasive cutting a Avoid any blockage to the cutting disc or excessi...

Page 61: ...not exposed to mechanical dam age or environmental in uences e g damp Working procedures NOTE Grinding tools should only be used for the recommended applications Otherwise they can break be damaged o...

Page 62: ...ce is secure and stable For an optimum grinding e ect move the appliance evenly at an angle of 15 to 30 between grinding disc and workpiece back wards and forwards When working on angled surfaces do n...

Page 63: ...itional handle CAUTION For safety reasons this appliance may only be used with the additional handle Failure to do so can lead to serious injury The additional handle can be screwed onto the left the...

Page 64: ...ety s sake run the appliance at maximum speed for 60 seconds after every disc change Be aware of unusual noises and sparks Check whether all fastening elements are correctly tted Make sure that the ar...

Page 65: ...TE Replacement parts not listed such as carbon brushes switch can be ordered via our service hotline Disposal The packaging consists of environmen tally friendly material It can be dis posed of in loc...

Page 66: ...mage and defects present at the time of purchase must be reported immediately after unpacking Repairs carried out after expiry of the warranty period shall be subject to a fee Scope of the warranty Th...

Page 67: ...till receipt and information about what the defect is and when it occurred You can download these instructions along with many other manuals product videos and installation soft ware at www lidl servi...

Page 68: ...n described above complies with the requirements of the Directive 2011 65 EU of the European Parliament and Council of 8 June 2011 on the limitations of use of certain dangerous substances in electric...

Page 69: ...0 R ckschlag und entsprechende Sicherheitshinweise 71 Besondere Sicherheitshinweise zum Schleifen und Trennschleifen 72 Weitere besondere Sicherheitshinweise zum Trennschleifen 72 Zul ssiges Zubeh r 7...

Page 70: ...ngswidriger Verwendung ent standene Sch den bernehmen wir keine Haftung Das Ger t ist nicht f r den gewerblichen Einsatz bestimmt Erkl rung der Symbole Lesen Sie die Original Betriebs anleitung und di...

Page 71: ...Die angegebenen Schwingungsgesamtwerte und die angegebenen Ger uschemissions werte k nnen auch zu einer vorl u gen Ein sch tzung der Belastung verwendet werden WARNUNG Die Schwingungs und Ger uschemis...

Page 72: ...einem Elektrowerkzeug im Frei en arbeiten verwenden Sie nur Verl nge rungskabel die auch f r den Au enbereich geeignet sind Die Anwendung eines f r den Au enbereich geeigneten Verl ngerungskabels ver...

Page 73: ...nen das Ger t nicht benut zen die mit diesem nicht vertraut sind oder diese Anweisungen nicht gelesen haben Elektrowerkzeuge sind gef hrlich wenn sie von unerfahrenen Personen benutzt werden e P egen...

Page 74: ...hren g Verwenden Sie keine besch digten Einsatz werkzeuge Kontrollieren Sie vor jeder Ver wendung Einsatzwerkzeuge wie Schleif scheiben auf Absplitterungen und Risse Schleifteller auf Risse Verschlei...

Page 75: ...n z B eine Schleifscheibe im Werkst ck hakt oder blockiert kann sich die Kante der Schleifschei be die in das Werkst ck eintaucht verfangen und dadurch die Schleifscheibe ausbrechen oder einen R cksch...

Page 76: ...r die h heren Drehzahlen von kleineren Elektrowerkzeugen ausgelegt und k n nen brechen Weitere besondere Sicherheits hinweise zum Trennschleifen a Vermeiden Sie ein Blockieren der Trennscheibe oder z...

Page 77: ...keit ausgesetzt sind Arbeitshinweise HINWEIS Schleifk rper d rfen nur f r die empfohlenen Einsatzm glichkeiten verwendet werden An dernfalls k nnten sie zerbrechen besch digt werden und Verletzungen v...

Page 78: ...Schleifwirkung bewegen Sie das Ger t gleichm ig in einem Winkel von 15 bis 30 zwischen Schleifscheibe und Werk st ck auf dem Werkst ck hin und her Beim Bearbeiten von schr gen Fl chen darf das Ger t...

Page 79: ...Sicherheitsgr nden darf dieses Ger t nur mit dem Zusatz Handgri verwendet werden Andernfalls k nnen Verletzungen die Folge sein Der Zusatz Handgri kann je nach Arbeitsweise links rechts oder oben am G...

Page 80: ...chsel sicherheitshalber 60 Sekunden auf H chstdrehzahl laufen Achten Sie auf unge w hnliche Ger usche und Funkenentwicklung berpr fen Sie ob alle Befestigungsteile korrekt angebracht sind Achten Sie d...

Page 81: ...nen Sie anhaftenden Schleifstaub mit einem Pinsel HINWEIS Nicht aufgef hrte Ersatzteile wie z B Kohle b rsten Schalter k nnen Sie ber unsere Service Hotline bestellen Entsorgung Die Verpackung besteht...

Page 82: ...schon beim Kauf vor handene Sch den und M ngel m ssen sofort nach dem Auspacken gemeldet werden Nach Ablauf der Garantiezeit anfallende Reparaturen sind kostenp ichtig Garantieumfang Das Ger t wurde...

Page 83: ...ilte Serviceanschrift bersenden Auf www lidl service com k nnen Sie diese und viele weitere Handb cher Produktvideos und Installationssoft ware herunterladen Mit diesem QR Code gelangen Sie direkt auf...

Page 84: ...ben be schriebene Gegenstand der Erkl rung erf llt die Vorschriften der Richtlinie 2011 65 EU des Europ ischen Parlaments und des Rates vom 8 Juni 2011 zur Beschr nkung der Verwendung bestimmter gef h...

Page 85: ...TRASSE 21 44867 BOCHUM GERMANY www kompernass com Estado de las informaciones Versione delle informazioni Estado das informa es Last Information Update Stand der Informationen 04 2020 Ident No PWS125F...

Reviews: